Recently in Photography

  Page 98 of 382 in Photography  

This is The Digital Story Podcast #556, November 1, 2016. Today's theme is "The OM-D E-M1 Mark II." I'm Derrick Story.

Opening Monologue

At first I was wondering, "Why were we in Iceland to test the new Olympus OM-D E-M1 Mark II?" After my first hour in the field, I had the answer: We had already shot in rain, cold, and sleet. Then we stood behind waterfalls, worked atop mountains to capture the Northern Lights in below-freezing temperatures, and had only two batteries to last us during the day's agenda. That's why we were in Iceland, and I'm going to tell you about how this camera survived in today's show.

The OM-D E-M1 Mark II

I just spent a week in Iceland testing the incredible E-M1 Mark II. Before I get into my hands on experience, let's review the highlight features.

PA285054-E-M1-MarkII.jpg

  • 20 Megapixel Live MOS sensor
  • 15fps sequential shooting (mechanical)
  • Cinema 4K video capture
  • 121-Point Dual FAST AF - Contrast & Phase Detection AF, all 121 points are cross sensors
  • Highly weather resistant body
  • 1/8000th second top shutter speed
  • Fully articulated 3" touch monitor
  • PRO Capture Lag-Free Electronic Shutter Mode
  • Dual SD card slots
  • Larger, more powerful battery
  • Still highly nimble, weighing in at 498 grams

As for the shooting experience, I highly recommend the new 12-100mm f/4 PRO lens. What a combination! I go into greater detail during the first segment of today's show.

In the News

Yongnuo Releases Budget 100mm f/2 Lens for Canon, Costs Just $170 (via Petapixel)

After tasting some success selling their budget 50mm f/1.8 and 35mm f/2 lenses, Yongnuo is adding another piece of glass to its ultra-affordable arsenal. Earlier today, they announced the arrival of their YN 100mm f/2 lens, and it'll only cost you $170.

The lens is made up of 8 lens elements in 6 groups, 58mm filter size, a 9-blade aperture, and looks pretty much exactly like Canon's EF 100mm f/2 USM.

Where it differs greatly is the price point. The Canon 100 currently costs $500, but you can already find the YN 100mm f/2 on AliExpress for just $170 US. Until it shows up in US stores we can't confirm that price will hold, but if it does, that'll be yet another dirt cheap Canon (and, in a few months, Nikon) alternative from Yongnuo.

Updates and Such

Big thanks to all of our Patreon members! I was able to pay for the podcast server and the backup system from last month's pledges. Your contributions are making a positive impact.

I'll be announcing the 2017 TDS Workshop season next week. And I have to tell you, this is our most exciting lineup to date. Keep eye peeled!

B&H and Amazon tiles on www.thedigitalstory. If you click on them first, you're helping to support this podcast. And speaking of supporting this show, and big thanks to our Patreon Inner Circle members.

And finally, be sure to visit our friends at Red River Paper for all of your inkjet supply needs.

See you next week!

More Ways to Participate

Want to share photos and talk with other members in our virtual camera club? Check out our Flickr Public Group. And from those images, I choose the TDS Member Photo of the Day.

Podcast Sponsors

Red River Paper - Keep up with the world of inkjet printing, and win free paper, by liking Red River Paper on Facebook.

MacPaw Creators of CleanMyMac 3 and other great software for Apple computers. Visit www.macpaw.com today.

Hedge for Mac - The fast solution for moving photos and videos from memory cards to drives, or drives to drives for that matter. Learn more at Hedge for Mac.

The Nimbleosity Report

Do you want to keep up with the best content from The Digital Story and The Nimble Photographer? Sign up for The Nimbleosity Report, and receive highlights twice-a-month in a single page newsletter. Be a part of our community!

Want to Comment on this Post?

You can share your thoughts at the TDS Facebook page, where I'll post this story for discussion.
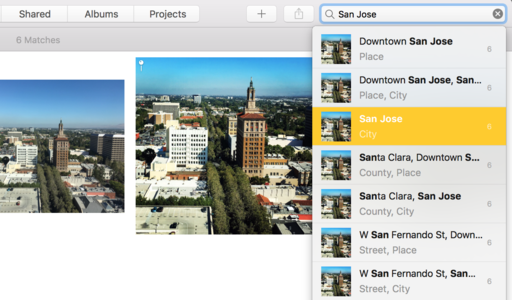
I forgot to adjust one of my cameras to the proper time here in Iceland. And those images were driving me crazy in my Capture One catalog because they were out of order. Unfortunately, I discovered that there was no easy way to fix this problem within Capture One.

PA270026-TG-4 web2.jpg The original time stamp for this shot of Skogafoss Falls, Iceland was 7 hours off. I needed to fix that. Olympus TG-4 in Program mode. Image by Derrick Story.

After a great deal of hunting, I discovered that I must leave the application for my fix. So, I turned to Photos for macOS, which does have a batch time stamp fix tool. The basic task went like this.

  • Export images out of Capture One Pro.
  • Delete the existing shots from the Capture One Catalog.
  • Create a new library in Photos for macOS.
  • Import pictures into Photos.
  • Use the Adjust Date and Time tool in Photos to fix the time stamps.
  • Export the images out of Photos and back into Capture One Pro.

I was very careful along the way and backed everything up, just in case something went wrong. But I have to say that the entire process was a real hassle. In the future, I'm going to be more diligent about checking the time stamps on all of my cameras. I certainly don't want to spend time on this again.

More Capture One Pro Tips and Techniques

Improve your skills by watching Capture One Pro Essential Training now available on lynda.com. More than 5 hours of tips, tricks, and techniques. Plus many free movies using advanced techniques.

Master Photos for OS X

(It's More Powerful than You Think)

For hands-on tutorials, be sure to take a look at Photos for OS X Essential Training on lynda.com. I cover everything you need to know to get the most from this surprisingly powerful image management application.

You can share your thoughts at the TDS Facebook page, where I'll post this story for discussion.

The Olympus E-M1 Mark II in Iceland

As we explored the waterfalls and geysers in Iceland's famous Golden Circle, we faced rain, wind, and cold temperatures. And not once during the entire day did I worry about my camera.

PA260080.jpg Olympus OM-D E-M1 with the new Olympus 12-100mm f/4 Pro lens. Photo by Derrick Story.

The Olympus OM-D E-M1 with the new Olympus 12-100mm f/4 Pro lens is an amazing all-weather resistant duo that captures stunning images. (We can't share those quite yet, but stay tuned.) The most difficult part of the day was keeping the front element free of droplets while shooting. Other than that, I would occasionally wipe down the camera with a bandana in-between scenes.

The E-M1 Mark II has all the features that you would expect, building upward from the excellent M-1. But Olympus has added many new touches too. The battery is beefier, there's a pro grip accessory, a new pro flash will be available, and the focus and burst rates can compete with the best of DSLRs.

As for the 12-100mm lens... that is all I shot with the entire day. One lens, every situation. The focusing is fast and sure, the range is terrific, and with its built-in image stabilization (coupled with the sensor-based IS in the camera), I was able to capture soft, running water shots without a tripod (6.5 stops of stabilization!)

The E-M1 Mark II, 12-100mm zoom, 25mm f/1.2 prime, and my accessories all fit easily in the svelte Think Tank Mirrorless Mover 25i. Which is amazing when you think about it... an entire pro kit in a challenging environment that weighs just a few pounds.

I'll be reporting more on the OM-D E-M1 Mark II, and publishing pictures once the embargo lifts. But after day 1 of putting it through its paces, I can tell you this is one heck of a pro kit.

Want to Comment on this Post?

You can share your thoughts at the TDS Facebook page, where I'll post this story for discussion.
think-tank-mirrorless-mover.jpg

After nourishing myself with one of those famous Icelandic hot dogs, I spent a couple hours photographing the colorful activity on the chilly, damp streets of Reykjavik using the Think Tank Mirrorless Mover 25i to protect my weather resistant Olympus OM-D E-M5 Mark II with dust and splash proof Olympus ED 12-50mm zoom.

The quality of construction in this bag is top notch, as you would expect from Think Tank. The key to the design is the quick access top flap that uses a magnetic closure system for quick access while shooting, but has the option of zippered security when the weather turns bad.

mirrorless-mover-side.jpg

This system is highly efficient. I could leave my OM-D protected in the bag while exploring the streets of Reykjavik, then grab it quickly to capture an action shot when presented with the opportunity. The trick is to leave the camera on and ready to shoot.

Inside the bag I stashed the Olympus OM-D E-M5 Mark II with dust and splash proof Olympus ED 12-50mm zoom, an Olympus 60mm f/2.8 macro (also dust and splash proof), and the Olympus Tough TG-4. There was plenty of room for all of these components, plus the accessories I needed for the day. Yet, the bag was light and positioned discreetly behind my arm, wearing it messenger style.

running-Reykjavik.jpg "Running Late" - Olympus OM-D E-M5 Mark II with 12-50mm lens, ISO 400, f/5.6 at 1/60th. Photo by Derrick Story..

Other niceties include a dedicated tablet pocket that holds my iPad mini, smartphone pocket, twin SD card holders, high quality metal hardware, top handle, back belt loop, fitted rain cover (if the weather gets really bad), and stretchable side pouches on both ends, outside of the bag.

Natural-heat-Reykjavik.jpg "Natural Heat" - You can warm yourself via the steam pipes tapping the water beneath the ground. Photo by Derrick Story.

The Mirrorless Mover 25i fits nicely in my suitcase for travel. I filled it with socks to stay efficient. When I was ready to shoot, I emptied the socks and added the gear I needed for the day. It is a great bag for the nimble photographer on the go.


Nimble Photographer Logo

The Think Tank Mirrorless Mover 25i has a high Nimbleosity Rating. What does that mean? You can learn about Nimbleosity and more by visiting TheNimblePhotographer.com.

This is The Digital Story Podcast #555, October 25, 2016. Today's theme is " Bridgeport." I'm Derrick Story.

Opening Monologue

I'm recording this show on a crisp Sunday morning in the Eastern Sierra. We're in Day 3 of our TDS Fall Photography Workshop, and while the participants are working on their current assignments, I'm slipping off to say hello to you. Here's what's been going on.

cain-house-bridgeport.jpg

Top 5 Tripods for 2016

Top 5 Tripods for 2016 via PhotographyTalk

  • Sirui T2205X - If you want a lightweight tripod that's compact, yet has a maximum height of nearly 5 feet, the Sirui T-2205X is the tripod for you. It weighs just 2.6 pounds, meaning you can easily carry it on long journeys without getting fatigued. Folded down, the tripod is a mere 14.6 inches long, again, making it a great choice for photographers that need a full-size tripod but don't want to deal with carrying something that's heavy or cumbersome.
  • Handlepod - Handlepod offers sturdy support in a highly compact package and gives you the versatility of utilizing it in a number of ways. Hold it in your hand for steadier low-light or long exposure shots. Brace it against a support like a wall or a post for instant tripod-like stability. Use the Handlepod's built-in elastic cord to lash it to a steady object like a tree or even the side mirror of your car. That's versatility that no tripod can match!
  • Manfrotto 190go! - Being able to take shots close to the ground is not something that all tripods offer, but the Manfrotto 190go! certainly does. The center column can be positioned at a 90-degree angle to the ground, giving you the ability to take shots at a height of just 2.75 inches. As if that's not attractive enough, the 190go! is made of aluminum for strong, sturdy support, but doesn't weigh a ton either - just 3.7 pounds.
  • 3 Legged Thing Equinox Winston - With a maximum height of 76.9 inches, the Equinox Winston tripod from 3 Legged Thing will give you the height you need for virtually any shot. The Equinox Winston doesn't neglect the need to go low either, as it can get down to 10.6 inches above the ground for low perspective shots. Another advantage this tripod has over others is that it can support over 88 pounds.
  • Velbon Ultra 555A - This small, aluminum tripod from Velbon has five leg sections for an extended height of just over 60.6 inches, but folds down to a compact 14.7 inches when not in use. Weighing in a 3.25 pounds, it's relatively lightweight as well. It's telescoping legs have a twist to lock feature, ensuring that the legs don't become disengaged, causing the tripod to fall. The legs can be set at three different angles, giving you leeway to shoot from different perspectives. It even allows for shooting just 5 inches off the ground for those must-have shots with lots of foreground details.

Follow Us on Apple News for iOS Devices

I'm happy to announce that The Digital Story, The Nimble Photographer, and theAnalogstory are all available on the Apple News App for iOS devices. Just click on the following links on your iPhone or iPad, then save us to your Favorites.

Updates and Such

Big thanks to all of our Patreon members! I was able to pay for the podcast server and the backup system from last month's pledges. Your contributions are making a positive impact.

I'll be announcing the 2017 TDS Workshop season by the end of October. And I have to tell you, this is our most exciting lineup to date. Keep eye peeled!

B&H and Amazon tiles on www.thedigitalstory. If you click on them first, you're helping to support this podcast. And speaking of supporting this show, and big thanks to our Patreon Inner Circle members.

And finally, be sure to visit our friends at Red River Paper for all of your inkjet supply needs.

See you next week!

More Ways to Participate

Want to share photos and talk with other members in our virtual camera club? Check out our Flickr Public Group. And from those images, I choose the TDS Member Photo of the Day.

Podcast Sponsors

Red River Paper - Keep up with the world of inkjet printing, and win free paper, by liking Red River Paper on Facebook.

MacPaw Creators of CleanMyMac 3 and other great software for Apple computers. Visit www.macpaw.com today.

Hedge for Mac - The fast solution for moving photos and videos from memory cards to drives, or drives to drives for that matter. Learn more at Hedge for Mac.

The Nimbleosity Report

Do you want to keep up with the best content from The Digital Story and The Nimble Photographer? Sign up for The Nimbleosity Report, and receive highlights twice-a-month in a single page newsletter. Be a part of our community!

Want to Comment on this Post?

You can share your thoughts at the TDS Facebook page, where I'll post this story for discussion.
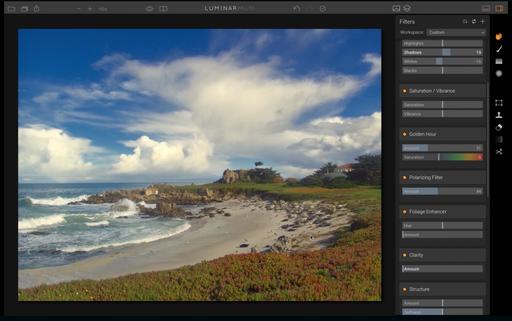
Connecting Capture One to Aurora HDR

Once my RAW file sequences are safe and sound in Capture One Pro, I can open them in Aurora HDR for finishing the work. Here are the four basic steps I use to make this connection.

Step 1 - Select your three shots in Capture One, then use the Open With command. I right-click on one of the thumbnails to reveal this popup menu.

01-open-with.jpg

Step 2 - Check the Alignment box in the following screen, and make any additional choices required for your images.

02-make-settings.jpg

Step 3 - Once Aurora HDR has processed your images, you can choose from the presets to get the look you want. Presets are revealed by clicking on the big, round icon in the lower right corner.

03-choose-preset.jpg

I often adjust the amount of the preset, then fine tune its settings by working the sliders in the Tools panel.

Step 4 - Export the final version of the shot by choosing File > Export to Image in Aurora HDR. Since I'm usually sending this photo back to Capture One, I export a full-size, 8-bit Tiff file. I then import that Tiff back into Capture One and keep it in the same project as the original shots.

04-export-image.jpg

The exported image can be worked on some more with Capture One tools. I keep the finished HDRs in their own album, within the Project. That way they're easily accessible when I want to display them or export out as lower resolution Jpeg.

If you want to save the work you've done in Aurora HDR, then use the Save command. That file can be reopened in the state that you left it for further fine tuning.

Bridgeport-Dusk-2016.jpg "Bridgeport General Store at Dusk" Olympus OM-D E-M5 Mark II with Panasonic 20mm f/1.7 prime at ISO 320, handheld. Images by Derrick Story.

Capture One and Aurora HDR are a terrific tandem for creating and managing high quality dynamic range images from your RAW file sequences.

More Capture One Pro Tips and Techniques

Improve your skills by watching Capture One Pro Essential Training now available on lynda.com. More than 5 hours of tips, tricks, and techniques. Plus many free movies using advanced techniques.

I've also created a dedicated Capture One Pro Training page on The Digital Story. You can follow all of the tips and techniques that I publish in one convenient spot.

Thinking About Making the Transition from Aperture or Lightroom? - Download my free eBook titled, Rocky Nook's Guide to Moving to Capture One Pro. I show you the steps to create a test library, then build the foundation for a smooth transition to Capture One Pro.

Want to Comment on this Post?

You can share your thoughts at the TDS Facebook page, where I'll post this story for discussion.
Luminar Needs to Be on Your Radar

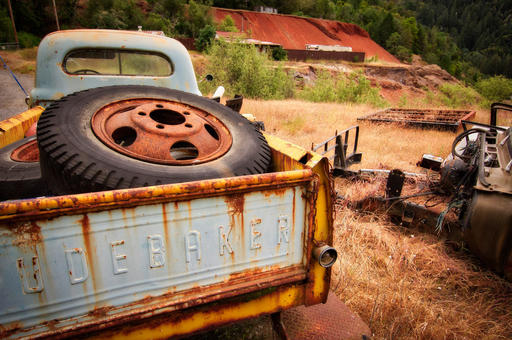
I've been working with a beta version of Luminar, the latest innovative photo application from Macphun. And I can tell you right now, this is software worthy of your attention.

luminar-Filters.jpg

What they've done is modernize the approach to the image editing tools that we all need to use, but are not always sure how to implement them. Macphun has made this easier by creating a Filter panel that contains the various adjustments we need, then allows us to combine these adjustments in any manner that we want. And for those combinations that we want to use over and over, we can save them as presets or workspaces.

Additionally, we can use these filters with other tools in the application, such as brushes and gradient screens. So, while you're working, you're not thinking about how to create a mask, rather, you're just making the picture look better. For those who really want to dig in, there are layers that make sense, a history function that's easy to use, a cloning tool, and much more.

Plus, Luminar works as an Editing Extension for Photos for macOS, and as a plug-in for Lightroom, Aperture, and Photoshop. The icing on the cake is that it's going to be affordable too: $60.

The application is scheduled for release in mid-November. Stay tuned here for updates, tutorials, and offers. I want to help us all learn this app together. This is terrific software that I think is going to add great enjoyment to your image editing.

Master Photos for macOS

(It's More Powerful than You Think)

VIDEO TRAINING

Want to see how easy it is to apply local edits to your images using Editing Extensions? Take a look at my new lynda training, Photos for OS X: Extensions for Local Adjustments.

And for an overview of all of the great features in Photos, my Photos for OS X Essential Training will get you up and running quickly. I cover everything you need to know to get the most from this surprisingly powerful image management application.

INSTRUCTIONAL GUIDE

The Apple Photos Book for Photographers

For photographers who are more than just casual snapshooters, or who are making the transition from Aperture or iPhoto, The Apple Photos Book for Photographers shines a light on the sophistication of this app and the ecosystem it taps into. Available as an eBook now, and coming to print later this year.

Want to Comment on this Post?

You can share your thoughts at the TDS Facebook page, where I'll post this story for discussion.
This is The Digital Story Podcast #554, October 18, 2016. Today's theme is "My Return to Iceland." I'm Derrick Story.

Opening Monologue

My first trip to Iceland was nearly a decade ago, when I was there on assignment with the "Lightroom 12" to capture imagery and test the beta version of Adobe's fledgling image management application. We were there in the summer, and the days were 23 hours long. It was amazing. And now I'll return again. This time for another assignment.

It's going to be a crazy couple weeks. On Thursday morning I head up to the Eastern Sierra for the TDS Fall Workshop. I'm so looking forward to it. I return home on Sunday night, then catch a plane on Monday morning to Iceland.

iceland-2006.jpg

I thought you might be interested in what I'm packing for these back-to-back trips.

In the News

Could Flash Porter Be The Field Back-up Solution of Your Dreams? (via ThePhoblographer)

Flash Porter is a Kickstarter campaign aimed at doing one thing: creating the worlds best field backup solution.

The unit is essentially a small battery powered memory card reader with a screen and built in storage of varying capacity levels - somewhat Gameboy-esq in its appearance. The idea is similar to something like WD's My Passport Wireless Pro, but more advanced with multiple memory card slots (not just SD) a built in screen, etc. The Flash Porter also supports RAW image display from most of today's popular brands, which means that unlike the Toshiba and WD offerings, you will actually be able to see and interact with the RAW files on the unit - such a key feature for us photographers.

The Kickstarter Campaign has 10 days remaining. If you would like to see this project become a reality you can head over to the Kickstarter page to get more information and to support the project.

Follow Us on Apple News for iOS Devices

I'm happy to announce that The Digital Story, The Nimble Photographer, and theAnalogstory are all available on the Apple News App for iOS devices. Just click on the following links on your iPhone or iPad, then save us to your Favorites.

Updates and Such

Big thanks to all of our Patreon members! I was able to pay for the podcast server and the backup system from last month's pledges. Your contributions are making a positive impact.

I'll be announcing the 2017 TDS Workshop season by the end of October. And I have to tell you, this is our most exciting lineup to date. Keep eye peeled!

B&H and Amazon tiles on www.thedigitalstory. If you click on them first, you're helping to support this podcast. And speaking of supporting this show, and big thanks to our Patreon Inner Circle members.

And finally, be sure to visit our friends at Red River Paper for all of your inkjet supply needs.

See you next week!

More Ways to Participate

Want to share photos and talk with other members in our virtual camera club? Check out our Flickr Public Group. And from those images, I choose the TDS Member Photo of the Day.

Podcast Sponsors

Red River Paper - Keep up with the world of inkjet printing, and win free paper, by liking Red River Paper on Facebook.

MacPaw Creators of CleanMyMac 3 and other great software for Apple computers. Visit www.macpaw.com today.

Hedge for Mac - The fast solution for moving photos and videos from memory cards to drives, or drives to drives for that matter. Learn more at Hedge for Mac.

The Nimbleosity Report

Do you want to keep up with the best content from The Digital Story and The Nimble Photographer? Sign up for The Nimbleosity Report, and receive highlights twice-a-month in a single page newsletter. Be a part of our community!

Want to Comment on this Post?

You can share your thoughts at the TDS Facebook page, where I'll post this story for discussion.
Considering Last Year's Model

Fresh off the heels of Photokina, and with Photo Plus just ahead, there are many tempting new cameras available for enthusiasts. The question is, do you go new, or with last year's model?

fujifilm-ad.jpg

Take the Fujifilm X-T1 vs the Fujifilm X-T2. The XT-1 is available now, brand new in the box with warranty, for $899, while the just announced XT-2 is selling for $1,599. That $700 difference could land you a top notch lens that will last for years.

If you look at key differences, it's true, there are many. The question is, however, how important are they to your work. Both cameras are top notch, weather-resistant wonders. The XT-2 has a 24MP sensor, 4K video capture, improved autofocus, and some nice design tweaks. Compared to the XT-1's 16MP sensor with a bit slower performance and lower video capture resolution, Fuji really did make some improvements with the XT-2.

This is the point where you have to step back and think analytically. "What is the net gain for my photography?" I'm not automatically advocating that you go with the XT-1 or the XT-2. What I am suggesting is that you ask the question.

In some instances, I think the answer is easier than in others. If a key feature that you need is substantially improved, then the latest model makes total sense. But if you don't shoot video, and don't require the swifter autofocus, is the 16MP XT-1 a great fit?

What I do know is that there is this golden opportunity right when the new model is available and there's inventory of the older model in unopened boxes. In all honestly, we really can't lose here.

We're on Apple News!

Find us now on the Apple News App for iOS! Just open this link on your iOS device, then add The Digital Story to your Favorites.

Want to Comment on this Post?

You can share your thoughts at the TDS Facebook page, where I'll post this story for discussion.

New Editing Extension - Polarr Photo

If you're looking for a new goodie to spruce up Photos for macOS, you might want to take a look at Polarr Photo Editor, currently on sale for $1.99.

adjustments.jpg

You buy it as an app, but doing so also loads an editing extension that works great in Photos for macOS. First launch the Polarr app to make sure everything is working OK. Then close it. Next go to System Preferences > Extensions > Photos and check the box next to Polarr. It's now ready to go as an extension.

Launch Photos for macOS and choose a picture to edit. Select Polarr from the list of Extensions in Edit mode. Your image will open in the Polarr interface. There are numerous filters to browse on the left side of the screen, and plenty of adjustments on the right.

The adjustments include all of the usual suspects for light and color, but there are plenty of surprises too, such as debase, distort, and grain. You can check your progress with the before/after button in the lower right corner.

The most recent version includes copy/paste adjustments. That might not seem practical, since you can only work on one image at a time with editing extensions, but Polarr remembers your copied adjustments for the next picture you open with the tool. Nice. It's actually quite useful.

There are plenty of tools and filters to explore here. And you certainly can't argue with the $1.99 sale price. Load it up this weekend and see what you can do with it.

Master Photos for macOS

(It's More Powerful than You Think)

VIDEO TRAINING

Want to see how easy it is to apply local edits to your images using Editing Extensions? Take a look at my new lynda training, Photos for OS X: Extensions for Local Adjustments.

And for an overview of all of the great features in Photos, my Photos for OS X Essential Training will get you up and running quickly. I cover everything you need to know to get the most from this surprisingly powerful image management application.

INSTRUCTIONAL GUIDE

The Apple Photos Book for Photographers

For photographers who are more than just casual snapshooters, or who are making the transition from Aperture or iPhoto, The Apple Photos Book for Photographers shines a light on the sophistication of this app and the ecosystem it taps into. Available as an eBook now, and coming to print later this year.

Want to Comment on this Post?

You can share your thoughts at the TDS Facebook page, where I'll post this story for discussion.