Recently in Photography

  Page 187 of 385 in Photography  

A Closer Look at Instagram Video

Instagram Video in iMovie for iOS

When Instagram announced that it now supports 15-second video clips, I was curious about how this actually worked. The capture part is straight forward. You update your current iOS version to V4.0, tap the video icon in camera mode, hold down the record button, and capture. What happens after that is interesting.

Instagram lets you choose a filter from a new set designed for movies, then publish your video just like you would a still photo. It also saves a copy of the file to your Camera Roll.


An Instagram-captured video being edited in iMovie for iOS.


That file can be used by any app that has access to the Camera Roll, such as iMovie for iOS. What you're working with is a H.264 .MOV file with AAC audio. The size is 640x640 at 30 fps. The audio is single channel at 44.100 KHz.

This could introduce a whole new style of mobile movie making, beyond simply sharing your clips on Instagram itself. Just like the square format in still photography, this look presents a different view of the world compared to 4:3 or 16:9.

In the meantime, it will be interesting to see what Instagram users create with this new functionality.

Want to Comment on this Post?

You can share your thoughts at the TDS Facebook page, where I'll post this story for discussion.

Join me on my Instagram site as I explore the world of mobile photography.

Samsung Galaxy GC110 Camera

The Samsung GC110 Galaxy digital camera does take pictures. But to be honest, I've spent most of my time with it looking at the shots by others.

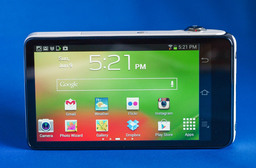
That's because it features a 4.8" HD Super Clear display that is both huge and gorgeous. Using the Galaxy to browse Flickr and Instagram is a treat for the eyes. Tap the Home button, and you also have access to the entire Web universe including using Chrome for browsing and Gmail.

Samsung Galaxy GC110 Camera Back Side with LCD

Under the hood there's Android 4.1 Jellybean controlling a 1.4 GHz quad core processor with WiFi and Bluetooth connectivity. I've had no problems connecting to networks at home or on the road. Once I do, I have a large screen device with decent horsepower that can serve as either a large smart phone (without cellular) or a small tablet. Take your pick.

In the vertical position, it's not bad to hold because the zoom lens is at the top of the device and out of the way. When horizontally oriented, the Galaxy feels a bit clumsy to me, and I haven't found a comfortable way to hold it. So I'm in portrait mode most of the time.

Samsung Galaxy GC110 Camera Back Side with LCD Showing Camera Settings

The LCD is also command central for setting the camera. When you tap the Camera icon, the Mode icon appears on the right side. Tap it, and you're presented with 3 options: Auto, Smart, and Expert. Auto is self-explanatory; the camera takes care of everything. Smart is really your access to scene modes for macro, party, action, etc. For me, Expert is where the action is. Here I can access Program, Aperture Priority, Manual, and Shutter Priority modes to take more control of the camera. All of the usual suspects are located here, including aperture, shutter speed, and exposure compensation settings.

If you don't mind onscreen camera controls, these are logically placed and easy to use. But this is also where you'll feel that this is a different device. Other than a physical shutter button, zoom ring, and flash pop-up button, the Galaxy behaves more like your smart phone than a camera, albeit it one with a 21X optical zoom lens (35mm film equivalent 23-483mm) with a maximum aperture of f/2.8 on the wide end and f/5.9 on the telephoto side.

samsung Galaxy GC110 Camera Zoom Lens

And as a camera, it gets the job done, both with 16 MP stills and HD video. It definitely has its quirks, however. For example, the Auto Screen Off control is very aggressive. Two minutes is the longest setting in Auto mode. I realize that the Galaxy has a big screen to power, but I had to turn Auto off all together and take my chances with the screen staying on. There are times when the camera becomes unresponsive. So I would have to go back a menu screen, then return to make the adjustment I wanted. And it does use micro SD (up to 64 GB) to augment its internal 8 GB memory. I know micro SD is the trend in super compacts, but the Galaxy is 5" long!

This all leads to trying to define exactly what the Samsung Galaxy GC110 really is. Since I'm primarily an iOS user (iPhone and iPad), the Galaxy is an opportunity for me to use a modern Android device without having to turn my iOS world upside down. I can test Android apps and see how things look and multiple platforms. It gives me a chance to learn and understand more about the Android ecosystem.

The large LCD is a pleasure to view, performance is good, and the entire Google Play store is available to me. I think that's what I really like about the Galaxy. It's a photography-oriented smart device. Not many smartphones or tablets have a 21X optical zoom lens.

The Samsung GC110 Galaxy digital camera is currently available on Amazon for $449. Since it's WiFi and Bluetooth, no contract is required for connectivity.


iPad for Digital Photographers

If you love mobile photography like I do, then you'll enjoy iPad for Digital Photographers-- now available in print, Kindle, and iBooks versions.

Want to Comment on this Post?

You can share your thoughts at the TDS Facebook page, where I'll post this story for discussion.
Lightroom 5 Pros and Cons

Lightroom 5 has its share of headliner features as well as small improvements. In my Macworld Magazine article, Adobe Photoshop Lightroom 5 presents an impressive and innovative upgrade, I cover the biggies, such as Smart Previews and Upright, as well as my favorite refinements.

Lightroom 5 Radial Gradient Tool The Radial Gradient Tool in Lightroom 5

My most-liked headliners are: Upright (to help straighten buildings and horizons), Radial Gradient (to draw attention to a specific area of the image), and Smart Previews (lossy DNGs that allow you to work offline with the masters at home). As for refinements, I'm thrilled that Adobe finally incorporated a true full screen view of an image (hit the F key).

As for cons, the Slideshow module continues to lag behind the competition. This surprises me considering that Adobe knows how to make great video editing software. And I think that the Library module needs some attention. Lightroom's photo organization isn't nearly as robust as its image editing ability.

Overall, Lightroom 5 is an excellent upgrade for current Lightroom users. Its lens correction abilities and gradient tools are particularly attractive.

Want to Comment on this Post?

You can share your thoughts at the TDS Facebook page, where I'll post this story for discussion.

This week on The Digital Story: 3rd Party Camera Batteries, Joby Ballhead X, and Workshops Update. All of this and more on The Digital Story podcast.

Story #1 - 3rd Party Camera Batteries: Are They Worth Buying? I've been testing a variety of 3rd party batteries, including the Premium Tech 2 Pack Battery And Charger Kit For Olympus OM-D E-M5 ($25), Wasabi Power Battery for Canon LP-E6 ($15) for Canon EOS 5D Mark II, EOS 5D Mark III, EOS 6D, EOS 7D, EOS 60D,and the Power2000 (for the Canon NB-9L in the PowerShot N).

My overall experience has been good with them. In everyday use, I'm noticing comparable performance and drain times. The Wasabi cells for the 60D behave in the camera the same as those made by Canon, including menu status of percentage of power left and battery health. The Premium Tech cells for the OM-D do require their own charger, unlike the Wasabi that uses the standard Canon charger, but other than than perform as well as the original Olympus battery.

With typical cost savings well over half price, I see no reason why not to try the previously mentioned cells, especially for your backup batteries.

Story #2 - Joby Ballhead X - I originally used the Joby Ballhead X ($69) on the Joby Focus flexible tripod. But I liked it so much that I got a second head for the lightweight tripod I use for location work.

Ballhead X is compatible with Arca-Swiss quick release plates, holds up to 11 pounds of camera, is constructed of high quality machined metal, looks great, and includes a separate panning control allowing me to use it for video work. Plus it works great with the $20 Joby UltraPlate. I think it's a great value at $69.

Story #3 - Workshops Update - We had a great time last weekend during the TDS Movie Making for Photographers Workshop covering the Sonoma County Hot Air Balloon Festival. Upcoming events include the Advanced Workshop for the Big-Q BBQ competition in July, Sonoma Coast Workshop in August, and still a couple seats available for the Fall Photography Workshop on October 20-22. All reservation forms are out for the Fall Photography Workshop, so if you didn't get one, be sure to write me immediately. We're also having the Aperture Intensive Workshop on November 16-17. You can still get on the Reserve List for that one.

Reminder! - If you're going to purchase gear through Amazon or B&H Photo, please stop by the TDS home page first. Look for the "Products" box about half way down the page in the second column. There you will see display tiles for Amazon, lynda.com, and B&H Photo, in that order. By entering those sites through those display tiles, you help support The Digital Story.

Listen to the Podcast

In addition to subscribing in iTunes, you can also download the podcast here (23 minutes). You can support this podcast by purchasing the TDS iPhone App for only $2.99 from the Apple App Store.

Monthly Photo Assignment

The June 2013 photo assignment is Stylish.

More Ways to Participate

Want to share photos and talk with other members in our virtual camera club? Check out our Flickr Public Group. And from those images, I choose the TDS Member Photo of the Day.


iPad for Digital Photographers

If you love mobile photography like I do, then you'll enjoy iPad for Digital Photographers-- now available in print, Kindle, and iBooks versions.

Podcast Sponsors

Red River Paper -- Keep up with the world of inkjet printing, and win free paper, by liking Red River Paper on Facebook.

Make Your Photos Sizzle with Color! -- SizzlPix is like High Definition TV for your photography.Special Offer! Anyone buying Derrick's new book, iPad for Digital Photographers, even at Amazon's or Barnes And Noble's discount, and putting the password for the Book Owners lounge in the comments space of their SizzlPix! order, will get 10 percent off their entire order -- the equivalent of more than a full refund for the book!

Need a New Photo Bag? Check out the Lowepro Specialty Store on The Digital Story and use discount code LP20 to save 20% at check out.

Want to Comment on this Post?

You can share your thoughts at the TDS Facebook page, where I'll post this story for discussion.

olympus-image-share_ipad.jpg

Fans of the Toshiba FlashAir wireless SD card will be happy to see the Olympus Image Share app back in iTunes for iPhone and iPad.

In my latest book, iPad for Digital Photographers, I recommend Image Share as the easiest way to filter Jpegs from Raws and only upload the Jpegs to your iPad. The app left iTunes for a couple weeks, presumedly while it was being retooled, but now has returned with new features. And most importantly, the old features still work.

If you have an Olympus E-P5, you can now tap the new remote control and geotagging features in the Image Share app. Very nice. Those of us using the FlashAir card don't have access to those features. But we can still wirelessly transfer our photos from the camera to the iOS device.

ShutterSnitch Adds Eye-Fi mobi Support

In related news, the venerable ShutterSnitch app has added support for the Eye-Fi mobi wireless SD card. On first test, I could not get the two talking to each other, even after quitting the Eye-Fi app as instructed by ShutterSnitch. I'll keep testing. Once I get things working, I'll report my findings.


iPad for Digital Photographers

This is the kind of stuff I write about in iPad for Digital Photographers-- now available in print, Kindle, and iBooks format.

Want to Comment on this Post?

You can share your thoughts at the TDS Facebook page, where I'll post this story for discussion.

The Movie Making for Photographers Workshop focused on the Sonoma County Hot Air Balloon Classic for its filmmaking subject. We spent portions of both Saturday and Sunday at Keiser Park in Windsor, CA capturing content for our work in Final Cut Pro X.

Waiting for Lift Off Close access to the action provided great content for our filmmaking.

The workshop crew then learned the ins and outs of setting up a project in Final Cut Pro X, organizing the vast library of scenes we had recorded, building an effective storyline, massaging audio, and best practices for outputting our finished product. We also covered how to move Final Cut projects from one drive to another and upgrading existing iMovie work to Final Cut X.

Two professional filmmakers joined us as co-instructors, Louis Ekrem of Laughing Cat Films and Eric Michael Perez of Clicker Video, who shared practical ways to tap the movie making functionality of our DSLRs.

TDS Movie Making Workshop for Photographers Classroom session of TDS Movie Making Workshop. Photo by Eric Perez.

"I'm never going back to iMovie," remarked Ed Shields, one of the workshop photographers. "Once you get your bearings in Final Cut X, it's actually quite logical," added Craig Tooley, who also joined the group.

Inflating Balloon photos by Derrick Story.

Having such intimate access to the action at the Hot Air Balloon Festival was so important for our movie making. We were able to show the details of preparation as well as the sweeping big shots during liftoff. We're planning to do this workshop again next year. If you want to improve your movie making skills and witness firsthand the excitement of a hot air balloon festival, make June 2014 on your calendar.

Want to Comment on this Post?

You can share your thoughts at the TDS Facebook page, where I'll post this story for discussion.


Join me on my Instagram site as I explore the world of mobile photography.

Flickr for Android

When Yahoo! released Flickr v2 for iOS, iPhone users had a more appealing experience than their Android counterparts. In late May, that discrepancy was diminished... for the most part.

Flickr for Android brings the visual beauty of the iOS version with much, but not all, of its functionality. Since I'm primarily an iOS user, I couldn't tell if the unevenness was my lack of understanding or Flickr's UI. According to others, such as PCMag.com, it's not me; it's the app.

But those few rough spots could be easily ironed out in future updates. And the app itself is beautiful. Like the iOS version, it has reenergized my enthusiasm for mobile Flickr when using Android.

If you haven't done so already, give the new Flickr for Android a try. And while you're at it, join the Digital Story Public Group. We have a talented community there. And selected images from that public group are featured on the TDS Facebook page as the TDS Member Photo of the Day.


iPad for Digital Photographers

If you love mobile photography like I do, then you'll enjoy iPad for Digital Photographers-- now available in print, Kindle, and iBooks versions.

Want to Comment on this Post?

You can share your thoughts at the TDS Facebook page, where I'll post this story for discussion.
Lowepro Transit Sling 250 AW on Derrick Story

When I'm working in an urban environment, I want to travel light, have fast access to my equipment, and carry a bag that doesn't scream "camera gear." Lately I've been packing my OM-D kit in the Lowepro Transit Sling 250 AW ($99) and feeling great, even during extended shoots.

The Transit sling has fast side-access allowing me to keep the Olympus OM-D tucked away when on the move, then able to grab it quickly when a shot presents itself. I have plenty of room for spare lenses, flash, an extra body, and snacks. There's a dedicated iPad pocket in the back that fits a 10" tablet or iPad mini. If I need a light tripod or monopod, I can use the tuck-away holder on the side of the bag. And just as importantly, I feel like I blend into the environment when working out of the Transit Sling.

Alyssa Parking Garage

Portrait of Alyssa

I used the Olympus OM-D E-M5 with the excellent Panasonic Lumix G X Vario 12-35mm/F2.8 lens to create this portrait of Alyssa in the downtown area of Santa Rosa, CA. With the ISO set to 400, I shot at f/2.8 at 1/800th in Aperture Priority mode, exposure compensation set to -1.3. The focal length was set to 35mm. I then processed the image in Aperture 3.4.

Packed Lowepro Transit Sling 250 AW

Inside the Transit Sling 250 AW

Inside the Transit Sling I pack the OM-D with grip, Panasonic 12-35mm f/2.8 zoom, Olympus 75mm f/1.8 prime, and the Leica 25mm f/1.4 lens. Also stowed is an Olympus flash, Fujifilm X20 compact camera, filters, cable release, iPad (in the dedicated back pocket) and a snack. In the field, I can upload images directly from the camera to the iPad using a Toshiba FlashAir or Eye-Fi Mobi wireless card.

Regardless if I'm working on location, or processing images on the iPad in a coffee shop, the Tranist Sling 250 protects my gear and doesn't get in the way. I give it a very high nimbleosity rating.


iPad for Digital Photographers

If you love mobile photography like I do, then you'll enjoy iPad for Digital Photographers-- now available in print, Kindle, and iBooks versions.

Want to Comment on this Post?

You can share your thoughts at the TDS Facebook page, where I'll post this story for discussion.
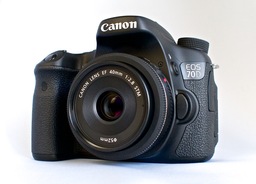
Great minds thinks alike. In this case it's Canon and DP Review. But I like the Canon EF 40mm f/2.8 STM lens too. And DP Review just honored it with Gold Award.

Canon 40mm Lens

In their review, they write: The EF 40mm f/2.8 STM is a fairly unprepossessing little lens, and its tiny size and relatively low price might make you wonder whether significant compromises have been made in its design and construction. But the moment you start shooting with it and looking at the images it produces, any such thoughts rapidly disappear - it's actually a very fine lens.

And I couldn't agree more. When I'm feeling creative and want to just have fun shooting, the 40mm is one of those lenses I reach for. And for $149, how can you go wrong?

Want to Comment on this Post?

You can share your thoughts at the TDS Facebook page, where I'll post this story for discussion.

Join me on my Instagram site as I explore the world of mobile photography.

Eye-Fi Mobi Review

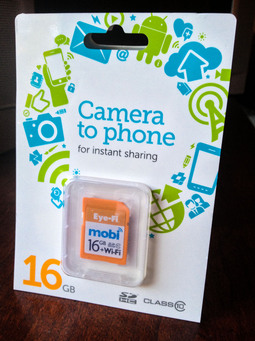
Eye-Fi Mobi Wireless SD Memory Card

The new Eye-Fi Mobi 16GB SDHC Wireless Memory Card does what I've always wanted an Eye-Fi card to do: easily connect my iOS device to my camera regardless of my location.

Once the card and camera are connected, the images flow from the camera to the iOS device, such as an iPad, where you can edit and share the pictures. The process is relatively simple.

  • Insert the card in the camera and power up.
  • Download the mobile app at www.eye.fi/mobi and enter the activation code that comes with the card.
  • Take a picture with your camera to force the card to begin broadcasting.
  • Open the Settings app on the iPad, tap on WiFi, and choose the Eye-Fi card that's in the list of networks.
  • Return to the Eye-Fi app and watch the picture being transferred from your camera to the iPad.

In the Eye-Fi app, you can monitor the connection via the status button in the upper left corner. When it's green, the two devices are talking. When it's red, the Eye-Fi card has timed out and stopped broadcasting.

Eye-Fi App on an iPad mini The Eye-Fi app on an iPad mini

This is where the system could use a little refinement. There's no control over how quickly the Eye-Fi card powers down in the camera. As it works out, it's just a couple of minutes. I understand why it does this, to save battery power. But once the card powers down, you have to prod it again to transmit, then go back to Settings on the iPad and log back in to the network.

I would like to have some control over the time period before the card powers down. I found myself having to log in to the card repeatedly, even during a single session of shooting.

Once the images are on the iPad, Eye-Fi creates a Photos Album to manage them. This is very convenient. You can access the Album via the Photos app, iPhoto app, or any other app that can read Albums. I also liked that transfer was swift. My medium-sized Jpegs loaded quickly and were virtually ready for use immediately after capture.

You can set up sharing to Facebook, Twitter, or via email within the Eye-Fi app itself. But since the images are automatically saved to your Camera Roll, you have access to them for publishing using your normal workflow. You can add multiple Eye-Fi Mobi cards to the app, and switch among them as needed. This allows you to have cards in all of your cameras if you wish.

The Eye-Fi Mobi is available in 16 GB ($75) and 8 GB ($50) capacities. Both versions are rated at a speedy Class 10. I anticipate refinements in how we can control the card's power management. But even in this first release, the Mobi is one of the best wireless card options currently available. Both versions are available on Amazon.com


iPad for Digital Photographers

This is the kind of stuff I write about in iPad for Digital Photographers-- now available in print, Kindle, and iBooks format.

Want to Comment on this Post?

You can share your thoughts at the TDS Facebook page, where I'll post this story for discussion.