In a recent podcast I asked the question, HDR: Do We Still Need It?. "Yes, we do," answers Landon Michaelson. He goes on to explain how he crafted his Wet Fields image. It's an outstanding example of pushing dynamic range creatively. He applies his own term to the process, Hybrid Exposure Compensation, and explains how he did it.
Capture
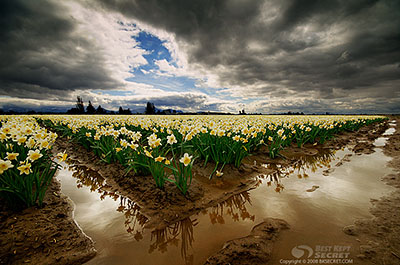
"I was standing in the mud on the edges of these expansive daffodil fields in the Skagit Valley of Washington State," said Landon. "I wanted to keep the scene more of how it felt to be standing here. The sky was bright, even though the sun was behind cloud banks and only peeked out later in the morning."
"I had circled around 3/4 of this field looking for a good lineup of the clouds, breaks in them, the fields and the placement of the horizon line. The reflections in the foreground caught my eye, as did the lines in this vantage point. I use a Sigma 10-20 4-5.6 EX lens for this shot, and crouched down to give just enough daffodils to go off into the distance, but not too few or too many (too high or too low)."
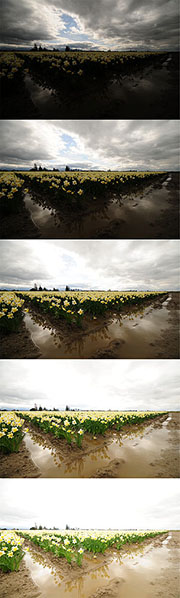
"I framed in the reflections and waited for the wind to die down a bit, then fired of 5 quick exposures, one stop apart,hand-held while braced in the crouch position (monopod and tripod get very muddy here)."
The sequence to the right shows the resized JPG files shot with the RAW files. EXIF: Nikon D300, Matrix Metering, Manual Exposure, f/11, 10mm, ISO 200, WB = cloudy, auto-bracketing (-2, -1, 0, +1, +2)
"I looked at the histogram for the five shots, liked what I saw for field capture of the data and moved on to the next composition."
Post Production
"I use a variety of tools to merge my exposures, a term I coined as HEC (Hybrid Exposure Compensation), which is just a fancy way of saying the workflow is fairly organic; using what tools I have and what I need on an image by image basis to meet my creative goals for the shot. I don't label any of my exposure merges as HDR, because one method is never used the same way twice and no one tool does it for me."
"In this case I loaded the 5 NEF RAW files into Photomatix Pro 2.5.2 - great tool for helping remove the slight movement in the individual blooms due to the breeze. I output one TIFF file via the "Tone Compressor" tool and got the sky the way I wanted it and how I felt about seeing it. I output another via the Tone Compressor tool for the foreground and middleground. I then output a third TIFF with the "Details Enhancer" tool to give some localized contrast and balance to the shot, as needed in post."
"I loaded the foreground/middleground shot into Photoshop CS3 Extended. I then loaded the sky layer on top, and the details enhanced layer on top of that. I did a hard line transition with a layer mask between the sky and the daffodils at the horizon line. I then changed the details enhance layer mode to soft light and with a layer mask and a Wacom painted in and out areas of this adjustment layer that got the scene close to how I liked it."
"Next I added a Selective Color adjustment layer to help the colors not have other muddy colors in them (taking some yellow out of the cyans for instance). Soft light layer to put more contrast in the sky above.
Hue/saturation adjustment layer to pull -9 out of saturation for the entire image. In this result, it was all about seeing the scene to completion with how I saw the scene, or felt about seeing the scene. Not meant as a documentation of standing there. Hard & soft edge GND filters could have been used too, but one more thing to worry about while crouching in the mud."
Final Thoughts
"In the end I am pleased with the outcome. There was a lot of dynamic range in that sky alone, so I was able to keep it under control with this approach. When I printed this image I chose to take a little bit of the contrast increase out of the shot. Once on paper I thought it was a little too surreal, but I personally like a touch of surreal in the real and a touch of real in the surreal. Just not too far."
Photos by Landon Michaelson.
More Tips from The Digital Photography Companion
"How I Did It" is a new feature of The Digital Story featured on The Digital Photography Companion mini site. These are techniques from virtual camera club members who have built upon information in The Digital Photography Companion, or have come up with new tips altogether.
We're building a living library of knowledge for everyone to use (and contribute to). If you have a "How I Did It" tip to share, just send it to me with the sample photo, and put "How I Did It" in the email subject.

Events! See the TDS Event Calendar for photography workshops, speaking engagements, and trade show appearances, including my Beginning Workflow with Adobe Photoshop and Lightroom on June 22-28, 2008 in Sante Fe, New Mexico.
Technorati Tags:
digital photography, Digital Photography Companion, technique, Technology, The Digital Story, How I Did It