Recently in Photography

  Page 325 of 385 in Photography  

bro_sis_tds.jpg

Recently, one of our virtual camera club members sent me a note about a Canon EF 70-200mm f/2.8L IS lens that he wanted to sell. I've been looking for a well-kept version of this pro telephoto glass for some time. I have the 70-200mm f/4, and I absolutely love it. But there have been times when I wanted that extra f/stop of light.

The f/2.8 is an interesting lens. It's been around since late 2001, so I've wondered if a revision is in the works where it would receive the same 3rd generation image stabilizer that the f/4 version uses, which is good for four stops instead of the three stops of stabilization that the current f/2.8 can achieve. Plus I've wondered if they are going to tweak the optical formula or stick with the successful recipe they've enjoyed for years.

Despite these questions, I decided to buy the lens. Even though its owner had used it for a couple years, it was in great shape. The first thing noticed when I mounted it on the Canon 5D body is how heavy the lens really is, especially if you're used to the f/4. The second wave of realization was how sweet f/2.8 is for portraits and fading light -- add to that the creamy boca effect for soft backgrounds, and it's easy to see why this is such a popular lens.

Focusing is fast and quiet with the USM motor. But be careful when shooting wide open at 200mm. You can easily make a focusing mistake resulting in a "soft eye" if you get lazy. The image stabilizer works well, though a little louder than the current versions. Plus, there are the included extras: nice case, lens hood, and tripod collar.

I've used the Canon EF 70-200mm f/2.8L IS lens for two shoots, and I'm already hooked on it. Normally, it sells for about $1,700 new, with deals around $1,600. But you can find pristine condition used versions for $1,100 - $1,400. It's big, it's heavy; but for portraits, events, and fading light, it's an outstanding zoom.

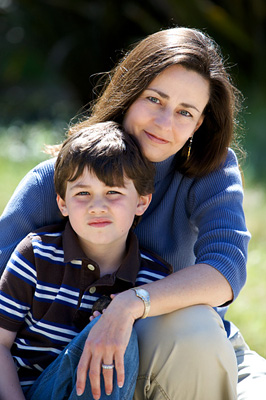
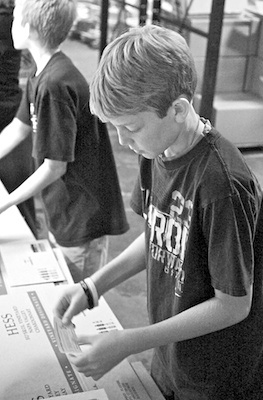
Photo of brother and sister by Derrick Story captured with a Canon 5D and Canon EF 70-200mm f/2.8L IS lens at 200mm, f/4, 1/500, ISO 250, using the spot meter pattern.

Technorati Tags: ,

Your Ideas for TDS Gift Guide

gorillapod_web.jpg

Next week's podcast will be a holiday gift guide for photographers. I'm recording the show on Sunday and am soliciting ideas from TDS members.

If you've discovered a gadget or photo accessory that you think would make a great addition to our gift guide, please send a note with the following information:

  • Its name
  • What it does
  • Where you can find it (web address preferred)
  • How much it costs ($100 or less)

Use the Subject for your email: TDS Gift Guide. You can find all the information on where to send you suggestion on our Submissions page.

Don't delay! Your great idea could make someone very happy this holiday season.

Image caption: The Gorilla Pod is a terrific holiday gift that is affordable and very useful for photographers.


twitter.jpg Follow me on Twitter

-


lacinema_rugged.jpg

How many bus-powered portable hard drives have you seen that come with HDMI ports that plug directly into your HDTV, enabling you to view photos, movies, and even listen to music without a computer? And how many of those come with a remote control?

The new LaCie LaCinema Rugged looks similar to the other drives in their Rugged product line, but boy is it different. It comes in two capacities (250 and 320 GBs), connects to your computer via USB 2.0, and has a variety of output options: video (composite video + stereo audio), HDMI, optical video, analog stereo (via A/V cable included), and optical audio.

It can play a variety of formats including: MPEG-1, MPEG-2 (AVI, VOB, IFO, ISO), MPEG-4 (AVI, XviD), plus audio and Jpegs. And if you want, you can even use it as a regular backup hard drive via the USB 2.0.

The pricing is a reasonable $219 for the 250GB model, and $249 for the 320GB drive. I couldn't find anywhere they were available yet, but they should be in stock at the usual places soon.


twitter.jpg Follow me on Twitter

-


Technorati Tags: , , ,

photo_rescue.jpg

Fear not if you accidently erase your pictures off a memory card. The latest version of PhotoRescue can help you recover those images, even including Raw files from the latest cameras, including the Nikon D700 and Canon EOS Rebel XS/1000D.

Just download the demo version (Mac and Windows), see what pictures can be recovered, and if you want them, pay the $29 to license the software. It's great stuff; I've used it myself.


twitter.jpg Follow me on Twitter

-


Technorati Tags: , , , ,

ps_cs4_180.jpg

Once you download the trial version of Photoshop CS4, you have 30 days to freely explore, test, and enjoy its bounty of new features. Here are a few things I'd look at during the trial.

Review Mode in Bridge. I've really become hooked on this carousel approach to sorting images. Enable by pressing CMD-B or CTRL-B. Use right and left arrows to navigate, and the down arrow to drop images out of the carousel. Once you have your favorites, use the Make Collections icon to save them as a group.

Collections in Bridge. These virtual folders are like Albums in iPhoto and Aperture, and similar to Collections in Lightroom. They finally give us the versatility to group images without messing up our filing organization.

Graduated Filter in Adobe Camera Raw. What a great addition this is to ACR! Not only can you use it for tonal adjustments, but for color and sharpness too. You'll find it in the toolbar at the top of ACR.

Localized Corrections with the Adjustment Brush in ACR. Another killer tool that allows you to work on specific areas nondestructively. You'll find it in the toolbar at the top of ACR.

Targeted Adjustment Tool in Curves and HSL Adjustment Panels in Photoshop. I like the new Adjustment Panel that automatically creates a new layer for you. But I really like the Targeted Adjustment Tool in the Curves and HSL panels.

Birdseye View in Photoshop CS4. Great navigation addition. When you're working with an image at magnification, hold down the H key and click. Photoshop takes you into Birdseye view enabling you to easily navigate to another area of the photo. You have to see it to believe it. And zooming (Z) in general is smoother and more fun. Try it.

Another recommendation is to get the book, The Photoshop CS4 Companion for Photographers before you download the trial. This 190 page guide will only set you back $16.49 on Amazon, and it can serve as your navigator for exploring Photoshop CS4. If you decide CS4 isn't for you, then you can pass the book along to someone else. If it is for you, you have the perfect companion for learning the new application.


twitter.jpg Follow me on Twitter

-


Technorati Tags: , , , , ,

psc_cover_web.jpg

Of all the features that Amazon offers its customers, reviews submitted by people who read the books are still the most useful. This is especially true when a book takes a specific approach to a subject, such as what I've done with The Photoshop CS4 Companion for Photographers. Unlike other Photoshop manuals that try to cover all of the tools, I filter through hundreds of features to present the most important ones for photographers who want to use CS4 as their photo workflow application.

When I read the first Amazon review for the Photoshop Companion, it was interesting to see that the book was perfectly suited for what that customer wanted (David J. McKee). By David sharing his thoughts, he helps both those who have similar needs and those who may want something else.

I'm mentioning this because, if you've read The Photoshop CS4 Companion for Photographers, and you have insights about it that might be useful for other photographers, I encourage you to post a review on Amazon.

It's like so many other things we do on The Digital Story: share our ideas and our work with each other.


twitter.jpg Follow me on Twitter

-


Technorati Tags: , , , , ,

After spending the bulk of my Saturday organizing the pictures I've captured over the last three weeks, I'm reflecting on archiving in the digital age.

Generally, I'm not someone who waits to get home before I start organizing my work. On my trip to Hawaii, for example, I rated all of my images, and updated the metadata for all of the "keepers" while I was still on the road. So it's not like I'm starting from ground zero once I'm at my desktop computer.

drobo_web.jpg

As I think back to the "old days" of sorting slides, marking them with a Sharpie, then putting them into sleeved binders, I have to say that archiving in the digital age is neither better nor worse. It's different.

With digital, my pictures are easier to retrieve up the road thanks to metadata and great browsing tools such as Aperture, Bridge, and Lightroom. I can multitask (unload the suitcase and start the wash) while files are being copied to backup drives. And I find that I'm making presentations and prints faster that I used to in the analog days.

On the other hand, I'm more nervous about hard drives crashing and optical discs going bad than I ever was about properly stored film. So I'm constantly looking for affordable redundant solutions to put my mind at ease. And those tools cost money. And I'm still not sure about my "return on investment" for all the time I spend writing captions and keywords. Maybe I'm just not taking advantage of that work properly yet.

I'll tell you when digital feels good though. When I really need to find a particular image quickly, and I actually locate it. So, I guess spending some time on the weekend toward this endeavor is not really wasted after all. Maybe I'll go take more pictures today.


psc_cover_web.jpg

Learn what photographers need to know to organize and edit their images with Photoshop CS4. Take a look at The Photoshop CS4 Companion for Photographers. It fits in your laptop bag and is very easy on your wallet.


Technorati Tags: , , , , ,

Green Turtle Farewell to Hawaii

green_turtle_tds.jpg

As I had mentioned in earlier posts, this had been an unusual week of diving for me. The swell from the north kept things churned up thereby decreasing visibility. The skies were variable, and when overcast, that also affected how things looked underwater. And, to top it off, I had gone all week without seeing a sea turtle.

On my last dive of the week, I was exploring a rocky area not far off the shore. The water was tumultuous, but the landscape was beautiful. Then, to my right, I spotted a giant green sea turtle coming by for a snack of vegetation. He was only inches from me, and we swayed back and forth in the tide (me trying to stay out of his way so as not to disturb his lunch.)

I figured that my week was now complete, and I should probably think about heading home. It was a terrific conclusion.

Photo by Derrick Story. Captured with a Canon SD700 IS in a Canon underwater housing. Camera set to Underwater Scene Mode.

Technorati Tags: , , , ,

Diving Off Ka'anapali, Maui

sea_slug_over_coral.jpg

The morning was overcast, which is always a drag for snorkeling. But a little light broke through in the afternoon. So I geared-up and headed straight out to the third buoy on my beach. Between the swell and wind, I wasn't expecting much. But to my surprise, I had one of my better shooting sessions underwater. I guess you just never know for sure.

It seemed like all of the fish were out. One of the more interesting creatures was this Sea Slug draped over a handsome coral. He was probably about 18" long. I appreciated him striking an elegant pose.

Photo by Derrick Story. Captured with a Canon SD700 IS in a Canon underwater housing. Camera set to "Underwater" scene mode.


Now Available! The Digital Photography Companion. The official guide for The Digital Story Virtual Camera Club.

  • 25 handy and informative tables for quick reference.
  • Metadata listings for every photo in the book
  • Dedicated chapter on making printing easy.
  • Photo management software guide.
  • Many, many inside tips gleaned from years of experience.
  • Comprehensive (214 pages), yet fits easily in camera bag.

Technorati Tags: , , , ,

A Day Shooting Jpeg - It Is Different

kapalua_dragons_teeth.jpg

When I'm on vacation, I try to be more like a normal person and less like a photographer. One of the ways I do that is to put a compact camera in my pocket and leave everything else behind. This usually means that I'm shooting Jpeg.

It's funny, now that I've been shooting Raw for a couple years, I really notice a difference when I process Jpegs in Aperture. I'm so used to being able to recover vast amounts of image data in the highlights and shadows. I have so much information to work with regardless of the slider I'm using.

After processing a day's worth of Jpegs, I feel like I'm image editing with one hand tied behind my back. I move a slider expecting a certain result, and the image just doesn't respond "right." It's a good reminder of just how powerful Raw photography is.

Does this mean I'm going to start lugging all my photo gear around? Nope. I'm still on vacation. I'll shoot Raw when it's convenient. But the rest of the time, I'm still going to be a tourist.

Photo of Dragon's Teeth formation near Kapalua, Maui, by Derrick Story. Captured with a Canon SD700 IS in Program mode.

Technorati Tags: , , , ,