This is The Digital Story Podcast #750, August 4, 2020. Today's theme is "Just Announced: The Olympus OM-D E-M10 Mark IV." I'm Derrick Story.
Opening Monologue
For those who thought Olympus was done for the year after the JIP announcement, I have a surprise for you: New camera and new super telephoto lens. Today, we're going to take a close look at the OM-D E-M10 Mark IV and the Digital ED 100-400mm f5.0-6.3 IS lens. Plus, I'll give an update to the Eastern Sierra workshop in the Fall and Costa Rica in January. I hope you enjoy the show.
The Olympus OM-D E-M10 Mark IV
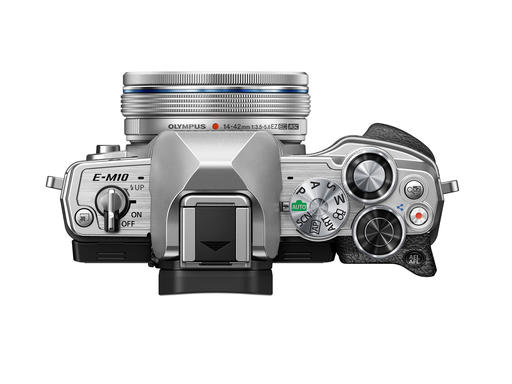
The Olympus OM-D E-M10 Mark IV is lighter than any previous model, at approximately 0.85 pounds. Even when paired with the M.Zuiko Digital ED 14-42mm F3.5-5.6 EZ lens, the kit is just over a pound, making it incredibly portable. A deep grip provides an ergonomic, comfortable and secure feel. Easy USB charging enables in-camera charging. So you can use a power bank when on the go. This body is also wireless radio wave external flash compatible.
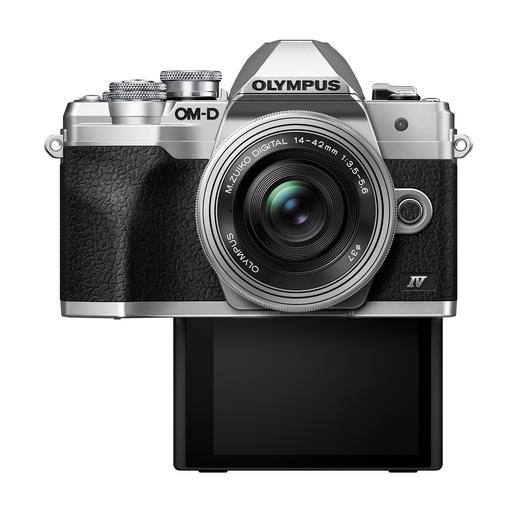
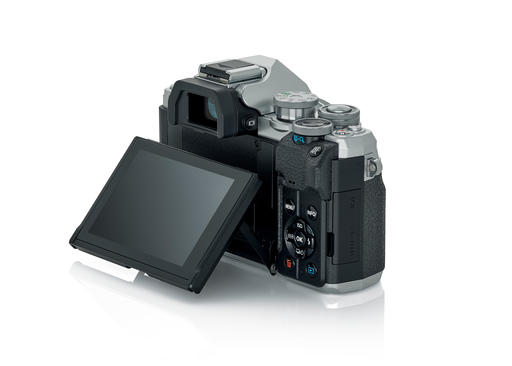
A first for the OM-D series, this model is equipped with a flip-down LCD monitor and dedicated selfie mode, making it easy and fun to take high-quality selfies using one hand. The camera supports high-angle and low-angle shooting, so photos and videos turn out exactly as imagined. Additionally, the OM-D E-M10 Mark IV features a high-definition electronic viewfinder, making it easier than ever to shoot in direct sunlight and in other situations where it might be difficult to view the LCD monitor.
Feature Highlights
- 20.3 million 4/3" Live MOS Sensor
- 121-point contrast AF - All target, group target (9-area), single target
- Built-in 5-axis sensor-shift image stabilization for video and still photos (compensates for yaw, pitch, roll, vertical shift, horizontal shift) - up to 4.5 stops
- Sequential shooting up to 8.7 fps
- Eye-level electronic viewfinder, approx. 2.36M dots
- 3.0-inch tilting monitor -Approx.1040k dots (3:2), electrostatic capacitance touch panel
- Digital ESP metering (324-area multi pattern metering), center-weighted average metering, spot metering, spot metering with highlight control, spot metering with shadow control
- AUTO ISO (default) : LOW (approx.100) †6400 Manual ISO : LOW (approx.100), 200 - 25600
- Built-In Flash with wireless capability, Triggered and controlled by the built-in flash (Olympus Wireless RC Flash system compatible)
- SD Card Slot - SD (SDHC, SDXC, UHS-I, UHS-II)
- 4K Video - 3840 × 2160 (4K) / 30p, 25p, 24p / IPB (approx. 102 Mbps)
- External mic can be attached, but not sure how (USB Micro-B?)
- BLS-50 Li-ion battery (included)
Pricing, Configurations, and Availability
Olympus OM-D E-M10 Mark IV Body (Silver/Black); $699 (U.S.)/$999.99 (CAD)
Olympus OM-D E-M10 Mark IV EZ Kit Body (Silver/Black) and M.Zuiko Digital ED 14-42mm F3.5- 5.6 EZiv lens; $799 (U.S.)/$1,049.99 (CAD)
The Olympus OM-D E-M10 Mark IV will be available for pre-order at participating local authorized retailers, or at www.getolympus.com, and will begin shipping on September 25, 2020. For detailed product specifications visit https://www.getolympus.com/digitalcameras/omd/e-m10-mark-iv.html.
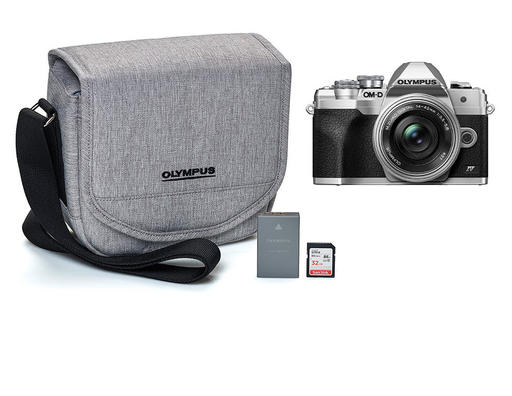
Take advantage of a special launch offer by purchasing a new OM-D E-M10 Mark IV before November 1, 2020; receive an Olympus starter kit, including an Olympus camera bag, extra BLS- 50 battery and 32GB SD card (starter kit valued at $99.99).
October Eastern Sierra Physical Photography Workshop Postponed
Based on the progress of the pandemic and the need to keep our community members safe, I'm postponing the Eastern Sierra Photography Workshop to 2021.
I do have an event, however, that I'm hoping you'll be interested in: The Nimble Landscape Virtual Workshop Experience. Derrick then explains how this new event will work.
The Olympus 100-400mm F5.0-6.3 IS Lens
The 100-400mm f5.0-6.3 IS is an ultra-compact, lightweight super-telephoto zoom lens that covers a broad telephoto focal length of 200-800mm equivalent1 and is compliant with the Micro Four Thirds System standard.
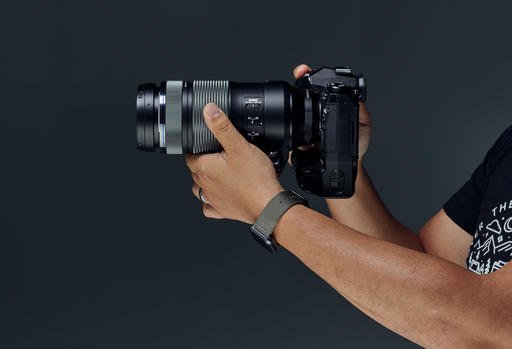
The optic features the same dustproof and splashproof performance as the M.Zuiko PRO lens series, and when paired with the M.Zuiko Digital 2x Teleconverter MC-20, delivers up to 1600mm equivalent1 super telephoto shooting. This lens offers superior autofocus performance, even handheld, and in-lens image stabilization for the optimal shooting experience.
Despite being a 200-800mm equivalent super telephoto zoom lens, the Olympus M.Zuiko Digital ED 100-400mm f5.0-6.3 IS lens is compact and lightweight, with a length of 205.7 mm, a weight of 1,120 g6 and a filter diameter of 72 mm.
The M.Zuiko Digital ED 100-400mm f5.0-6.3 IS lens is capable of 200-800mm equivalent1 telephoto shooting on its own, which can be further extended when paired with the optional (sold separately) M.Zuiko Digital 1.4x Teleconverter MC-14 or the M.Zuiko Digital 2x Teleconverter MC-20, for up to 1600mm equivalent , making it possible to zoom in close on subjects that are difficult to approach, such as birds and wildlife, and delivering flattening effects for shooting that is unique to a super telephoto lens.
A rear focus system is employed to drive this lightweight focusing lens, for fast, high-precision autofocus performance. This lens is also equipped with four functional switches, designed to support handheld shooting, including a Focus Limiter switch for AF operation selection, ranging between three levels, according to the focusing distance, allowing for quick focusing and comfortable shooting, even in the super telephoto range. In-lens image stabilization on/off delivers stable handheld super telephoto shooting, an AF/MF switch and a zoom locking switch.
Pricing and Availability
The Olympus M.Zuiko Digital ED 100-400 f5.0-6.3 IS lens will be available for $1,499 (U.S.)/$2,199.99 (CAD). To pre-order, visit a participating local authorized retailer, or www.getolympus.com. Shipping will begin September 8, 2020. Please visit the website for detailed product specifications: https://www.getolympus.com/lenses/m-zuiko-digital-ed-100- 400mm-f5-0-6-3-is.html.
I'm Now Writing on Medium
I've started publishing articles on Medium.com as @derrickstory. Posts that aren't anywhere else include: "How IBIS Saved the Day, er, The Night," "From LA to San Francisco, 61 Days in a Different World," and "My 10 Years with Olympus Cameras." If you're interested in these topics, I'm posting an article a week. You might want to stop by and follow.
After mentioning this last week, I was thrilled so see that many of you from our TDS audience were hanging out on Medium last week. Thank you so much for chiming in. I think this is going to be an excellent complement to the work we're doing on TDS.
The New Donation Kit for Carefree Shipping of Found Film Cameras
We have more time around the house than ever. And you finally dove into that bedroom closet that's been begging for some organization.
If you found a film camera that you're no longer using, our new Donation Kit makes it easy to pack and ship. Just visit the Contact Form on thenimblephotographer.com, click the box next to Donating a Film Camera, and let me know what you have. In your note, be sure to include your shipping address.
If it's a camera we can use for the shop, I'll send you a Donation Kit that includes a USPS Priority Mail shipping box and prepaid label. All you have to do is tape it up, insert the camera, and add the label. USPS will pick up your shipment from the front door of your house during their regular mail delivery. It's that simple!
Your donation help get analog gear in the hands of aspiring fine art photographers, and the proceeds help support this podcast.
The Essential Steps to Impressive Video Conferencing
If you want to learn more about looking and sounding great for your next online interaction, then I think you'll very much enjoy my latest online workshop, The Essential Steps to Impressive Video Conferencing.
This 1-hour deep dive focuses on the 3 major areas of successful online interaction: Audio, Video, and Environment. During the course, I walk you through a variety of techniques that range from simple using gear that you already have, to improving your chops through a few inexpensive purchases.
The course is currently available for free to our Inner Circle Members on Patreon. Members, just go to our Patreon site, and all the information will be there. If you're not already an Inner Circle Member, you can join us for $5 a month.
The course is also available on our Nimble Photographer Workshop Page for $14.95.
I have tons of great tips and techniques waiting for you there. If you want to get serious about how you come across during online meetings, classes, interviews, and family interactions, then you definitely will want to watch this course.
Digitizing Family Memories Course Now Available Online
Each of the four classes will outline a specific set of steps for you to accomplish. By the end of the course, you will have an organized digital archive of your most valuable family images.
You can sign up for the course by visiting the Workshops page on The Nimble Photographer. The course fee is a reasonable $39 (on sale right now). It includes the 4 class videos, class notes, and access to the class forums that are a part of each movie.
Updates and Such
Inner Circle Members: A big thanks to those who support our podcast and our efforts!
How to Watch Photos for macOS Catalina and iPadOS - Learn everything you need to know about Photos for the Mac and iPad by checking out my latest course on LinkedIn Learning and on lynda.com. This course is perfect for Mac and iPad based photographers who shoot with iPhone, Mirrorless, and DSLR cameras. It covers both photography and movies. And if I say so myself, it's a lot of fun.
B&H and Amazon tiles on www.thedigitalstory. If you click on them first, you're helping to support this podcast. (The Digital Story is supported by its audience. When you purchase through links on our site, we may earn an affiliate commission.) And speaking of supporting this show, and big thanks to our Patreon Inner Circle members:
Affiliate Links - The links to some products in this podcast contain an affiliate code that credits The Digital Story for any purchases made from B&H Photo and Amazon via that click-through. Depending on the purchase, we may receive some financial compensation.
And finally, be sure to visit our friends at Red River Paper for all of your inkjet supply needs.
See you next week!
Product Links and Comments
There are product links in this article that contain affiliate tags. In some cases, depending on the product, The Digital Story may receive compensation if you purchase a product via one of those links. There is no additional cost to you.
You can share your thoughts at the TDS Facebook page, where I'll post this story for discussion.