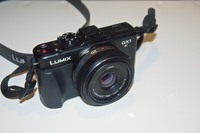
This field report, including photos, is contributed by TDS member, Ed Shields. I also took a look at the GX1 while at CES, and enjoyed testing it in the short time I had with it. I'll talk more about that in the comments of this article.
As one would expect, the Panasonic Lumix DMC-GX1 is very identifiable as belonging to the Lumix line of cameras -- a comfortable, solid feel in the hand, solid feeling dials, control wheel, and buttons for the many external controls. And to me, a very intuitive menu system.

I feel that even if one didn't have previous experience with a Lumix camera, one could easily pick it up and use it without reading the manual. Most likely due to size and form factor, the similarity of the external controls are closer between the GX1 and the LX5 than with the G1. One thing I really appreciate is the fact that the main control dial only has a single icon for jpg scene mode vs the G1's and and my 60D's cluttered practice of squeezing 150 different scene mode icons onto the mode dial. Some early reviewers have faulted the metal 4-way controller buttons as being largely unreadable. My aging eyes are no longer good enough for manual focus, but I don't have any problem reading them in all but the dimmest, almost dark, light.
Image Quality
Because Aperture 3 does not yet support RAW conversion for the GX1 (as of Jan. 2012), I shot everything with RAW+JPG and imported the JPGs into Aperture. I don't shoot high speed action photography, so I don't normally shoot JPG. I wasn't really expecting stellar performance with the GX1, especially since everything I've read or seen about the Olympus PEN cameras having such great OOC (out of camera) JPGs. What I got out of the Lumix was just so-so at best. I felt they were a bit soft and flat. I suppose one could tweak the GX1 settings to increase sharpness and saturation to get better results, but I didn't go there as I discovered that on the Adobe Labs site they had a release candidate LR3 update that supports the GX1 RAW conversion.
So I downloaded it and imported both JPGs and RAW images into LR3. Nice! With only a minor boost in Clarity/Definition and Vibrance to about 18-20 and a slight nudge of sharpness from LR's default 25 to about 28 or so the image quality was excellent. If one sets these as a camera specific import adjustment it would be all that is needed for many grab images and an excellent starting point for those images where one desires local adjustments and further artistic expression. One caveat, I haven't printed anything yet, but I have no reason to expect anything less than excellent print quality for 11 x 14 or 16 x 19 inch prints.
One thing I did discover after comparing the LR3 RAW to JPG images is that rather than the JPGs universally being somewhat soft and flat, I feel they're more inconsistent. Take a look at the images below. There's a clear difference between the RAW and JPG in the Poinsettia images.
 Out of Camera Jpeg from the GX1.
 Processed RAW file from the GX1.
In this ocean image I don't see much difference between the RAW and JPG. If anything, I like the JPG better and need to go back and lighten the shadows in the RAW image. Its inconsistency is the same with others, hence my opinion that OOC JPGs are inconsistent vs. a bit soft and flat. But the RAW images all are consistent and excellent.
 Out of Camera Jpeg from the GX1.
 Processed RAW file from the GX1.
There are more images on my Flickr site -- all processed as RAW in LR3.
General Use, Shooting, and Handling
I purchased the GX1 with the non-powered 14-42mm zoom lens as I'm generally not a fan of power zoom lenses (I have my LX5 zoom programmed to discrete focal length increments, and with my S90, I have the lens ring set the same way, which isn't too bad). But the GX1 kit 14-42mm zoom is nowhere near the quality of the older 14-45mm kit zoom that came with my G1.
Besides looking and feeling rather cheap, zooming with it is more akin to turning a rusty faucet rather than a lens zoom ring. I know that's an exaggeration, but you get the point. It's quickly been relegated to the back shelf of my closet until it's time to sell my G1. Except for a few early images, all the rest were shot with either the older 14-45mm zoom or the 20mm pancake lens.
Except for one area, I find the handling and control of the GX1 excellent, very straight forward, and intuitive -- with external wheels, knobs or buttons for most functions. There are two configurable Fn buttons but I haven't had the chance to explore them yet. The generous hand grip is a pleasure to use.
The only real con I've discovered is that the rear thumb grip is rather small and too close to the rear control wheel. My hands are only medium size at best, but my natural grip covers both the thumb grip and thumb wheel, which when depressed, toggles between aperture or shutter speed and exposure compensation. I need to develop the muscle memory to keep my thumb away from the wheel and in the meantime make frequent checks that I haven't accidentally changed something.
Lenses
Although the 14-45mm is well balanced and not over powering for the GX1, it definitely loses a "nimbilosity" star. I can comfortably walk around all day with it hanging from a neck strap, but it's a bit large, for say, putting on the table when going out to dinner. The 20mm pancake is much better, but not wide enough for my liking. I've already ordered the pancake 14mm pancake, which I suspect will live on the camera with the 20mm in my pocket. When available, the 14-42mm power zoom might be an option that would provide a bit more flexibility and still maintain a 4 star "nimbilosity" rating (assuming the S90, 95 and 100 are the 5 star standard).
Touch Screen
I briefly tried the touch screen. My feeling is that touch focusing could be real useful when the camera was on a tripod. But having it on for general use is a pain, unless one turns the camera off after each shot. The problem is that while on a neck strap the constant hitting movement and handling causes the camera to constantly change focus location, or worse if one has full touch screen activated but aperture and exposure compensation settings as well. For me it's infinitely easier to center focus and recompose.
Exposure and White Balance
As with my other Lumix cameras, I find auto white balance to be fine in just about any light other than low light where flash is required. It's almost always fine as is but if a post processing adjustment is required, it's only a minor tweak one and that more often than not for personal artistic preference. Speaking of flash, the built in flash is for minor fill flash at best as witnessed by several of my Flickr photos.
Initially, I thought exposure was spot on, unlike my G1 or LX5 that consistently need a -1/3 compensation adjustment. However when I view the GX1 files in LR3 or AP3 they also seem to be overexposed by 1/3, the difference being that the GX1 LCD histogram doesn't necessarily show this.
Battery
I haven't done any precise testing, but in general use the battery feels to be noticeably less robust compared to either of my other Lumix cameras. This is just an observation I have by viewing the remaining battery indicator at the end of a day's shooting.
Final Thoughts
Overall I'm very satisfied with the GX1. It feels great in the hand, has lots of external controls, an intuitive menu system, and excellent RAW image quality (albeit JPG just so-so). Overall I'd rate it at least 4.5 stars (out of 5). Nimbilosity is probably quite different for different people, especially considering where they are starting from, but with any pancake lens it's a solid 4 star for me (deduct at least a 1/2 star with the 14-45 non-powered zoom). For traveling both the GX1 with the 14-45mm zoom and 20mm pancake, plus the LX5, and the chargers -- all fit nicely in my Lowepro Nova 160 AW.
As I mentioned previously, I've already ordered the 14mm pancake, which will probably live on the camera with the 20mm in my pocket. When readily available, and depending on the reviews, the new 14-42mm power zoom may be a nice option. But for me, I want to upgrade my G1 to a GH2(3?) before my wife and I go to Peru later this summer. So budget wise, the zoom upgrade is probably way down the road.
Is it a perfect camera? No. For me a perfect camera would have the GX1 form factor and price with in-body stabilization and a tilt LCD (like the the Sony Nex 7).
When I get the 14mm, and as I continue to use this camera, I'll shoot Derrick an quick update if I uncover anything substantially different from this review.
Find great deals at the TDS Photography Store on Amazon.