A friend of mine, Tom Bridge, recently found a Canon 5D Mark II and posted about it on his twitter page. I asked Tom if he wouldn't mind writing up his first impressions of finding the camera, and then actually shooting with it. He sent me the following report that I thought you might enjoy.
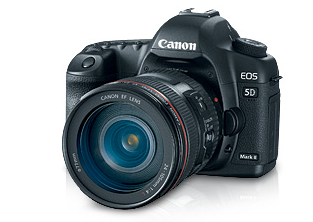
Tom's Canon 5D Mark II
Washington DC -- Yesterday afternoon, knowing that Penn Camera was sold out on the 5D Mark II for at least 3 months, I went to Dominion Camera in Falls Church. They'd told me late on Wednesday that they had one that hadn't been claimed yet, and that it was mine, were I to come over and pay for it. So I did. I picked up the 5D Mark II with the kit lens and all the assorted accoutrements.
I ran straight home, and busily set about clearing a workspace to open the box. My only disappointment after tearing through all the manuals and whatnot was that the battery came drained. I had to sit there and watch the LED blink on the wall charger for what felt like an eternity while I assembled the camera, filled out the documents, repacked the box and put it away.
This did give me the opportunity, though, to feel the camera out. For the last three years, I've used an old Canon 10D that I got second-hand. It's a work-horse, that I love to death, but it can't hold a candle to the 5D Mark II. I hardly knew quite what to expect in the upgrade.
The best way I can describe it is to go from a car that you dearly love to drive, but has clear and delineated issues you work around, to driving a brand new sport-tuned Porsche on the Autobahn. The 5D Mark II just seems to fit my hand better than the 40D or 50D that I tried out as part of this process, and the balance is exquisite with the 24-105mm f/4 IS kit lens. I was amazed at how agile it felt, despite the significant weight. Canon did a great job just with the hold-factor of the camera.
I tend to shoot aperture-priority most of the time, with my thumb on the wheel. I'm always dialing back the exposure with the 10D, even at 800 or H, so I get something that I could hold still enough to capture. Boy is that gone from the 5D Mark II. The flexible ISO metering is something that I'll have to get used to, and learn how to capture to its best ability. It's pretty astonishing, though, to see something that's shot at ISO 3200 that looks better than anything I shot at ISO 400 on the 10D.
I'll know a lot more after this weekend's shooting, but for the time being, I'm a very, very happy camper. Here's hoping for some good weather tomorrow, I've got my 50mm prime, the 24-105, and there's a beautiful Christmas display in downtown Pittsburgh where we're visiting.
Thanks Tom for the field report. If you have first impressions of a new camera you just laid hands on, please send it my way. You can get all the details on our Submissions page.
-
Technorati Tags: Canon 5D Mark II, Derrick Story, digital photography, Technology, The Digital Story