What's the best way to protect your Olympus, Panasonic, Sony, or Samsung compact DSLR and still look stylish? You bought one of these nimble cameras to travel light, yet have all the functionality that you need. I have three Lowepro camera bags that work great for the Olympus PENs, Panasonic G series, Sony NEX, and Samsung NX10 camera systems.
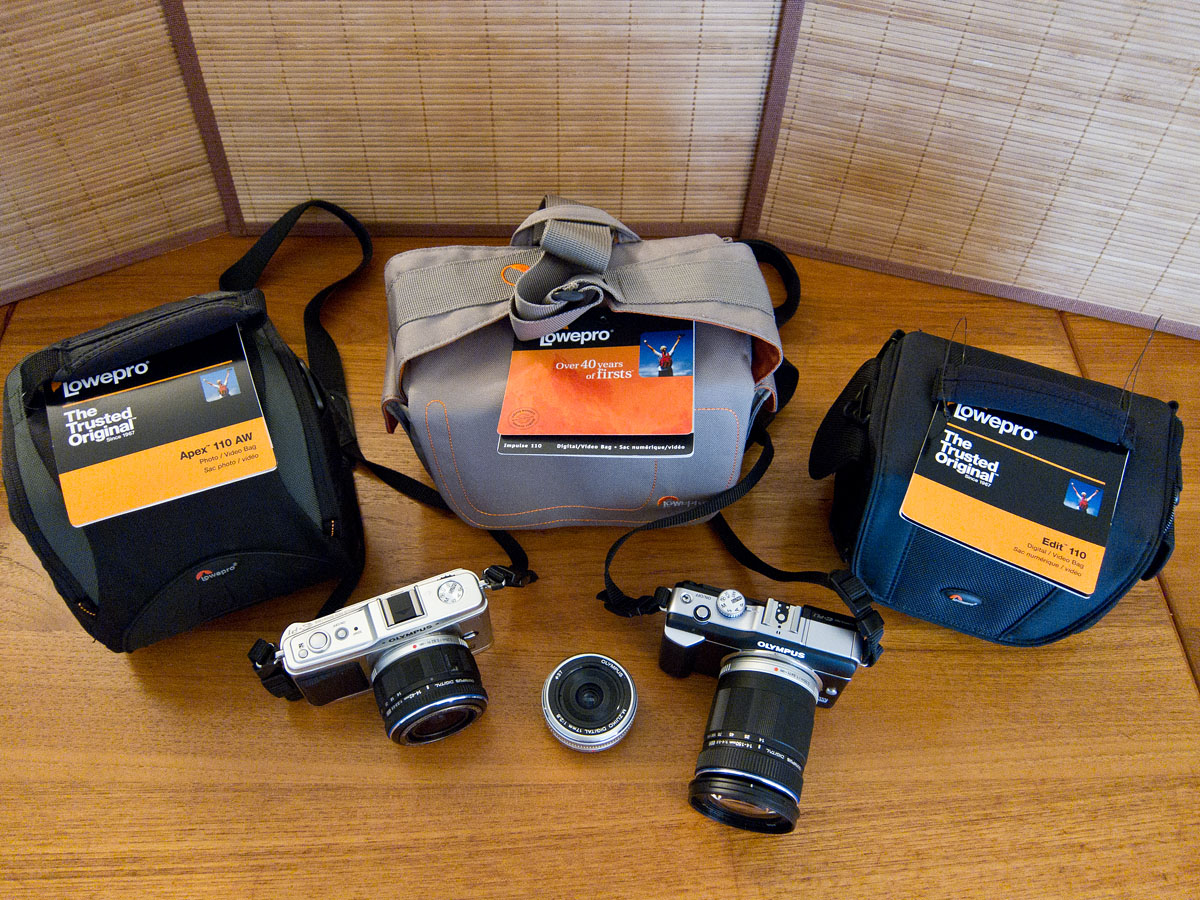
 From left to right: Lowepro Apex 110 AW, Impulse 110, and Edit 110 bags for compact DSLRs. Click on image to enlarge.
Lowepro Apex 110 AW ($40) -- For outdoor work where the elements come into play. Included All Weather cover, belt loop, shoulder strap, sliplock loops, memory card pouches, padded handle, rugged rubber trim, and micro fiber cloth. Heavily padded design.
Fits Olympus PEN with 14-150mm zoom lens, and Panasonic, Sony, and Samsung bodies with any zoom. Additional room for pancake lens (such as Panasonic 20mm, Olympus 17mm, or Sony 16mm). But no room for additional zoom lens other than what is mounted on the camera. Most rugged of three cases.
Lowepro Impulse 110 ($19) -- For urban work. Largest of the three bags with shoulder strap, top loop but no padded handle, side pockets and front document pocket.
Fits Olympus PEN with 14-150mm zoom lens, and Panasonic, Sony, and Samsung bodies with any zoom. Additional room for pancake lens (such as Panasonic 20mm, Olympus 17mm, or Sony 16mm) and kit zoom lens separately. Accessories can be stored in side pockets.
Lowepro Edit 110 ($17) -- Suitable for urban or outdoor work. Shoulder strap, padded top handle, 2 side pockets, zippered front pocket, zippered mesh pocket inside, and belt loop.
Fits Olympus PEN with 14-42mm zoom lens, and Panasonic, Sony, and Samsung bodies with kit zooms. Additional room for pancake lens (such as Panasonic 20mm, Olympus 17mm, or Sony 16mm). Accessories can be stored in side pockets, zippered front pocket, or zippered mesh pocket inside. Heavily padded, all purpose bag for those who don't use the long zoom lenses (such as the Olympus 14-150mm).
Bottom Line
Rugged outdoor types who like the longer zooms should consider the Apex 110 AW. It can withstand just about any environment and protect your gear. For those who need a bit more room and tend to work in urban environments, the Impulse 110 is an affordable choice. And shooters who sometimes venture into the great outdoors, but need a good all purpose bag at an affordable price should look at the Edit 110.
 Follow me on Twitter