Here's the problem when you click the new Olympus 12mm f/2.0 prime lens into place on the redesigned E-P3 body: You never want to take it off. Seriously.
I've been testing this combination for a few weeks, and every time I considered switching to the new 14-42mm zoom (which is very nice, btw), I found a reason to keep the 12mm mounted. Actually, there are a number of reasons:
- The 12mm f/2.0 looks amazing against the matte black body of the E-P3. The feel of the machined metal, design of the barrel, and that big objective glass in the front is addicting.
- It focuses fast. Olympus has overhauled the focusing system in the E-P3, and combined with the 12mm lens, the speed is blazing. (Also great with new 14-42mm, once I actually tried it.)
- Sharp. Edge to edge sharpness.
- Wide field of view. The 12mm prime is a 24mm equivalent on a full frame camera. (You double the focal length on micro four-thirds bodies.)
- Snap Focus. The focus ring can be pulled back toward the body allowing you to manually focus the camera with a dampened feel that harkens back to the day of great prime lenses. I'm also thinking of what I can do with this when recording full HD movies with the E-P3.

When I work with the E-P3 and 12mm prime, in all honesty, I feel like I have that top of the line German camera I always wanted, but could never afford. That doesn't mean this combination is cheap, but it's within my range.
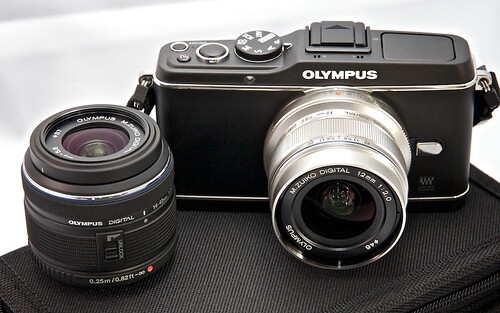
The new Olympus PEN E-P3 with the redesigned 14-42mm zoom is $899 US. The 12mm f/2.0 prime lens is $799 US. For about $1,700, you get a solid, state-of-the-art digital body, a zoom, and a fast prime lens. (As shown in the top photograph.) That's nice.
I'll be writing more about the E-P3 itself. You can read the basic overview of the camera here. And here's more information on the 12mm f/2.0 prime lens. I've published a set of images on Flickr that show you different views of the camera and some photos captured with the 12mm lens.
More to come on all of this!
The Digital Story on Facebook -- discussion, outstanding images from the TDS community, and inside information. Join our celebration of great photography!