This is The Digital Story Podcast #592, July 11, 2017. Today's theme is "DJI Spark - The Nimble Drone." I'm Derrick Story.
Opening Monologue
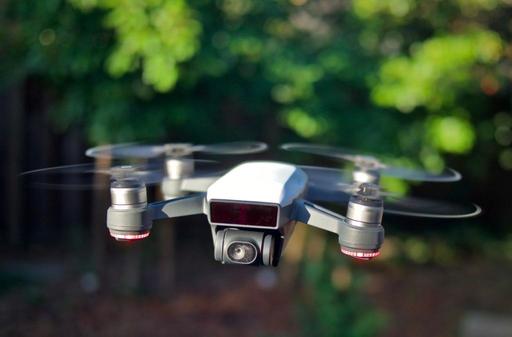
Quite frankly, drones were just too cumbersome to mess with. Since aerial photography was not essential to my business, I decided to bide my time until the right quadcopter was developed. Fortunately, I didn't have to wait too long. In June 2017, DJI released the Spark. It is truly the Nimble Photographer drone, and the top story for today's show.
DJI Spark - The Nimble Drone
One of the things I really like about the Spark is that I can carry it with me all the time in my Think Tank Retrospective 7 shoulder bag. It fits nicely in the front pocket, and it's like carrying a second camera. Except this camera can fly.
I don't lug around extra batteries or a controller. I'm sticking with the basic $499 kit. I have an extra set of props and the charging cable. That's it.
All of my testing has been using the iPhone or iPad mini as the controller. My preference is the iPad because of its additional screen real estate, plus my phone is free for other tasks during flights. The DJI GO 4 app is quite good.
So really, the only think I've added to my everyday kit is the svelt quadcopter itself. But the payoff is tremendous. Here are five reasons why I recommend the Spark for Nimble Photography.
- Built Like a Rock, but Much Lighter - You don't need to baby this device. It is solid. I carry it in a soft case in the front pocket of my Retrospective 7, and forget about it. When it's time to fly, the Spark is ready.
- Amazing Technology - Incredible use of GPS satellites, infrared detection, WiFi connectivity, still photography, video recording, and aerodynamics. When combined with a state of the art smartphone, it's mind blowing what you have in the palm of your hand for $500.
- Excellent for Still Photography - The 12 MP camera is quite good. Jpegs only. But on the fly you have options for single shot, burst mode, auto exposure bracketing, timed shot, shallow focus, and panorama photography. You can use full auto, or switch to manual exposure mode as needed. You can change both the ISO setting and white balance. All of this from your smartphone.
- Intelligent Flight Modes - For HD video recording, you can take advantage of settings such as Active Track and Tripod mode. For Active Track, you ID a subject, and the Spark follows it while recording. For Tripod mode, it becomes super steady and moves slowly allowing for the sexy screen saver videos that we see on Apple TV.
- Learn a New Skill - Just like I had to learn all about audio to become a photographer podcaster, I'm learning about aeronautics to become and aerial photographer. And it's fun. I'm using an app called Kittyhawk to review flight conditions such as wind and airspace clearance, I'm aware of obstructions and airport, and I'm learning how to take pictures from a completely new perspective.
I did register with the FAA because I may use some of my imagery commercially. Even though the Spark is super nimble, it's a serious aircraft. And I respect both its capabilities, and the responsibilities that come with its use.
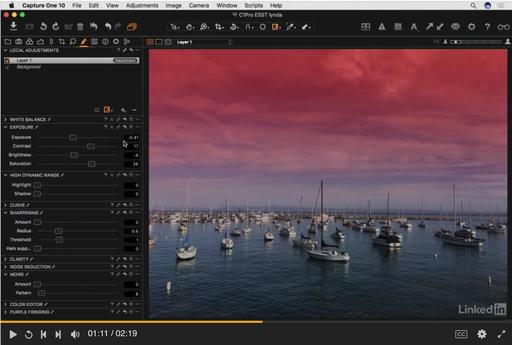
Capture One Classroom
I've been trying to figure out a way to bring more personalized training to photographers without them having to travel. It's one thing to get on a plane to photograph wine country or the French Quarter, but not quite as alluring to travel far to sit in a classroom for two days.
As a result, I've designed a new approach called, The Nimble Classroom. And the first course series offered as part of this program will be for Capture One Pro. Here are the highlights.
Capture One Classroom - Session 1 - Catalog Management
Saturday, August 19, 8am PDT/11am EDT
Designing your Capture One Pro catalog to meet your needs as a photographer is an important first step toward creating a digital asset manager that is easy to use, effective, and enjoyable.
In this class, Derrick Story shows you best practices for creating a top notch catalog environment. Participants may submit their unique questions before class, allowing Derrick to incorporate that content into his teaching. And there will be live Q&A sessions throughout the course.
Class participation is limited to 6. The course may be viewed on a computer, tablet, or smartphone. Details will be sent to you prior to class.
Tuition for the one-day session is $129. No plane fares, hotel rooms, or rental cars. You can reserve your spot by visiting The Nimble Classroom on theNimblePhotographer.com
Framing Tip of the Month
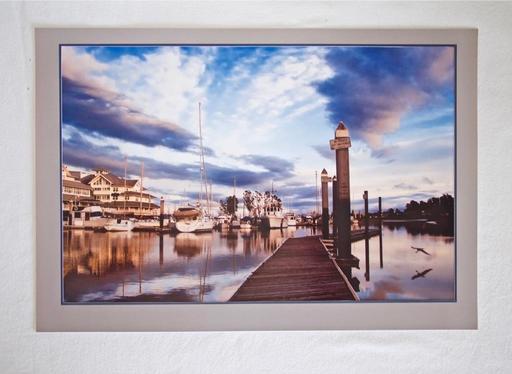
One thing your professional framer will tell you is that some pieces of art «need» help. If a picture is a non-standard size, either too large or too long, or the focal point of the picture is very close to the lower edge of the image, then the mat can be "pulled down".
This means that the lower edge of the mat is wider compared to the upper and side edges, creating a feeling of proportionality. This same technique can be applied in cases where two pictures of different sizes are shown together. If the inner edges of both mats are made slightly narrower, the two pictures will look more balanced.
ImageFramer on Facebook
For more tips like these, and lots more, visit ImageFramer on Facebook. And give your images the ImageFramer look they deserve.
We want everyone to enjoy the benefits of the new ImageFramer. ImageFramer 4.0 is a free upgrade for ImageFramer 3 customers. Note that it requires macOS 10.11 (El Capitan) or later. TDS listeners can receive a 20 percent discount by visiting: our ImageFramer landing page.
Updates and Such
Big thanks to all of our Patreon members!
B&H and Amazon tiles on www.thedigitalstory. If you click on them first, you're helping to support this podcast. And speaking of supporting this show, and big thanks to our Patreon Inner Circle members.
And finally, be sure to visit our friends at Red River Paper for all of your inkjet supply needs.
Texas-based Red River Paper recently announced a new fine art paper, Palo Duro Etching. The new paper is a 100 percent cotton rag paper and is free of optical brightener additives. The paper is designed to offer warm white tones, deep blacks and a subtle texture to accurately recreate traditional darkroom fine art prints.
See you next week!
More Ways to Participate
Want to share photos and talk with other members in our virtual camera club? Check out our Flickr Public Group. And from those images, I choose the TDS Member Photo of the Day.
Podcast Sponsors
ImageFramer 4 - ImageFramer is used by artists, professional and amateur photographers, scrapbookers, framers, and people who simply want their family photos to look better.
Red River Paper - Keep up with the world of inkjet printing, and win free paper, by liking Red River Paper on Facebook.
The Nimbleosity Report
Do you want to keep up with the best content from The Digital Story and The Nimble Photographer? Sign up for The Nimbleosity Report, and receive highlights twice-a-month in a single page newsletter. Be a part of our community!
Want to Comment on this Post?
You can share your thoughts at the TDS Facebook page, where I'll post this story for discussion.