Recently in Capture One Pro

Culling Is Better in Capture One 23, Much Better

I just spent 15 minutes culling 300 photos from the Eastern Sierra. Thanks to the new Cull Images feature in Capture One Pro 23, the process was not only painless, but enjoyable. Here's how it works.

C1P23-Cull-2.jpg 
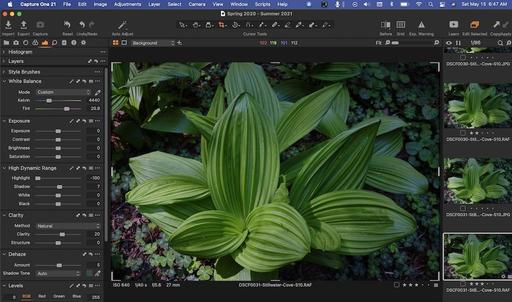
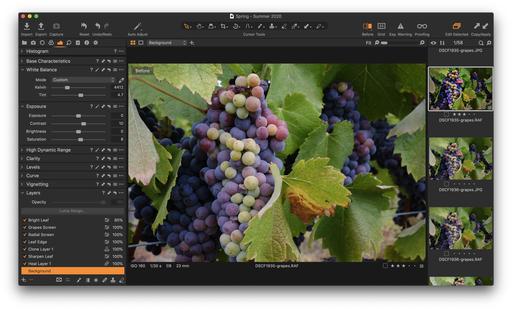
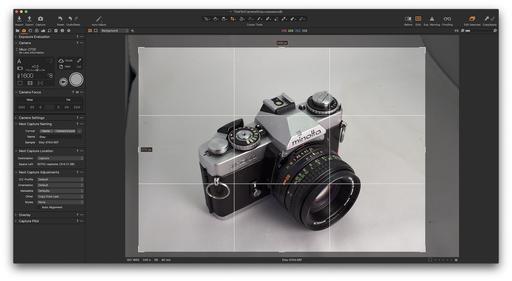
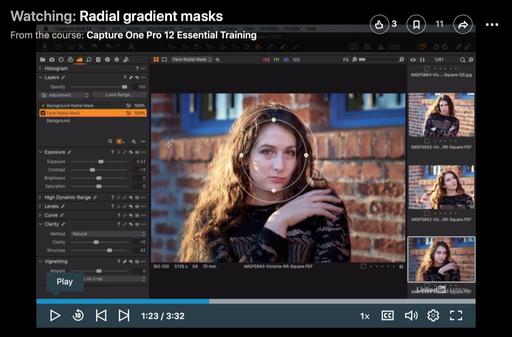
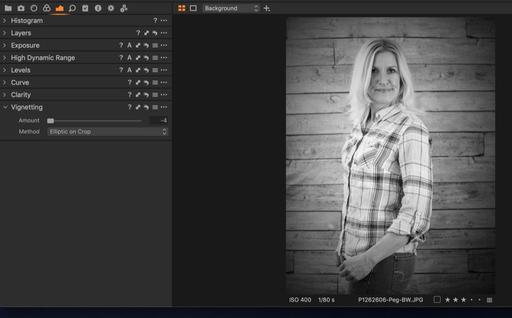
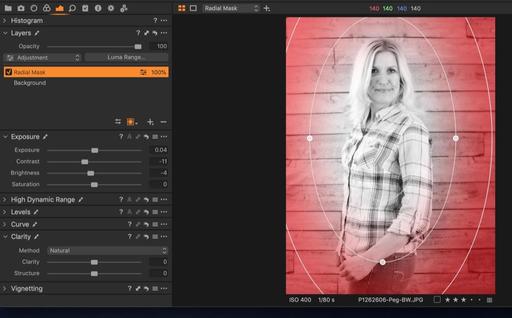
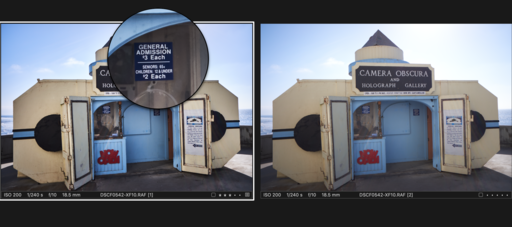
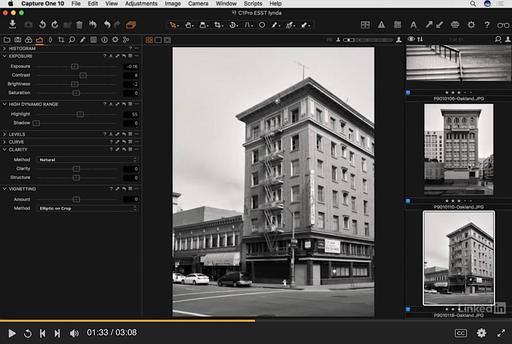
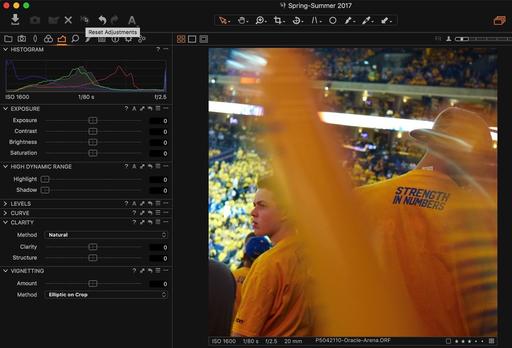
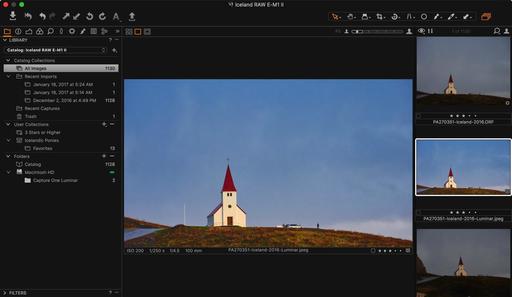
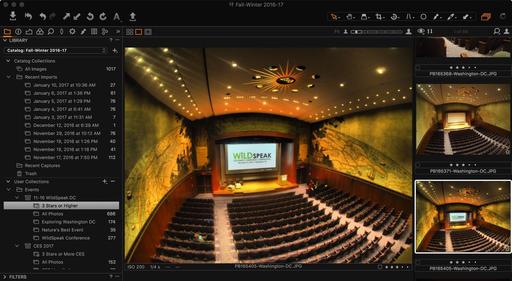
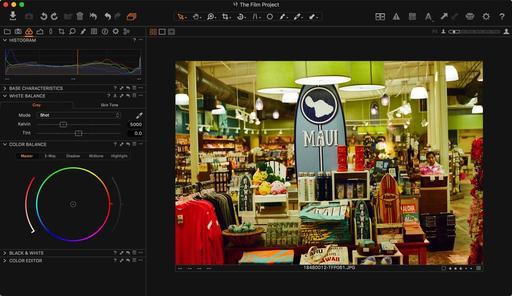
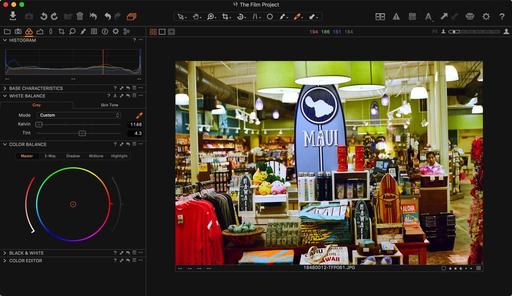
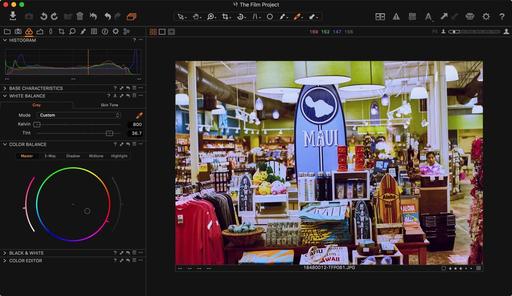
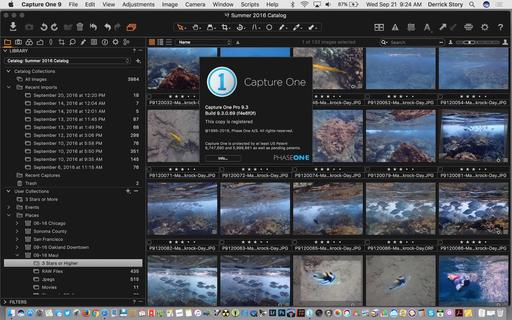
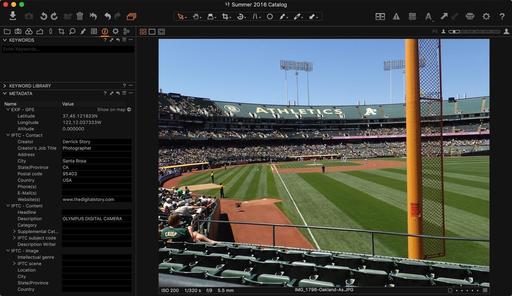
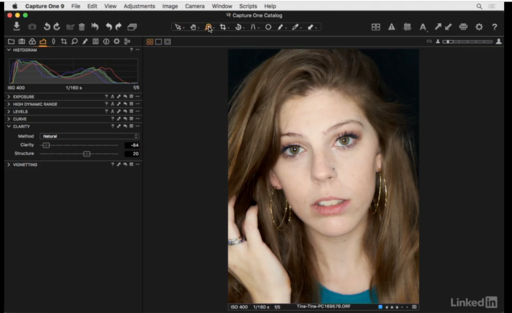
Culling images in Capture One Pro 23.

Two Basic Approaches to Using the Cull Images Tool

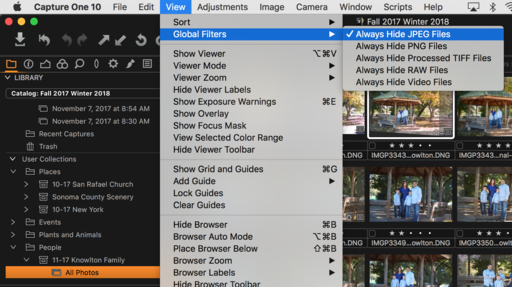
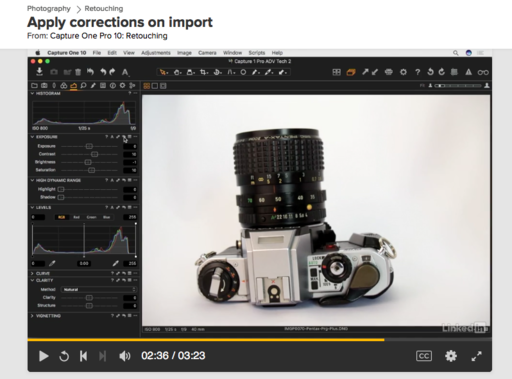
There are two basic approaches to culling in C1P 23: at the time of import, or after the images are in the catalog. There's a big difference between the two.

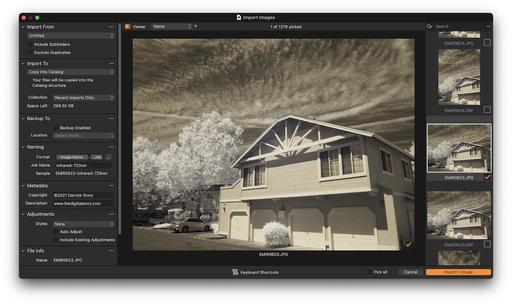
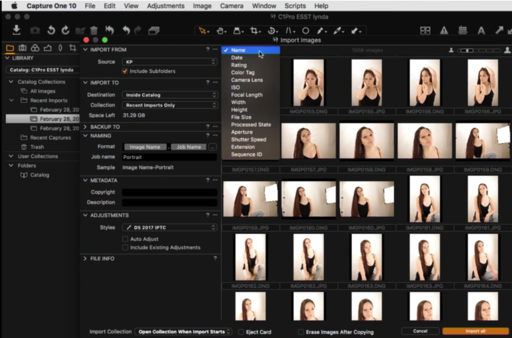
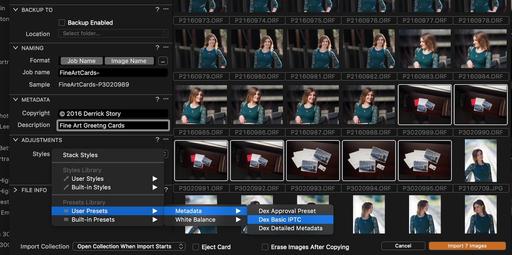
If you're culling directly off the card in the import dialog box, you're determining which images will be copied into the catalog. Pictures that aren't marked for import will remain on the card only. This is presorting in the truest sense.

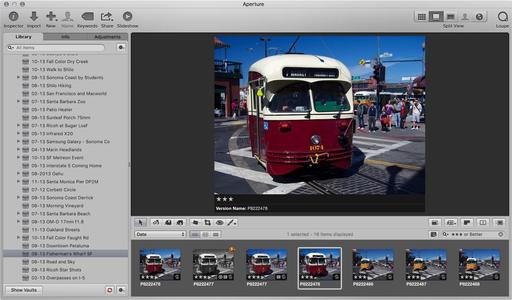
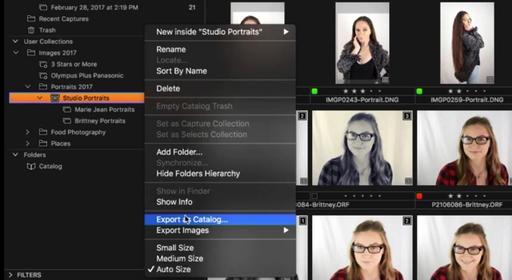
The second approach is to bring everything into the catalog, then cull, using the star and color label tools to rate the pictures. The upside of this is you have everything you shot on the computer. The downside is you're bringing in a lot of content that you may never use.

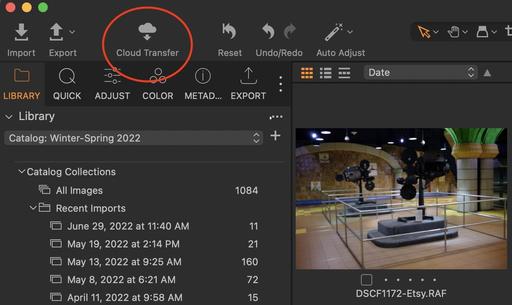
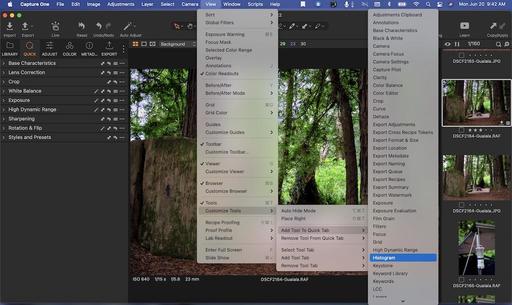
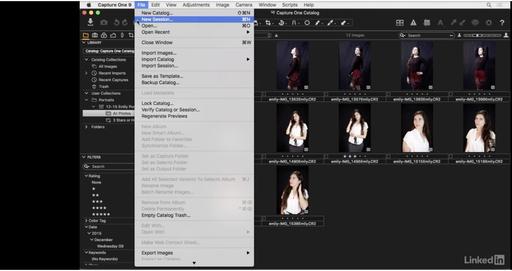
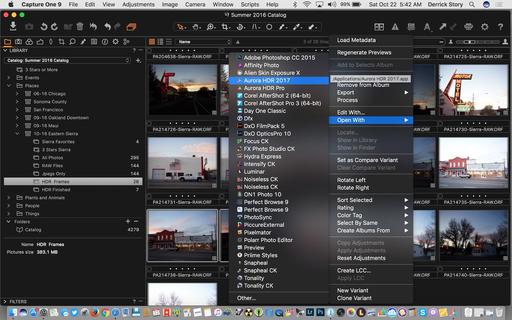
Enabling Cull Images

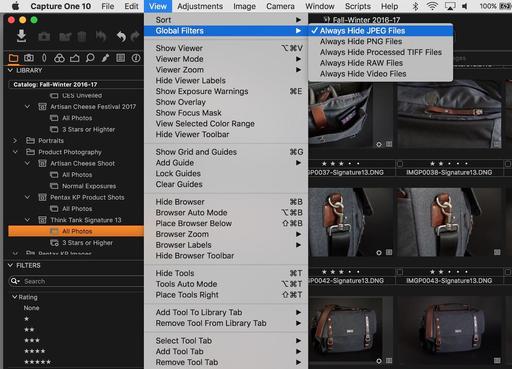
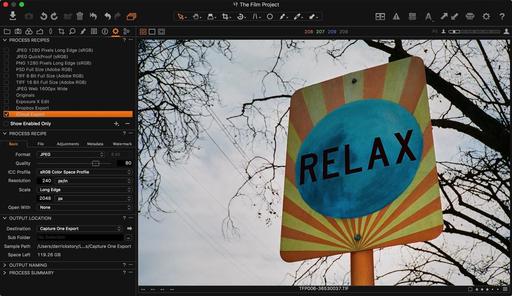
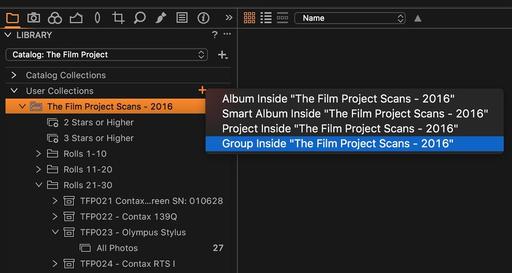
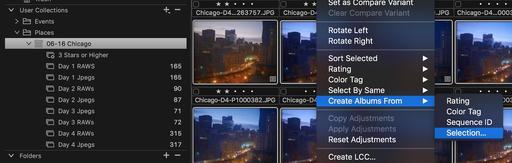
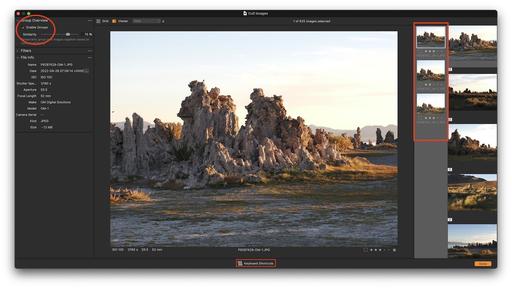
In the Group Overview panel on the left side, make sure Enable Groups is checked. If the images are already on the computer, click on the Cull icon in the upper left first to start the process.

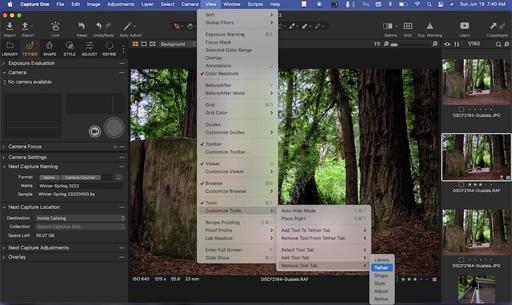
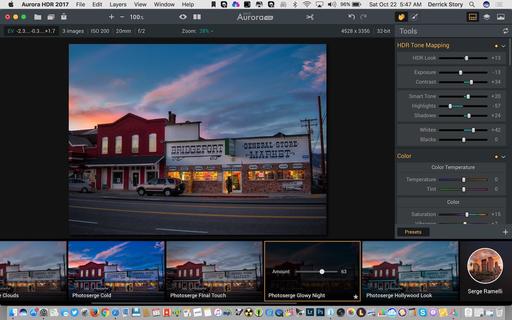
The Similarity default is 75%. That has worked well for me, and I just leave it there unless otherwise needed. The computer will take a few moments to gather the pictures. Once it has, double-click on an image to get the ball rolling.

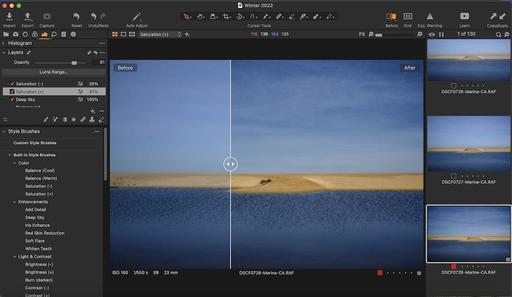
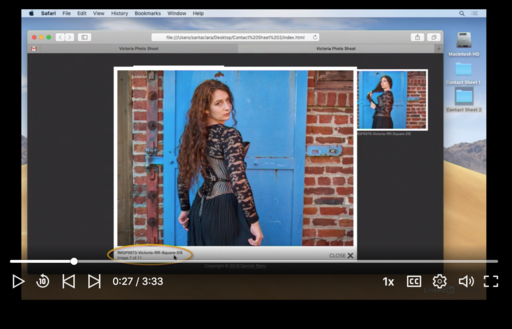
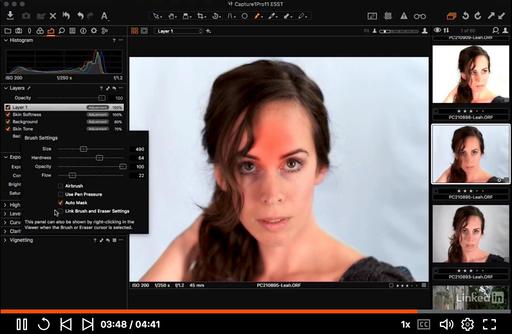
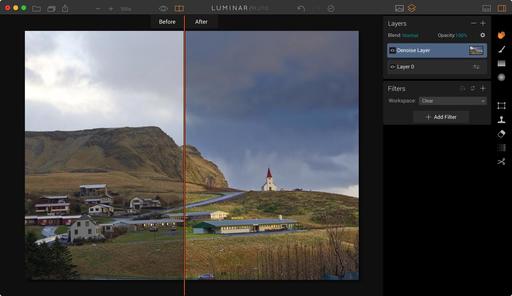
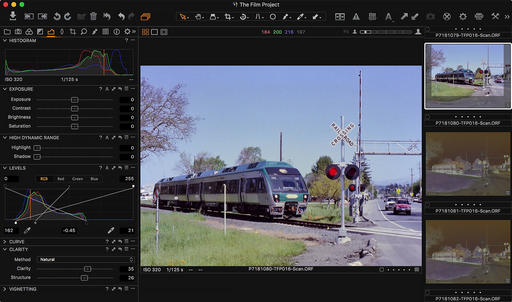
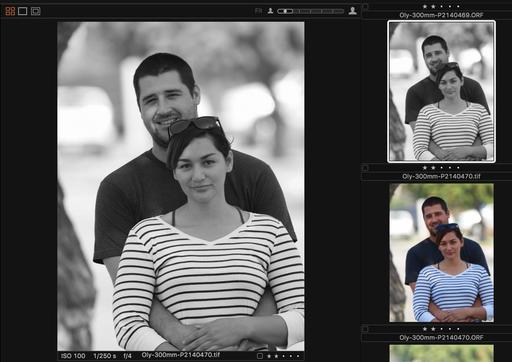
You will see an enlarged version of the shot you clicked on, plus two vertical columns on the right. The column next to the selected picture contains the images in that group. You can navigate through them using the Up and Down arrow keys.

The column to the far right contains all the images with the group markings. You can navigate from group to group using the Right and Left arrow keys.

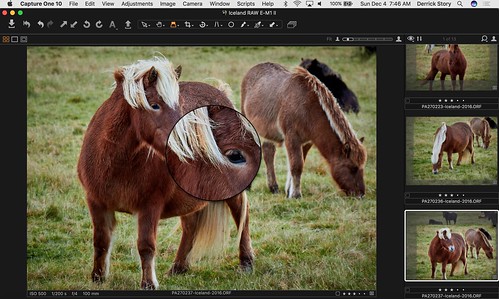
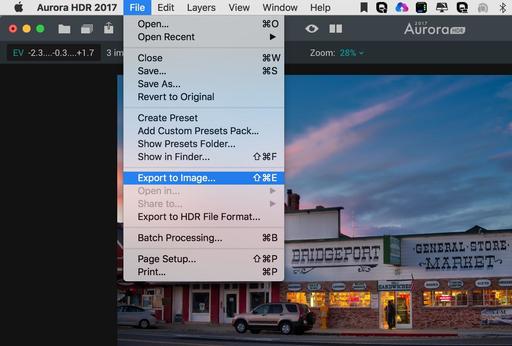
If you want to zoom in on a displayed picture, double-click on it for closer examination. Once you're finished with the process, click the Done key in the lower right to return to the standard Capture One interface.

That's all there is to it! Easy. If you forget the keyboard shortcuts, they are available at the bottom of the interface. You can add star ratings via the number keys. The entire process goes very quickly once you get going. Navigate via the arrow keys and mark with the numbers.

C1P23-Sorted.jpg 
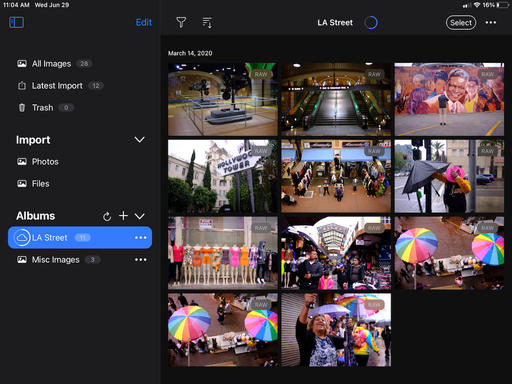
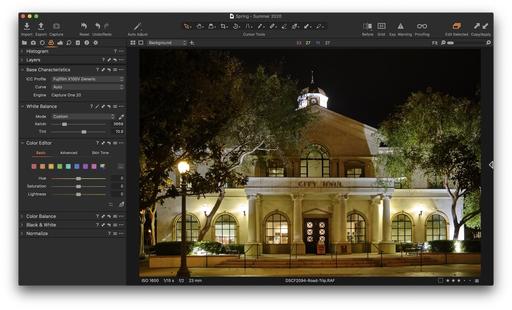
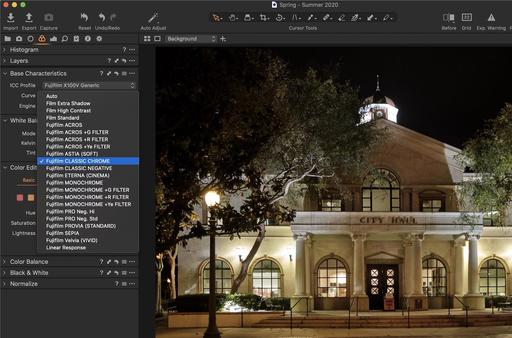
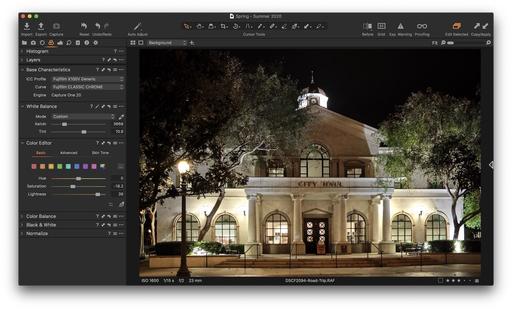
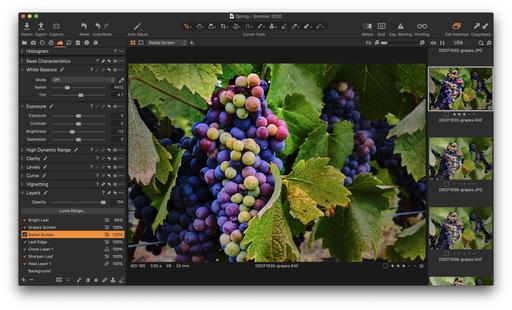
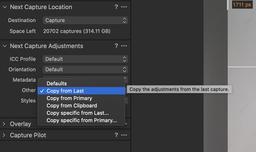
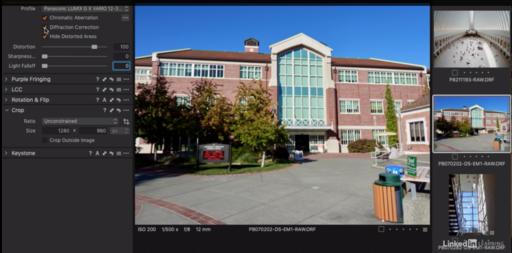
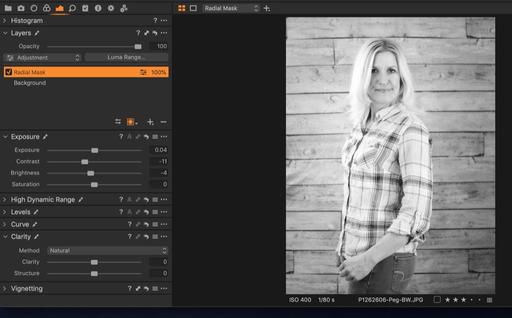
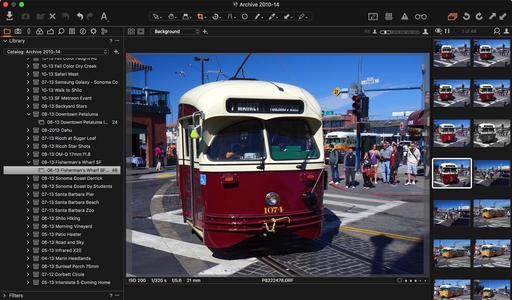
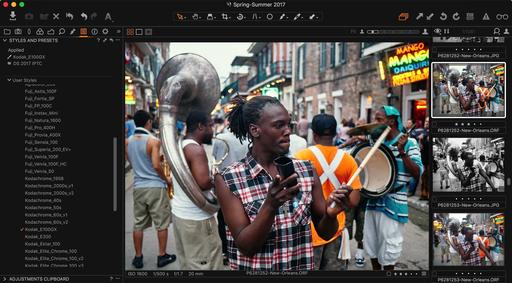
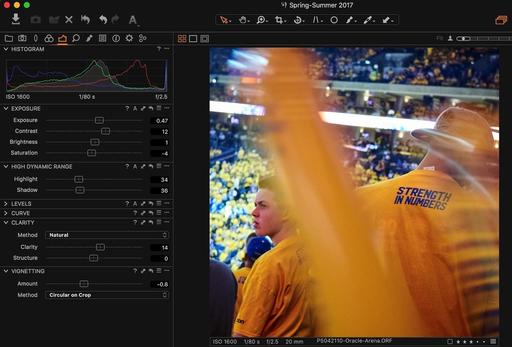
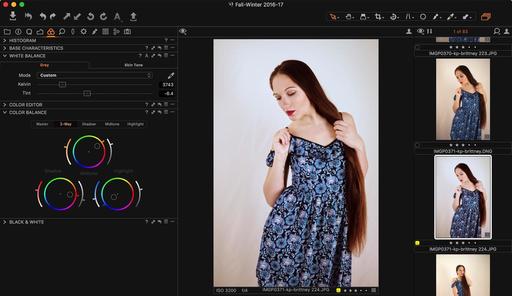
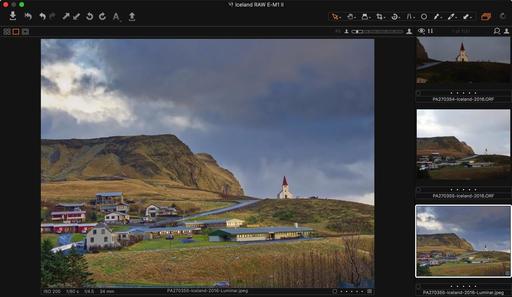
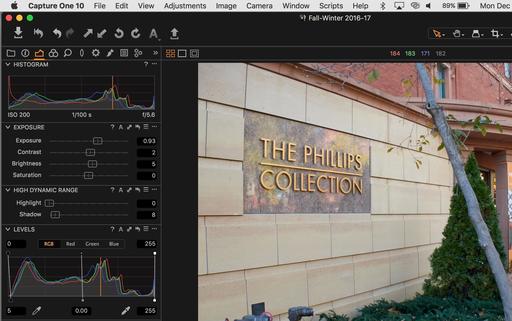
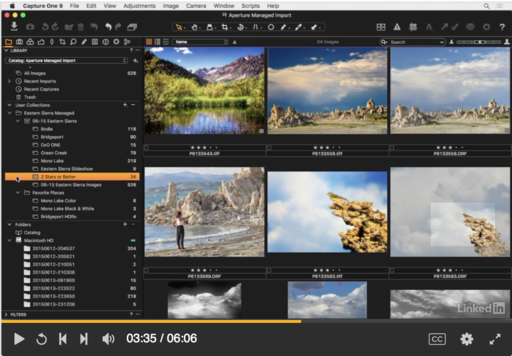
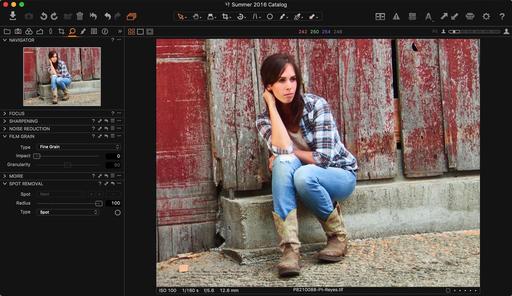
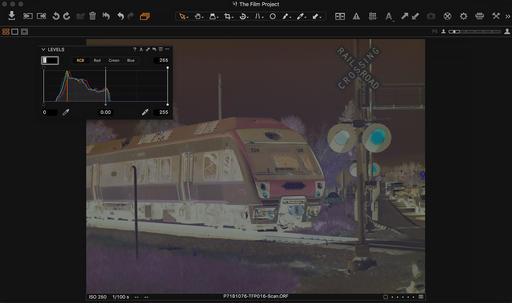
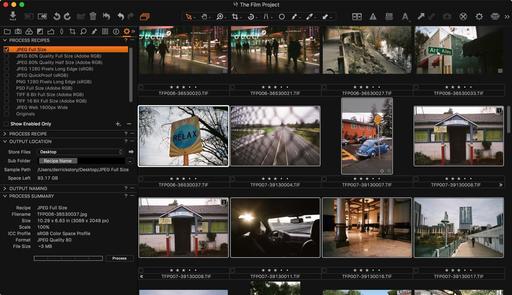
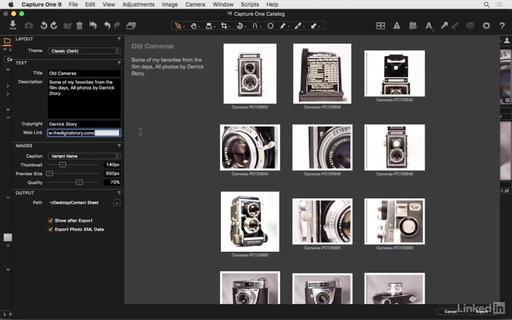
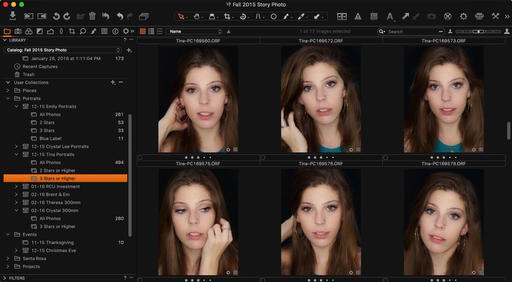
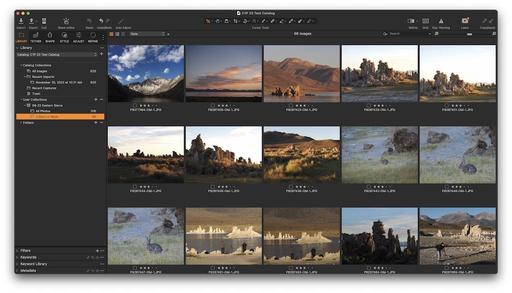
Sorted images in Capture One Pro 23.

Final Thoughts

Culling is one of the least exciting activities (other than keywording). Yet the engineers at Capture One have found a way to make this enjoyable.

Generally speaking, I recommend that you save culling for after the images are already copied to the catalog. But there might be those times, such as grabbing your favorites off a cherished memory card, where culling at import makes sense. I must admit, it's fun to see only your best shots flow into Capture One.

Capture One Pro 23 is available now from capture one.com.

You can share your thoughts at the TDS Facebook page, where I'll post this story for discussion.

You're going to hear a lot of pros and cons about the just-released iPad version of Capture One, just like you would with any V1 software. But the fact of the matter is that this is a great start for mobile photographers who like to shoot RAW.

capture-one-ipad-1024.jpeg

And to make it an even better start for you, here are 5 tips to get you headed in the right direction.

Its Minimum Specs are Conservative

Technically, according to the FAQs, Capture One only runs on newer iPads. For example, my iPad mini 5 is not officially supported, but I've been using the software on that device without any problems since the official release.

There is a 7 day free trial period if you want to test your iPad. If you're only a generation off, I would definitely try it out.

Dig Out Your iPad SD Card Reader

The joy of Capture One on the iPad is its beautiful RAW processing. And unlike tossing around Jpegs wirelessly from device to device, a SD card reader is the best way to go for RAW files.

So, it's time to dig around in the bottom of your gadget bag to retrieve that iPad card reader. You'll be glad you did.

Load All of the Styles You Own on to the iPad

The user interface for the adjustment tools on the iPad are good, but your existing Styles for the desktop version of the app work on the iPad as well, and they are easy to use.

You'll always know which Style you applied, which is really helpful if you want to use it again on another image. And it's easy to stack Styles too.

Here are the instructions for adding Styles to the iPad. I really like using them with this workflow.

Add Cloud Transfer

At the moment, Cloud Transfer isn't anything to get really excited about. But it is the easiest way to move an album of freshly edited iPad images to your desktop application.

cloud-transfer.jpg Add Cloud Transfer to your desktop app toolbar.

The first thing you'll want to do is add Cloud Transfer to your top toolbar in Capture One Pro on the computer. Here are the instructions for setting up Cloud Transfer.

IMG_0255.jpeg An album of iPad images being uploaded from the iPad to the cloud.

This is one area that we will see workflow improvements in the coming versions.

Remove from Cloud after Transfer

Since you're driving on a one way street here (iPad to desktop), you should remove transfers from the cloud server after completion.

"Once you have transferred your photos, you can go back to your iPad and in the three-dot menu for an album you will find an option to "remove from cloud". This will free up space for your next uploads. If you also want to remove the photos from the iPad, you can delete them by selecting them and pressing the delete button. They will be moved to the trash if you want to restore them; if you remove them from the trash too, they will be completely gone from your iPad."

How you manage the RAW files you've uploaded to the iPad will depend on your particular workflow. Some folks will want to keep some of the images on the mobile device to play with while on the go. For others, once the files have been moved to the desktop application, they will want to free up space on their device and in the cloud.

Final Thoughts

Once I dug into Capture One on the iPad, I enjoyed editing my images there. You can bring in content from Files, Photos for iOS, and of course camera memory cards.

It's too early to tell how my workflow will shake out with this new option. But the journey looks like a lot of fun.

You can share your thoughts at the TDS Facebook page, where I'll post this story for discussion.

One of the new features in the Capture One Pro 15.3 update is a redesigned tools panel. This is where you access everything from Exposure to Spot Removal. And if you haven't customized your Tools panel in a while, the timing couldn't be better to do so.

Start by Removing Tool Tabs You Don' Need

Remove-Tool-Tab-1024.jpg Removing tools you don't need.

First you want to clear up a little space at the top of the Tool Tab by removing any Tool Tabs that aren't part of your daily workflow. In my case, the Tether Tab is the first to go. I rarely use is, and I don't need it taking up valuable real estate.

Go to View > Customize Tools > Remove Tool Tab and select from the list the one you want to take off the top of the column. Keep in mind that this Tool Tab isn't deleted, just repositioned.

Also note that you can customize the tools within any tab. So if you want to remove the Refine Tab, but want Sharpening easily available, you could add that tool to another tab such as the new Quick Tab.

Customize Within the Tool Tabs

Add-Tool-1024.jpg Adding a Tool to a Tool Tab

Once you get your basic categories set at the top of the Tools column, you will probably want to customize a few of the Tools within each tab. Open the Tab you want to modify, then go to View > Customize Tools > Add Tool to [selected] Tab. You can also remove tools as well to tailor each Tab exactly to your liking.

If you want to reorder the Tab icons at the top of the Tools column, hold down the Command key and drag the icon to its new location.

Save Your Workspace

save-workspace.jpg

It's a great feeling to get your Capture One Pro house in order. Now is the time to save your Workspace so you can return to it at any time. This is particularly handy if you have different workspaces for different workflows, or if you have multiple photographers using the same computer.

Click on the three vertical dots at the top of the Tool Tab column. Save the Workspace, and you're set. This is also where you can move the Tool Tabs column from one side of the interface to the other.

Final Thoughts

Customizing your Tools workspace feels good and improves efficiency. And now that we have new tabs with a fresh design, this is the perfect time to tidy up your Capture One Pro interface.

You can share your thoughts at the TDS Facebook page, where I'll post this story for discussion.

When we work on specific parts of our pictures, the editing process tends to slow down as we create masks and screens. But in Capture One Pro, you can still work on segments of the photo, and do so quickly with Style Brushes.

style-brusheds-before-after-1024.jpg I used three different Style Brushes for a quick edit of this image. One for the sky, one for the sand, and another for the water.

The Style Brushes panel is located beneath the Layers panel in the Exposure tab. If you open up the panel and click on Built-in Style Brushes, you'll see an array of adjustments for color, tone, and enhancements. Simply choose the style brush you want, start painting, and Capture One Pro will create the new layer for you with the name of the brush.

You can see the mask itself by pressing the M key, brush adjustments are located in the lower left of the panel (the two arrows icon pointing opposite directions), and you can change the opacity of the adjustment with the Opacity Slider near the top of the panel.

Once you've finished using a particular style brush, be sure to return to the Background layer for your overall edits such as Clarity and Sharpness.

Style Brushes are an often overlooked tool in Capture One Pro. But they are very handy for quick edits on specific areas of the image such as sky and foreground.

You can share your thoughts at the TDS Facebook page, where I'll post this story for discussion.

Capture One Pro 21 includes many terrific new tools, including Speed Edit, Dehaze, and HEIC support. But the feature I've been enjoying most is the Import Browser that makes it easy for me to decide what I want to bring into the catalog, and what to leave behind.

import-browser-1024.jpg The Capture One Pro 21 Import Browser

In my latest training for LinkedIn Learning, titled Capture One Pro 21 Essential Training, I cover not only Capture One Pro 21, but the new things added with the point 1 update, including the fabulous Import Browser.

Here's an overview of the training to whet your appetite.

CaptureOne-Screenshot-1024.jpg Getting to know Capture One Pro 21 from Capture One Pro 21 Essential Training by Derrick Story

Capture One Pro is a complete digital photo management and editing application for professional photographers and serious enthusiasts. Photographers who appreciate outstanding RAW processing, expert color control, and logical organization should consider Capture One Pro for its comprehensive feature set. In this course, professional photographer and instructor Derrick Story helps you learn the basics quickly, then takes you deeper into the application to master its finer points. For seasoned users, Derrick also covers all the new features in version 21, including Speed Edit, the Dehaze slider, and Style Brushes that allow you to enhance specific areas of a photo. To wrap up, he shares tips and techniques that can help you ensure your workflow is as efficient as possible.

I hope you enjoy the show!

You can share your thoughts at the TDS Facebook page, where I'll post this story for discussion.

When I'm out exploring urban settings at night with my Fujifilm X100V, I often encounter mixed lighting situations. Because different types of bulbs are used, they are hard to tame with a single white balance adjustment.

Mixed-Lighting-AS-Is.jpg I applied a White Balance adjustment to this image, but still wasn't happy with the overall color.

In Capture One Pro 20, my next step is to look at the color curve options. I like these because they address the overall appearance of the photograph so the look hangs together as much as possible. One of my favorites for this type of challenge is the Classic Chrome curve available for Fujifilm cameras. (Depending on your camera, the available options will be different in this menu.)

Color-Curve-Classic-Chrome.jpg Applying the Classic Chrome curve helped substantially. Getting better!

I still wanted to tone down that odd yellowish color a bit more. So I went to the Color Editor panel, enabled the Color Picker, and selected that yellow. I decreased the saturation and increased the lightness for that hue.

Color-Editor.jpg The Color Editor helped me tone down and brighten up that yellowish hue.

All of these corrections only take a minute or two, but they make a world of difference.

Corrected-DSCF2094-Road-Trip.jpg Finished image: Fujifilm X100V, ISO 1600, 1/15th, f/2.0, RAW. Photo by Derrick Story.

Learn Capture One Pro 20 Quickly

If you're new to Capture One Pro, you may want to check out my latest online class, Capture One Pro 20 Essential Training on LinkedIn Learning, or, if you're a lynda.com subscriber, you can watch it there as well. It will get you up and running in no time at all.

If you don't have Capture One Pro yet, you can download the 30-day free trial (Mac/Win). No credit card is required, and it's a fully functioning version.

There are product links in this article that contain affiliate tags. In some cases, depending on the product, The Digital Story may receive compensation if you purchase a product via one of those links. There is no additional cost to you.

You can share your thoughts at the TDS Facebook page, where I'll post this story for discussion.

Catalog or Session in Capture One Pro?

As new users come to Capture One Pro, I'm hearing a familiar question from them: Should I use a catalog or a session when I start a new library? My answer is: "Well, that depends." Click on the link below to watch a 2-minute video that explains the differences.

session-vs-catalog.jpg

Catalog vs. session: How are they different? from Capture One Pro 9 Essential Training by Derrick Story

If you do decide to use a session for a temporary work area, such as sorting out a wedding or taking your laptop on vacation, remember you can use the Import Session command to incorporate the session into your catalog, if you need to.

Even though I use catalogs the majority of the time, I do use sessions for my tethered shooting for product shots. If I want to add those images to my catalog, I can. But generally speaking, I don't.

Hope this helps clear the muddies waters a bit.

Learn Capture One Pro 20 Quickly

If you're new to Capture One Pro, you may want to check out my latest online class, Capture One Pro 20 Essential Training on LinkedIn Learning, or, if you're a lynda.com subscriber, you can watch it there as well. It will get you up and running in no time at all.

If you don't have Capture One Pro yet, you can download the 30-day free trial (Mac/Win). No credit card is required, and it's a fully functioning version.

You can share your thoughts at the TDS Facebook page, where I'll post this story for discussion.

I still have Photoshop, but I'm so happy that I don't need it often thanks to layers in Capture One Pro 20. And I was reminded of that joy again today while editing this grape image.

Sonoma County Grapes Sonoma County Grapes - Fujifilm X100V, f/8, 1/30th, ISO 160, processed in Capture One Pro 20. Photo by Derrick Story.

I really like the unique variety in this bunch, something that I don't see often. But there were also a few distracting elements that I knew I would have to address in post. I captured the image in RAW with the Fujifilm X100V, then loaded the files into Capture One Pro 20 when I returned home. Here's what it looked like before I started working on it.

C1P-Not-Edited.jpg Not edited version of grape shot.

One of the biggest distractions for be was the ugly leaf just to the right of the grapes. In the old days, that would have guaranteed a trip to Photoshop. But the cloning and healing tools have improved a lot in Capture One. So I stayed home and addressed the issue there.

I actually started with the healing brush first, then touched up with the clone tool. Each on separate layers. I still have a bit more fine tuning to do, but it's coming along nicely. Here's a look at where I am now with the picture. You can see the layers listed on the left of the screen.

C1P-Edited-With-Layers.jpg Editing in progress with the grapes.

Another adjustment that I made was tandem radial screens for the grape bunch. The first radial screen excluded the grapes and worked like a sophisticated vignette. Then I copied the mask, inverted it, and brightened up the fruit a bit. This is one of my favorite techniques.

All in all, I have seven layers plus the background. They are very easy to manage, and quite powerful.

I'm sure I'll have to fire up Photoshop in the future for an image. Just not sure when.

Learn Capture One Pro 20 Quickly

If you're new to Capture One Pro, you may want to check out my latest online class, Capture One Pro 20 Essential Training on LinkedIn Learning, or, if you're a lynda.com subscriber, you can watch it there as well. It will get you up and running in no time at all.

If you don't have Capture One Pro yet, you can download the 30-day free trial (Mac/Win). No credit card is required, and it's a fully functioning version.

There are product links in this article that contain affiliate tags. In some cases, depending on the product, The Digital Story may receive compensation if you purchase a product via one of those links. There is no additional cost to you.

You can share your thoughts at the TDS Facebook page, where I'll post this story for discussion.

This has been the year of making my workflows better, and one of the improvements that I wanted to make was increasing the efficiency of creating product shots for TheFilmCameraShop. My theory was that using Capture One's excellent tethered capability would speed things up. And now that I've done it, I was right.

DSCF1790.jpeg

Tethering involves connecting a supported camera via USB cable directly to a computer running Capture One Pro. Once the connection is made, the camera will appear in the Capture Tab where you have a myriad of options and controls.

You can either control the camera from the application, or (as I do) shoot with the camera using its shutter button and instantly view the image on the computer screen. The advantage of this is you're looking at a large, detailed rendering where you can inspect every detail on the fly (and quickly) before moving on to the next shot. There are no surprises with tethered photography.

C1P-Tethered-2.jpg

C1P-Tethered-3.jpg

One of the features that really helps speed up this workflow is the "Copy from Last" setting in the "Next Capture Adjustments." It works like this: You take the first shot, then apply a few tweaks like cropping and exposure. The application remembers those adjustments and applies them automatically to the next image. It's fantastic.

The speed of the shoot really picks up at this point. Take a picture, adjustments applied, review it, take the next picture.

I've set up my shooting bay next to the worktable with my iMac. It's super convenient. My capture camera is a Nikon D700 with a modified focusing screen that gives me a micro prism collar and matte surface. This makes it easy to manually focus the Voigtlander Ultron 40mm f/2 SL IIS Aspherical lens. (BTW: the Voigtlander is a great lens for this task. It has a CPU chip for the Nikon, focuses as close as 1:4, and has beautiful image quality.) If I need more resolution than the 12MP from the D700 (which I rarely do), then I can switch to the Nikon D610 which has 24MP. But that feels like overkill for catalog product shots.

DSCF1787.jpeg

Capture One Pro tethers out of the box with most Nikons and Canons, and selected Sonys and Fujifilm cameras. Unfortunately, there isn't tethered support for Olympus and Panasonic Micro Four Thirds. Too bad, because my EM-1 Mark II with the 30mm macro would be a great capture device for this workflow as well.

Aside from that disappointment, what I really like about this system is that when I'm done with the shoot, I'm done. I've totally eliminated the post production step. I simply output my selects, upload them to TheFilmCameraShop, and I'm finished. I've just improved my efficiency for creating new catalog pages.

C1P-Tethered-5.jpg

One final note: Product photography isn't the most glamorous activity when you're a street photographer at heart. But I have to say, using the classic Nikon D700 with an upgraded SLR-style focusing screen and the beautiful Ulton 40mm lens that's as smooth as butter to operate, has made this otherwise mundane task quite enjoyable. Switching to tethered with Capture One Pro was the icing on the cake.

Learn Capture One Pro Quickly

If you're new to Capture One Pro, you may want to check out my latest online class, Capture One Pro 20 Essential Training on LinkedIn Learning, or, if you're a lynda.com subscriber, you can watch it there as well. It will get you up and running in no time at all.

If you don't have Capture One Pro yet, you can download the 30-day free trial (Mac/Win). No credit card is required, and it's a fully functioning version.

Product Links and Comments

There are product links in this article that contain affiliate tags. In some cases, depending on the product, The Digital Story may receive compensation if you purchase a product via one of those links. There is no additional cost to you.

You can share your thoughts at the TDS Facebook page, where I'll post this story for discussion.

As photographers, much of our image publishing is via the Web, which usually means that we reduce the size of the original image before posting.

In Capture One Pro, as we simultaneously export and reduce size (sample down), we can also compensate for any loss of detail that happens as we prepare the file for publishing. In the export dialog box we can go to the Adjustments tab and set up Output Sharpening. Here's a look at that process.

Applying sharpening while exporting a photo from Capture One Pro 20 Essential Training by Derrick Story

I like that there are options for both screen and print. For example, if I know I'm going to print this image on matte paper, the output settings would be much different than those for gloss, or for a Web page for that matter.

If you're curious about how easy output sharpening can be in Capture One Pro, watch the movie at the top of this article. It's a solid introduction to this pro feature.

C1P-Output-Sharpening.jpg

It's from my latest online class, Capture One Pro 20 Essential Training on LinkedIn Learning, or, if you're a lynda.com subscriber, you can watch it there as well.

If you don't have Capture One Pro yet, you can download the 30-day free trial (Mac/Win). No credit card is required, and it's a fully functioning version.

Some applications have some form of output sharpening, but very few provide the control that's available to you in Capture One Pro.

You can share your thoughts at the TDS Facebook page, where I'll post this story for discussion.

Layers Made Easy in Capture One Pro

I was never a layers guy. I wanted to be, but the software of the past just didn't resonate with me. Then, not too long ago, Capture One Pro introduced layers into their photo management and editing app. Everything changed for me (well, at least with layers anyway).

Working with layers from Capture One Pro 20 Essential Training by Derrick Story

The key for me was their making layers just another function of the toolset. If I want to work on a particular area, such as a sky or foreground, but I'm not sure how successful I will be, I create a layer. I start playing. If it works, it works. If it doesn't, no harm. I can always come back and fiddle with it later.

The layers are available in all of the Tools panels. I can start in Exposure for example. But if I go over to the Color panel, my layer is there as well. It's so easy, so logical.

If you're curious about how fun and easy layers can be, watch the movie at the top of this article. It's just a brief introduction to this feature, but it will give you a good idea to what I'm talking about.

work-with-layers-d-story.jpg

Working with layers from Capture One Pro 20 Essential Training by Derrick Story

It's from my latest online class, Capture One Pro 20 Essential Training on LinkedIn Learning, or, if you're a lynda.com subscriber, you can watch it there as well.

If you don't have Capture One Pro yet, you can download the 30-day free trial (Mac/Win). No credit card is required, and it's a fully functioning version.

I can now happily say that I don't always use layers, but when I do, I prefer Capture One Pro. Take a look at that video and see why.

You can share your thoughts at the TDS Facebook page, where I'll post this story for discussion.

I have tested Capture One Pro 20 with RAW files from Fujifilm, Olympus, Nikon, Panasonic, and Pentax, and my feeling is that it's once of the best image processors that I've ever used. I know that you've likely heard this from others as well, but maybe you just haven't had time to try it for yourself.

C1P20-LA-1600.jpg

Well, that time may be now. And if you agree, here's the game plan that I recommend.

  • Download the 30-day free trial of Capture One Pro 20 (Mac/Win). No credit card is required, and it's a fully functioning version.
  • Nose around a bit with the application, watch some of the free Phase One videos, get a feel for the environment.
  • Create a folder of images that you can use for your test library. I recommend a combination of RAW files and Jpegs from a variety of scenes. Make this a completely different folder in your Pictures directory so that it doesn't get confused with the source material for other apps.
  • Start from the beginning with my latest online training and follow along with your own images (or download the asset catalog that comes with the training). There are two options available: Capture One Pro 20 Essential Training on LinkedIn Learning, or, if you're a lynda.com subscriber, you can watch it there as well.

Both trainings are the same and begin with a What's New section, a discussion on the app's strengths and weaknesses, and a simplified typical workflow to help you get off to a fast start.

Once you start to feel a bit more comfortable with the software, I delve into basic color and exposure adjustments, optical fine tuning, layers and masks, more sophisticated color controls, managing your catalog, and efficiency tips.

You can get a feel for the tone of the training by watching this 1-minute introduction.

C1P20-IntroSlide.jpg

Manage and improve your photos with Capture One Pro 20 from Capture One Pro 20 Essential Training by Derrick Story

If you love getting the most out of your RAW files and appreciate a logical image management catalog system, then this might be the time to take a serious look at Capture One Pro 20, and see what you think. My guess is that you will find it time well spent.

You can share your thoughts at the TDS Facebook page, where I'll post this story for discussion.

I had my first opportunity last night to look at RAW files in Capture One Pro 20.0.3 from the Fujifilm X100V. Phase One had announced earlier this week that they were the first to provide RAW support for the two new Fujifilm cameras.

X110V-ISO3200-C1P20.jpg Walking to the Shark Tank - Fujifilm X100V, ISO 3200, f/2.0 - Photo by Derrick Story.

I packed the X100V to a San Jose Sharks match against the Toronto Maple Leaves (Sharks win: 5-2). The above image was captured while walking to the Shark Tank at ISO 3200, wide open, camera focused on Jersey 39. I processed the RAW file in Capture One Pro 20.0.3.

All of the Fujifilm simulations were available under Base Characteristics > Curve (as shown). The app recognized the lens and allowed all of the lens corrections including CA, Distortion, diffraction correction, light falloff, and sharpness. And the RAW files were very editable, including excellent highlight and shadow recovery.

Just a note on film simulations: C1P allows you to apply any of them, including Velvia, Provia, Acros, etc. in post production. So as long as you captured the image in RAW, all of your Fujifilm options are always available. The particular simulations that show up in C1P are based on the camera you used.

If you're a Fujifilm photographer, and especially if you have one of their new cameras, Capture One Pro 20 RAW processing is definitely worth a look.

There are product links in this article that contain affiliate tags. In some cases, depending on the product, The Digital Story may receive compensation if you purchase a product via one of those links. There is no additional cost to you.

You can share your thoughts at the TDS Facebook page, where I'll post this story for discussion.

There are those times when you want to share a collection of images without tapping a 3rd party web service. One excellent option is Capture One's electronic contact sheet.

electronic-contact-sheet.png

Once you create an electronic contact sheet, you can put it on a flash drive, embed it on a web page, and even make a hard copy print. In this short video, you can see how to make one for yourself.

Build an electronic contact sheet from Capture One Pro 12 Essential Training by Derrick Story

Electronic contact sheets are one of those tricks that you can keep in your back pocket for those times when you want to deliver a gallery on a flash drive or some other non-web-service approach. Plus, they are quite attractive.

Master Capture One Pro 12 in Just 2 Hours

You can learn all the ins and outs of this amazing software in the comfort of your home, or even on your smartphone by watching my fast-paced training: Capture One Pro 12 Essential Training on LinkedIn Learning. If you're a lynda.com fan, it's available there as well. You will learn everything from image organization, to expert editing, to output and more. It will feel good to finally take control of your photo library with Capture One Pro 12.

For those of you who like to shoot RAW+Jpegs, The Global Filters tool in Capture One Pro can be quite handy. It's available near the top of the View menu.

It allows you to quickly control what you see in the thumbnail browser. You can hide Jpegs, RAWs, processed Tiffs, PNGs, or movie files with a simple command. I like it to hide the RAWs when I only want to see and work with the Jpegs, or vice-versa.

In this short video, I walk you through the steps for using Global Filters Capture One Pro. This is from my essential training on LinkedIn Learning and lynda.com.

Use global filters to see only certain file types from Capture One Pro 12 Essential Training by Derrick Story

There's also a cautionary note: Global Filters are sticky, so if you find files missing, that's probably the reason why!

global-Filters-1024.jpg

This is just one of the many techniques that I cover in this course. Other topics include (peppered with inside tips):

  • Tapping all the new features in Capture One Pro 12
  • Auto adjustments and basic image editing
  • Advanced editing techniques (and goodbye to Photoshop)
  • Organizing your catalog
  • Using star ratings and color labels to cull images
  • Building an electronic contact sheet
  • Creating a slideshow to review and present images
  • Strategies for protecting master images

For those of you new to this application, I have a Quick Start chapter that gets you up and running in less than 20 minutes. Yes, that's the entire workflow, start to finish, in less than half an hour.

You can learn all the ins and outs of this amazing software in the comfort of your home, or even on your smartphone by watching this fast-paced training: Capture One Pro 12 Essential Training on LinkedIn Learning. If you're a lynda.com fan, it's available there as well. You will learn everything from image organization, to expert editing, to output and more. It will feel good to finally take control of your photo library with Capture One Pro 12.

You can share your thoughts at the TDS Facebook page, where I'll post this story for discussion.

You can squeeze every drop of quality from your optics in Capture One Pro 12 by tapping the Lens Correction panel before editing your shot. Here you can enable profiles for your optics, adjust distortion, reduce light falloff, and even correct for diffraction. Combine this capability with a good RAW file, and you can enjoy amazing image quality as a result.

In this 4-minute video, I walk you through the steps for maximizing optical performance in Capture One Pro 12. This is from my essential training on LinkedIn Learning and lynda.com.

Improve optical performance with Lens Correction from Capture One Pro 12 Essential Training by Derrick Story

I don't apply Diffraction Correction to every image, only those where I think it's appropriate or can improve an important photograph. It does use extra processing power, so I save it for those pictures that really count.

lens-correction.png

This is just one of the many techniques that I cover in this course. Other topics include (peppered with inside tips):

  • Tapping all the new features in Capture One Pro 12
  • Auto adjustments and basic image editing
  • Advanced editing techniques (and goodbye to Photoshop)
  • Organizing your catalog
  • Using star ratings and color labels to cull images
  • Building an electronic contact sheet
  • Creating a slideshow to review and present images
  • Strategies for protecting master images

For those of you new to this application, I have a Quick Start chapter that gets you up and running in less than 20 minutes. Yes, that's the entire workflow, start to finish, in less than half an hour.

You can learn all the ins and outs of this amazing software in the comfort of your home, or even on your smartphone by watching this fast-paced training: Capture One Pro 12 Essential Training on LinkedIn Learning. If you're a lynda.com fan, it's available there as well. You will learn everything from image organization, to expert editing, to output and more. It will feel good to finally take control of your photo library with Capture One Pro 12.

You can share your thoughts at the TDS Facebook page, where I'll post this story for discussion.

If you want to stretch beyond the limitations of the vignette tool in Capture One Pro 12, I recommend getting familiar with the new radial mask option. It's far more flexible and powerful, yet you can learn how to use it in just 3 minutes. Here's a video to show you how.

Radial gradient masks from Capture One Pro 12 Essential Training by Derrick Story

The way that I approached editing the portrait in this video was by creating two radial masks on two different layers. The first one was designed to lighten the tones on the subject's face. The second mask, on another layer, darkened the tones for the background. By having two masks on different layers, I had complete control over the relationship between the compositional elements. And because it's so easy to do, I could build this effect in just minutes.

You can use the masks for more than just tones as well. I can adjust colors, clarity, and other aspects of the photo. Again, this is so much more powerful than a basic vignette tool.

radial-mask-c1p12-1024.jpg

This is just one of the many techniques that I cover in this course. Other topics include (peppered with inside tips):

  • Tapping all the new features in Capture One Pro 12
  • Auto adjustments and basic image editing
  • Advanced editing techniques (and goodbye to Photoshop)
  • Organizing your catalog
  • Using star ratings and color labels to cull images
  • Building an electronic contact sheet
  • Creating a slideshow to review and present images
  • Strategies for protecting master images

For those of you new to this application, I have a Quick Start chapter that gets you up and running in less than 20 minutes. Yes, that's the entire workflow, start to finish, in less than half an hour.

You can learn all the ins and outs of this amazing software in the comfort of your home, or even on your smartphone by watching this fast-paced training: Capture One Pro 12 Essential Training on LinkedIn Learning. If you're a lynda.com fan, it's available there as well. You will learn everything from image organization, to expert editing, to output and more. It will feel good to finally take control of your photo library with Capture One Pro 12.

You can share your thoughts at the TDS Facebook page, where I'll post this story for discussion.

The latest version of Capture One Pro 12 is my favorite to date. Among the many new features, I love the way it handles luminosity masking. I can finally get my head around this useful image adjustment. And there's so much more in this update. And I cover all the cool stuff.

captureOnepro12-intro.png

In this course, I cover the following topics, peppered with inside tips and techniques:

  • Tapping all the new features in this version
  • Auto adjustments and basic image editing
  • Advanced editing techniques (and goodbye to Photoshop)
  • Organizing your catalog
  • Using star ratings and color labels to cull images
  • Building an electronic contact sheet
  • Creating a slideshow to review and present images
  • Strategies for protecting master images

For those of you new to this application, I have a Quick Start chapter that gets you up and running in less than 20 minutes. Yes, that's the entire workflow, start to finish, in less than half an hour.

You can learn all the ins and outs of this amazing software in the comfort of your home, or even on your smartphone by watching this fast-paced training: Capture One Pro 12 Essential Training on LinkedIn Learning. If you're a lynda.com fan, it's available there as well. You will learn everything from image organization, to expert editing, to output and more. It will feel good to finally take control of your photo library with Capture One Pro 12.

You can share your thoughts at the TDS Facebook page, where I'll post this story for discussion.

Small Camera, Big Workflow

fujifilm-xf10-front.jpg

The software we have on the backend can help free us from cumbersome equipment at capture. One example is my "weekend kit" that I carry with me when out and about with family and friends.

In one pocket, I have an iPhone X for all the usual reasons. And in the other, I often carry the Fujifilm XF10. Even though it fits in my front jeans pocket, it sports a lovely Fujinon aspherical lens and an APS-C image sensor. Plus it communicates with the iPhone to record location data as I shoot. (I love geotags!)

Most of the grab shots are in Jpeg mode, but if I come across a scene that would benefit from RAW, I can capture a .RAF file with the simple press of a button the the back of the camera. By doing so, I have all of my options available to me later in post production.

In Between Storms "In Between Storms" - Fujifilm XF10 - Photo by Derrick Story

Once I return home, I have a specific workflow that helps me maximize the content that I've captured in the field. I process the RAW files in Capture One Pro 12. This latest version does a great job with Fujifilm RAW files, pulling out all of the color and detail. Plus, while I'm there, I can fine tune the image a bit with the new Luminosity mask or a graduated screen.

Gazebo on a Rainy Day "Gazebo on a Rainy Day" - Fujifilm XF10 - Photo by Derrick Story

There are lots of things that I could do at this point. And to be honest, this is where most photographers will diverge from my workflow. But I'm going to tell you anyway.

I then export a maximum resolution Tiff file, import it into Photos for macOS Mojave, and use the Luminar 3 Editing Extension to finish the shot.

One of the reasons why I move my best shots to Photos after processing in Capture One Pro 12 is because of iCloud. The image is automatically backed up and propagated to all of my devices. I can use it right away for Flickr, Instagram, Facebook, etc. Plus, I have the good feeling of knowing that my favorite work is archived without any further effort on my behalf.

The other reason is because the Luminar 3 editing extension is just so darn good. The finishing touches I apply with that app really make a difference, and the changes are automatically saved to the images in iCloud.

Side Note: Luminar 3 is on sale for 29 percent off through Feb. 18, 2019. That's only $49 for this impressive app.

I only use this Capture One Pro 12 > Photos > Luminar 3 workflow for my favorite shots. The rest of the images are backed up traditionally via hard drive in Capture One. But those favs... they are culled out and are now in my pocket, and available to share at anytime, anywhere.

Luminar Essential Training

You learn all the ins and outs of Luminar via my Essential Training on lynda.com and on LinkedIn Learning. It's fun, and I promise, you will improve your shots.

Learn Capture One Pro

You can get familiar with this imaging software by checking out Capture One Pro 11 Essential Training on LinkedIn Learning. You can also tune in on lynda.com if you prefer your training there. My updated Capture One Pro 12 Essential Training should be out next month. Stay tuned.

You can share your thoughts at the TDS Facebook page, where I'll post this story for discussion.

It's no secret. The vignette tool in Capture One Pro left plenty to be desired. But with the release of version 12, we now have the Radial Gradient Mask. And suddenly, we have much better control for creating a vignette effect.

vignette-1024.jpg Standard vignette in Capture One Pro. For portraits like this, the shading covers part of the face, and there's no way to position the effect. Photos by Derrick Story.

The steps to create a radial mask are as follows:

  • Create new Empty Layer in the Layers panel.
  • Choose Draw Radial Gradient Mask from the brush tools in the Layers panel.
  • Adjust the size and shape of the mask by dragging on its handles.
  • Use the tools in the Exposure panel to adjust the tones of the mask.

It's that simple! Here's a radial mask in progress.

radial-mask-1024.jpg You can toggle the red mask indicator on and off by pressing the M key.

And here's the finished (and improved) vignette using the radial gradient mask.

better-vignette-1024.jpg More natural vignette effect using the radial gradient mask instead of the vignette tool.

At first you may think that's it's more complicated to create a mask than just using the vignette slider. But to tell you the truth, once you've done it a couple times, it's just as easy... and so much better.

Learn Capture One Pro

You can get familiar with this imaging software by checking out Capture One Pro 11 Essential Training on LinkedIn Learning. You can also tune in on lynda.com if you prefer your training there. My updated Capture One Pro 12 Essential Training should be out next month. Stay tuned.

You can share your thoughts at the TDS Facebook page, where I'll post this story for discussion.

Coming off the holidays, we're very much in a group shot frame of mind. As we should be, right? Gathering people together is an efficient (and fun) way to document the event.

PC271995-Zach-1024-TDS.jpg

But we sometimes forget the value of individual family portraits as well. And over the years, these are just as valuable because they give us as photographers the opportunity to capture the essence of the person we know.


Zach at 22 years old. Photo by Derrick Story. Olympus OM-D E-M1 Mark II with Olympus PRO 45mm f/1.2 at f/1.4, ISO 200. Processed in Capture One Pro 12.


Once you process the shoot, be sure to share a gallery with a variety of poses with your subject. Chances are good that the version they like will differ from your favorite. That's OK. They can use the images for social, resumes, etc. while you build the family archive.

Updating family portraits is an excellent creative project for 2019. After all, we don't want the shoe cobbler's kids to have bare feet.

More on Capture One Pro

To learn more about Capture One Pro, take a look at my online course: Capture One Pro Essential Training on LinkedIn Learning. You can also tune in on lynda.com if you prefer your training there. Either way, I have four hours of entertaining education that will help you master this excellent photo management and editing application.

You can share your thoughts at the TDS Facebook page, where I'll post this story for discussion.

I was among the many pleased photographers who exclaimed, "Finally!" when Phase One announced their improved Fujifilm RAW support with version 11.3.

Last of the Garden Tomatoes "Last of the Garden Tomatoes" - Photographed with a Fujifilm XF10 with the RAW file processed in Capture One Pro 11.3. Photo by Derrick Story.

This highlight, of course, is bringing the Fujifilm GFX 50S into the mix. But a dozen Fujifilm cameras and another half dozen lenses were included as well. Among them was my humble, but loved, Fujifilm XF10 compact with APS-C sensor. I was dying to seeing how its RAW files were decoded with Capture One Pro. I was not disappointed. (Take a look at the Garden Tomatoes shot above.)

Capture-1-loupe.png The combination of the Fujifilm camera and Capture One Pro retains all that beautiful detail. Processed RAW file on the left, original RAW on the right.

The XF10 Jpegs are beautiful. And I shoot in that mode most of the time. But I've programmed the back Function button to switch to RAW+Jpeg when I want to extract as much image information as possible. And now, thanks to Capture One Pro 11.3, I can do so with confidence.

Edit Like a Pro with Capture One

Improve your skills with my new course titled, Capture One Pro 11 Essential Training on LinkedIn Learning. You can also tune in on lynda.com if you prefer your training there. Either way, I have four hours of entertaining education that will help you master this excellent photo management and editing application.

You can share your thoughts at the TDS Facebook page, where I'll post this story for discussion.

The Keystone correction tool can be found in the Capture One's Lens Correction tab, and it's definitely worth a look. It makes it easy to straighten both vertical and horizontal converging lines - the types of distortion that we often encounter when photographing buildings from ground level.

Generally speaking, I use it to correct vertical lines. In this short movie, you can see exactly how it works.

Straighten lines with Keystone Correction from Capture One Pro 11 Essential Training by Derrick Story

Not only does this tool work well, it's not difficult to figure it out. And just like everything else in Capture One Pro, it's non-destructive. So you can go back at any time to readjust the picture. And by using it, you can correct an everyday snapshot (such as the iPhone shot below) into a pretty nice photograph.

keystone-correction.png

This video is from my new course titled, Capture One Pro 11 Essential Training on LinkedIn Learning. You can also tune in on lynda.com if you prefer your training there. Either way, I have four hours of entertaining education that will help you master this excellent photo management and editing application.

You can share your thoughts at the TDS Facebook page, where I'll post this story for discussion.

I love the file organization and RAW processing in Capture One Pro 11. But once I have the basic image the way I want, I then like to move my favorites over to Luminar 2018 for the finishing touches. Here's an example from Maui.

maui-hana-falls-2048.jpg "Playing in the Falls, Maui" - Olympus OM-D E-M10 II with a Panasonic 20mm f/1.7. 1 second exposure with a polarizer filter. Image by Derrick Story.

There are a variety of ways to do this, but I go the old fashion route by processing the RAW in Capture One, applying my basic edits, exporting a full resolution Tiff, then opening that file in the standalone version of Luminar 2018. I then save the working file as a Luminar document. When I'm finished with the enhancement, I also send an exported Luminar version back to Capture One Pro.

Each application has its own strengths. And when you take the best from each, image editing becomes really powerful, and quite fun.

Rock Luminar with my new Essential Training

You learn all the ins and outs of Luminar 2018 via my Essential Training on lynda.com and on LinkedIn Learning. It's fun, and I promise, you will learn a lot.

One of my favorite new features in Capture One Pro 11 is redesigned layers. Now, you can access them in practically every adjustment tool, and we have plenty of powerful, yet easy to use masking tools for localized edits on each of those layers.

layers-capture-one-11-web.jpg

If you haven't experienced them yet, I have a treat for you. Here's 5-minute movie that introduces you to the new Layers, how to use them, and the tools available within them. You'll be up and running right away.

Learn about the redesigned layer approach from Capture One Pro 11 Essential Training by Derrick Story

This video is from my new course titled, Capture One Pro 11 Essential Training on LinkedIn Learning. You can also tune in on lynda.com if you prefer your training there. Either way, I have four hours of entertaining education that will help you master this excellent photo management and editing application.

You can share your thoughts at the TDS Facebook page, where I'll post this story for discussion.

I received an image request the other morning for a photo that I captured in 2014. Those were Aperture days for me, so I went upstairs to the archive room, fired up the Drobos, and launched the appropriate Aperture library.

In 2014, I loved Aperture. I thought it was some of the finest software that Apple had designed. But on this morning, I was impatient with it. And for the first time, the interface looked a bit dated. Then I realized... the infatuation was over.

Aperture-Archive.jpg

At that moment, I decided to finally migrate that 1TB archive to Capture One Pro 11. Thanks to the easy import command (File > Import Catalog > Aperture Library), I knew that the computer would handle all of the heavy lifting. All I had to do was use another machine for a day or so. So I set up a new Capture One Catalog, and initiated the process.

Capture One Pro is exceedingly good at this transition. Most of the library structure migrates, sans Smart Albums. Many of the image adjustments carry over as well. And all of the metadata, including my star ratings and IPTC were welcomed in their new home.

A day and a half went by, and the job was complete. At first, performance was a bit funky. So I quit Capture One, counted to 10, then relaunched the app. Ah, much better. And the more I browsed, the better the performance became.

Capture-One-Pro-Archive-web.jpg

The pleasant surprise was the improved RAW processing in Capture One. All of my shots looked better. That subtle contrast enhancement that's in the Capture One secret sauce really played out nicely with my older photos. My cropping carried over as well. Yay!

I recommend that you keep separate Capture One catalogs for your archives. Mine are on Drobos with Thunderbolt connections. Performance is good enough for browsing, enhancing, and exporting older shots.

I still have my Aperture archives as well. It's just disk space, and that seems like a cheap enough insurance policy in case something goes wrong. Aperture and I had a wonderful relationship. But for now, Capture One Pro is looking after my archives.

Master Capture One Pro

Start with Capture One Pro 10 Essential Training that will quickly get you up to speed with this pro level imaging application.

Then drill down into mastering the editing tools with Capture One Pro 10: Retouching and get supremely organized with Advanced Capture One Pro: Catalog Management.

You can share your thoughts at the TDS Facebook page, where I'll post this story for discussion.

I admit it, I shoot RAW+Jpeg a lot - and for many good reasons. These days, I just pile everything into Capture One Pro, then sort things out in the app. I can do this because of the terrific C1P tools, with Global Filters at the top of the list.

global-filtes-c1p.png

Generally speaking, when it's time to rate images and decide which ones are worthy of editing, I just want to work with the RAW files. So all I have to do is go to View > Global Filters > Always Hide Jpeg Files. (There are other options as well, depending on the situation.) The Jpegs remain in the catalog, I just don't see them. So then I can go about my business of working just on the RAWs. Here's a movie that shows this in action.

Use global filters from Advanced Capture One Pro: Library Management by Derrick Story

It's a little thing, right? But little things really add up when you're under the gun with finishing off a shoot.

Master Capture One Pro

Start with Capture One Pro 10 Essential Training that will quickly get you up to speed with this pro level imaging application.

Then drill down into mastering the editing tools with Capture One Pro 10: Retouching and get supremely organized with Advanced Capture One Pro: Catalog Management.

You can share your thoughts at the TDS Facebook page, where I'll post this story for discussion.

Many photographers capture both RAW and JPEGs. I think a lot of that comes out of social networking. We have those JPEGs on our cameras. We can send them via Wifi to our mobile devises and upload them to social sights. And then when we're ready to do the heavy work, right, the serious work on our images, then we want to work on RAW files in applications such as Capture One-Pro.

So we find ourself having both types of files on our memory cards. Now when you bring in the images to Capture One-Pro, you might not want to bring in those JPEGs.

Why? Because Capture One Pro's already going to create JPEGs for you. Plus, if you bring them both in, you'll have to manage them in the catalog. And that's probably extra work you don't need. So here's how to cheery pick the RAWs only off the memory card.

Handle RAW and JPEG files on a memory card from Capture One Pro 10 Essential Training by Derrick Story

Basically your enable a sort in the import dialog box that separates the RAWs from the Jpegs. The you select the RAWs only for copying to your catalog. It seems simple once you know the trick. And it can save you a lot of time up the road with catalog management.

More Capture One Pro 10 Techniques

import-c1-pro.png

You can master Capture One Pro in just a few hours by viewing my LinkedIn Learning Training title, Capture One Pro 10 Essential Training, which also includes an entire chapter dedicated to version 10.1.

Most Capture One users have master catalogs with thousands of images. If, however, you want to take a project with your on the road (and leave the rest of the catalog behind), it's very easy to do.

export-as-catalog.jpg

Once you've exported a project as a catalog, you can copy it to your laptop and take it on the road. If you make changes to the exported catalog, you can integrate them back into the master collection by using the Import Catalog command under the File menu.

Here's a movie that shows you the steps for exporting the project.

Output a project or album as a catalog from Capture One Pro 10 Essential Training by Derrick Story

More Capture One Pro 10 Techniques

You can master Capture One Pro in just a few hours by viewing my LinkedIn Learning Training title, Capture One Pro 10 Essential Training, which also includes an entire chapter dedicated to version 10.1.

Many photographers try to use Spot Removal instead of cloning in Capture One for a very simple reason: they can't find the cloning tool.

enable-clone-layer.jpg

That's because it's tucked away in the Local Adjustments panel. Then, someone could tell you that, and you still might not find it. You'll see adjustments for just about everything else - white balance, exposure, etc. - but not cloning.

The trick is to long-click on the new layer icon (+) until a popup menu is revealed displaying: New Layer, New Clone Layer, New Healing Layer. Choose New Clone Layer, and now when you select the Brush, it will transform into a cloning tool that works pretty much like everyone else's.

Give your layer a name. Then make sure the brush icon is highlighted or press the B key. Use the bracket keys to control the size of the brush, and Shift-bracket keys to control feathering. Option-click on the area that you want to sample. Then paint over the area that you want to clone. When you're finished, tap the V key to disable the brush.

(Another nifty way to go about this is to create a regular Adjustment layer, then change it to a Clone layer by click on the "Adjustment Bubble" that reveals the popup menu.)

There are a variety of options in the brushing tool itself that allow you to control the appearance of the mask. And since all of this work is created on a layer, you can turn it off and on by simply unchecking its box in the Adjustments panel.

After a little trial and error, you should get comfortable with Capture One's cloning tool. And now you can save Spot Removal for what it was designed for... removing sensor dust and other specks.

Master Capture One Pro

Start with Capture One Pro 10 Essential Training that will quickly get you up to speed with this pro level imaging application.

Then drill down into mastering the editing tools with Capture One Pro 10: Retouching and get supremely organized with Advanced Capture One Pro: Catalog Management.

You can share your thoughts at the TDS Facebook page, where I'll post this story for discussion.

There are a variety of adjustments that you can apply to your images when you import them into Capture One Pro. These could be as simple as adding a contrast boost for studio images captured under flat light, or as fun as converting color images to black and white.

In addition to the visual adjustments you can make while the photos are importing into your catalog, you can add metadata as well, such as your copyright, contact info, and descriptions. I walk you through the steps in this video.

Keep in mind that any adjustments that you apply on import can be further tweaked, or removed, while editing in Capture One Pro. C1 is totally non-destructive. What is nice about this technique is that you can save yourself post processing time on images that have been captured under similar lighting conditions.

c1-import.png

Master Capture One Pro

Want more? Consider our upcoming C1 Expert Editing Nimble Class on September 9. Class is limited to 6, and you can participate from the comfort of your home.

And don't forget about my Capture One Pro 10 Essential Training that will quickly get you up to speed with this pro level imaging application.

Then drill down into mastering the editing tools with Capture One Pro 10: Retouching and get supremely organized with Advanced Capture One Pro: Catalog Management.

You can share your thoughts at the TDS Facebook page, where I'll post this story for discussion.

The Capture One Pro 10.1 update was a substantial, much bigger dot release than what we typically see.

New goodies include master reset, tokenized watermarking (really slick), Photoshop round tripping, styles packs, and more. I've added movies to these features in my Capture One Pro 10 Essential training on lynda.com, which is also available on LinkedIn Learning. Here's a 10.1 overview movie that I think you'll enjoy.

I think the 10.1 update is icing on an already delicious cake. Capture One Pro 10 provides an excellent workflow to manage, edit, and output your RAW and Jpeg images.

Master Capture One Pro

Start with Capture One Pro 10 Essential Training that will quickly get you up to speed with this pro level imaging application.

capture-one-pro-10.jpg

Then drill down into mastering the editing tools with Capture One Pro 10: Retouching and get supremely organized with Advanced Capture One Pro: Catalog Management.

Personalized Instruction Too!

If you want to have your questions incorporated into the curriculum, plus have live Q&A interactions, then take a look at my Nimble Classroom Series. I have personalized online sessions scheduled for Capture One Pro, Photos for macOS, and Luminar. Sign up today!

You can share your thoughts at the TDS Facebook page, where I'll post this story for discussion.

The news just keeps getting better for Capture One photographers. Today's happiness is brought to us by RNI, who just released RNI All Films 4 Lite for C1 users on both Mac and PC platforms. These styles are absolutely beautiful.

RNI-Kodak_E100GX.jpg "Street Musician, New Orleans" - Olympus PEN-F with Panasonic 20mm, RAW file processed in Capture One Pro using the Kodak E100GX Style in RNI All Films 4. Image by Derrick Story.

Here's what RNI has to say about them: "RNI All Films for Capture One is designed to bring the magic touch of film into your digital workflow. This package features 39 beautifully crafted film styles made after real analog film stocks. Rediscover film aesthetics. Create an emotional essence in your photography with RNI All Films.

And that's no exaggeration. Seems to me like the marriage of C1 RAW processing and RNI's film emulation science is ideal. As folks would say, "They are going to have some beautiful kids."

Once your purchase the Styles ($59), install them by opening Styles and Presets in the Adjustments panel, then clicking on Import Styles in the ... menu. All 39 film emulation profiles will be added to your User Presets.

Following that, simply open an an image and mouse over the different film types, you'll instantly see a preview of each effect. The workflow couldn't be easier.

Here's the processed version of the above image, using only C1's RAW processing and the RNI style.

Street Musician, New Orleans "Street Musician, New Orleans" - Photo by Derrick Story.

Master Capture One Pro

Start with Capture One Pro 10 Essential Training that will quickly get you up to speed with this pro level imaging application.

Then drill down into mastering the editing tools with Capture One Pro 10: Retouching and get supremely organized with Advanced Capture One Pro: Catalog Management.

Personalized Instruction Too!

If you want to have your questions incorporated into the curriculum, plus have live Q&A interactions, then take a look at my Nimble Classroom Series. I have personalized online sessions scheduled for Capture One Pro, Photos for macOS, and Luminar. Sign up today!

You can share your thoughts at the TDS Facebook page, where I'll post this story for discussion.

There are certain tools, that once you learn them, you wonder how you ever lived without them. For me, the Gradient Mask in Capture One Pro is a perfect example.

fix-a-sky.jpg

I particularly like the gradient mask for adjusting the sky in landscape shots. Not only does it make it easy to tweak color, saturation, and tone, I can go back with the brush tool and tailor the mask exactly as I wish. Keep in mind this is my everyday photo management software that can handle this. (Sweet!) Here's a short video that shows how it works.

Open one of your favorite landscapes in Capture One, then follow along with the video. After just a few minutes, you too will be smitten with the Gradient Mask tool.

Master Capture One Pro

Start with Capture One Pro 10 Essential Training that will quickly get you up to speed with this pro level imaging application.

Then drill down into mastering the editing tools with Capture One Pro 10: Retouching and get supremely organized with Advanced Capture One Pro: Catalog Management.

Personalized Instruction Too!

If you want to have your questions incorporated into the curriculum, plus have live Q&A interactions, then take a look at my Nimble Classroom Series. I have personalized online sessions scheduled for Capture One Pro, Photos for macOS, and Luminar. Sign up today!

You can share your thoughts at the TDS Facebook page, where I'll post this story for discussion.

When most photographers think of Capture One Pro, they envision sophisticated color and tonal controls. And that's true. But it isn't the whole story. Thanks to the just-announced downloadable Styles packs (otherwise known as presets), and built-in time saving controls such as Auto Adjust, Capture One can provide quick edits as well as sophisticated color grading. Let's take a look at how Auto Adjust works.

And the best part is, as shown in the video, you can turn on and off the adjustments that you want Auto Adjust to use. Plus, you can set up Capture One to apply Auto Adjust during the import process. Very handy, and there waiting for you to use right now.

Master Capture One Pro

auto-adjust-lynda.jpg

Start with Capture One Pro 10 Essential Training that will quickly get you up to speed with this pro level imaging application.

Then drill down into mastering the editing tools with Capture One Pro 10: Retouching and get supremely organized with Advanced Capture One Pro: Catalog Management.

You can share your thoughts at the TDS Facebook page, where I'll post this story for discussion.

If you've never explored the Skin Tone tab in Capture One Pro's Color Editor, you're in for a real treat.

skin-tone-adjustment-web.jpg

Unlike trying to adjust skin tones with the more generic white balance setting, Skin Tone in the Color Editor is designed just for portraits. In addition to hue, saturation, and lightness just for the complexion, you also have smoothness slider that makes everything look just a little better.

But the real magic surfaces with the uniformity sliders that help you offset areas of color shift, especially in the shadows. And what a difference these controls make in the professional appearance of your portraits. Take a look at this free training video that walks you through the entire process.

This is just one of the videos from my latest lynda.com/LinkedIn Learning course, Capture One Pro 10: Retouching. I focus on portraits and product photography in this course. And there are lots of handy tips, like the magic uniformity slider, for you to discover.

Master Capture One Pro

Start with Capture One Pro 10 Essential Training that will quickly get you up to speed with this pro level imaging application.

Then drill down into mastering the editing tools with Capture One Pro 10: Retouching and get supremely organized with Advanced Capture One Pro: Catalog Management.

You can share your thoughts at the TDS Facebook page, where I'll post this story for discussion.

Capture One Pro is a powerful imaging application that combines photo management, RAW conversion, and post production all under one well-designed roof. And version 10 ups the ante by adding features such as output proofing and 3-step sharpening.

In this course, I embark on an in-depth exploration of Capture One Pro 10. The teaching structure mirrors the design of the software itself, with chapters that step through each of the tabs in the program, from organizing to editing to outputting images.

welcome-c1ten-esst.jpg

Highlights include:

  • Organizing assets in the library
  • Correcting color casts with the Color Editor
  • Understanding the HDR sliders
  • Straighten lines with keystone correction
  • Diffraction correction
  • Using a gradient mask to fix a sky
  • Soften skin with a brush
  • Output proofing
  • 3-step sharpening

Here's an overview movie that will give you a good feel for the course.

You can share your thoughts at the TDS Facebook page, where I'll post this story for discussion.

capture-one-retouching.jpg

Capture One Pro 10 -- a professional, robust image editor and organizer -- allows you to handle all of your post processing in the same application that manages your images.

In this course, learn techniques for improving your images using Capture One Pro 10. Join Derrick as he demonstrates how to create uniformity in skin tones for professional portraits, use the Curve tool to adjust a specific tone, convert a selected color into a mask, and sharpen specific areas of an image. He also explains how to speed up your workflow by creating styles and presets, and using variants for different looks. When you wrap up this course, you'll have the knowledge you need to get the most out of the retouching features.

Topics Include:

  • Using brushing tools in the Local Adjustments tab
  • Adjusting a specific hue with the Color Editor
  • Minimizing an offending color in the Color Editor
  • Fine tuning hues with Color Balance
  • Exploring Color Balance presets
  • Addressing a specific tone with the Curve tool
  • Exposure adjustment tricks
  • Making color corrections to specific areas
  • Speeding up your workflow

Take a look at this intro video that provides you with an overview of the course.

If you've wanted to improve your image editing chops with this professional level photo app, then take a look at Capture One Pro 10: Retouching. I think you'll be happy you did.

You can share your thoughts at the TDS Facebook page, where I'll post this story for discussion.

You can share a Capture One Pro catalog with coworkers on a network, but someone has to be in charge of locking and unlocking it.

capture-one-network.png

"What?" you ask. Yes, catalogs can only be shared if they are locked first. Once locked, others can view all of the images and download the ones they need.

But when it's time for maintenance, the ringmaster must unlock the catalog to work on it. And during that time, others do not have access to it. Here's a video that explains the entire procedure.

For the most part, this is good news. Knowing that you can let an entire workgroup browse and download images from a master catalog is a handy feature of Capture One Pro. Just make sure someone is in charge of the entire operation.

Take Control of Your Capture One Library

My lynda.com title, Advanced Capture One Pro: Library Management, shows you how to organize like a pro, covering techniques for referenced and managed catalogs, plus integrating sessions, backing up masters, and configuring your Capture One environment specifically to your needs.

You can share your thoughts at the TDS Facebook page, where I'll post this story for discussion.

Of all the cool new stuff in Capture One Pro 10.1, Temporary Reset is the feature that I've been waiting for.

before-reset-c1.jpg "Strength in Numbers" Oracle Arena, Olympus OM-D E-M10 with Panasonic 20mm f/1.7 at ISO 1600. Photo by Derrick Story. Showing image edits in Capture One Pro 10.1.

master-reset-c1.jpg Holding down the Alt/Option key while clicking on the Reset Adjustments icon.

Essentially, we now have a Before/After function. To enable it, hold down the Alt/Option key while clicking on the Reset Adjustments icon in the top toolbar. You will see the original image. Let go of the keys and you're returned to the edited version. Cropping is not temporarily reset, but everything else is.

Sometimes it's the small things that make post production easier. I'm glad to finally have this function in Capture One Pro.

More Capture One Pro Tips and Techniques

Improve your skills by watching Capture One Pro Essential Training now available on lynda.com. More than 5 hours of tips, tricks, and techniques. Plus many free movies using advanced techniques.

I've also created a dedicated Capture One Pro Training page on The Digital Story. You can follow all of the tips and techniques that I publish in one convenient spot.

Thinking About Making the Transition from Aperture or Lightroom? - Download my free eBook titled, Rocky Nook's Guide to Moving to Capture One Pro. I show you the steps to create a test library, then build the foundation for a smooth transition to Capture One Pro.

Want to Comment on this Post?

You can share your thoughts at the TDS Facebook page, where I'll post this story for discussion.

Global Filters in Capture One Pro

If you shoot RAW+Jpeg, as many of us do these days, then you should know about Global Filters in Capture One Pro.

global-filters.jpg

They allow us to quickly hide various file types - RAW, Jpeg, PNG, Tiff, Video - so that we're only viewing the images we want. So if I have an upload that contains RAWs, Jpegs, and Video files, and I only want to see the movies, I can use Global Filters to temporarily hide the RAWs and Jpegs. Here's a short movie that shows you how this works.

One of the primary reasons I moved from Aperture to Capture One Pro was because of its robust and easy to use image catalog. Global Filters are just another example of how C1 improves my photography life.

Take Control of Your Capture One Library

My lynda.com title, Advanced Capture One Pro: Library Management, shows you how to organize like a pro, covering techniques for referenced and managed catalogs, plus integrating sessions, backing up masters, and configuring your Capture One environment specifically to your needs.

You can share your thoughts at the TDS Facebook page, where I'll post this story for discussion.

capture-one-import.jpg

If you're running a managed catalog in Capture One Pro, you have the option of customizing file names on import. I use this feature 99 percent of the time because having both the original image number and additional data makes it easier to keep track of my pictures once they leave the cosy confines of the C1 environment.

Capture One handles this task through the use of tokens. They are metadata building blocks that you can arrange in any order. My favorite combination is: Image Name-Job Name. The first token retains the original file number, while the second is an editable field that allows me to include a descriptive word or two in the file name itself. Here's a short video that shows how I do this.

Another way I use this functionality is to add my name to the file name itself when I deliver images to a client. Even though my copyright info is in the metadata, I've discovered that many PR folks don't dig very deeply when using my photographs. Having my name in the file name increases the odds of a photo credit in the caption.

If you're a Capture One Pro user, it's worth building a strategy for enhancing the file names of your images. We're in a bumper sticker society, and the more visible your vital info is, the better.

Take Control of Your Capture One Library

My lynda.com title, Advanced Capture One Pro: Library Management, shows you how to organize like a pro, covering techniques for referenced and managed catalogs, plus integrating sessions, backing up masters, and configuring your Capture One environment specifically to your needs.

Want to Comment on this Post?

You can share your thoughts at the TDS Facebook page, where I'll post this story for discussion.

My phobia of color wheels began back in the original Final Cut days. I would look at them, then devise any other method to make the correction. And it wasn't until Capture One Pro that I overcame my prejudice and learned that they are truly helpful... and easy.

color-adjust-with-cb.jpg Fine tuning a portrait shoot with Color Balance in Capture One Pro. Photo by Derrick Story.

Currently, I'm in the middle of recording a Capture One 10 title for lynda.com. (My existing Capture One Pro 9 Essential Training is very popular, and we wanted to integrate the new features.

When I finished the movie on Color Balance, I had to laugh at myself. It's so fun. What was my problem before? So I thought that if you shared my previous phobia, this should help. Here are the basic controls for each of the color wheels.

Color-Balance-CP1-web.jpg The midtone adjustment in the Color Balance panel of Capture One Pro.

  • Drag the point in the middle of the circle to change the color. This could cover the entire image with the Master color balance, or the basic tonal areas with Shadow, Midtone, and Highlight wheels.
  • The tiny handle on the edge of the color wheel is to fine-tune the hue.
  • Once you set the color you want, use the left side slider to adjust saturation.
  • The right side slider is for brightness.

Start by choosing the Color you want to shift to in the shadows, midtones, or highlights, then fine tune it with the Hue handle. Next, work the Saturation slider until the effect is exactly to your taste, then finish off with Brightness. It's easy! And the effects are amazing.

To see the Before and After, hold down the Option/Alt key and click on the Reset arrow in the Color Balance panel. That will show you the image without your adjustments. Let go of the mouse, and your adjustments will appear again.

Start with a simple image to practice. Once you get the hang of it, you'll be visiting the Color Balance adjustment on a regular basis... and dramatically improving your images along the way.

More Capture One Pro Tips and Techniques

Improve your skills by watching Capture One Pro Essential Training now available on lynda.com. More than 5 hours of tips, tricks, and techniques. Plus many free movies using advanced techniques.

I've also created a dedicated Capture One Pro Training page on The Digital Story. You can follow all of the tips and techniques that I publish in one convenient spot.

Thinking About Making the Transition from Aperture or Lightroom? - Download my free eBook titled, Rocky Nook's Guide to Moving to Capture One Pro. I show you the steps to create a test library, then build the foundation for a smooth transition to Capture One Pro.

Want to Comment on this Post?

You can share your thoughts at the TDS Facebook page, where I'll post this story for discussion.

Capture One Pro is one of the most powerful, flexible, photo management applications available. So powerful, in fact, that you may get lost configuring your catalog for optimal organization. If that's been the case for you, I can bring some clarity to your life, or at least to your photo management.

capture-1-library-mgmt-web.jpg

My latest lynda.com title, Advanced Capture One Pro: Library Management, shows you how to organize like a pro, covering techniques for referenced and managed catalogs, plus integrating sessions, backing up masters, and configuring your Capture One environment specifically to your needs. Take a look at this 1-minute introductory video for the course.

These techniques work for photographers using Capture One 8, 9, and 10. I have testing these approaches with my own Capture One catalog that manages my professional photography business. And I think that it will help you tame yours.

More Capture One Pro Tips and Techniques

Improve your skills by watching Capture One Pro Essential Training now available on lynda.com. More than 5 hours of tips, tricks, and techniques. Plus many free movies using advanced techniques.

I've also created a dedicated Capture One Pro Training page on The Digital Story. You can follow all of the tips and techniques that I publish in one convenient spot.

Thinking About Making the Transition from Aperture or Lightroom? - Download my free eBook titled, Rocky Nook's Guide to Moving to Capture One Pro. I show you the steps to create a test library, then build the foundation for a smooth transition to Capture One Pro.

Want to Comment on this Post?

You can share your thoughts at the TDS Facebook page, where I'll post this story for discussion.

I love the RAW editing tools in Capture One Pro. But there are times when I want to tap the magic of Luminar and its extensive set of filters. And I don't want to compromise my digital asset management system to do so. As a result, I needed to figure out how to get these two kids to play together. And that's what I'm going to show you right now.

luminar-in-c1p.jpg Image edited in Luminar, then returned to Capture One Pro for asset management. Photos by Derrick Story.

Going from Capture One Pro to Luminar

Since you're not going to get a clean roundtrip from Capture One to Luminar then back, the next best thing is to use the Open With... command in Capture One (right-click on the image and choose Open With... from the popup menu). Luminar can process your RAW files, so you're sending over a high quality image for editing. Select Luminar from the popup menu, and the image will open in the app.

open-with-command.png

Edit in Luminar

Edit as you normally would in Luminar, using the filters and presets to achieve the look you want. Once the image is ready to send back to Capture One, choose the Export command in Luminar, File > Export. This is the point where you have to think about your file organization.

Sending Back to Capture One Pro

My recommendation is to set up a standard receiving folder for the Luminar images, then import from that folder back into Capture One. Mine is a referenced system, leaving the images where they are and pointing the Capture One database to them. I tend to send back full sized Jpegs to keep file size reasonable. But you can choose Tiffs or another format, if you wish, during the export process.

before-after.jpg The before and after for this image in Luminar.

I add the word Luminar to the file name when exporting it, so I will know a bit about the picture's history when reviewing it in the Capture One catalog. Since the file name for the edited image is the same as the original, except for having Luminar at the end, the picture shows up in the catalog next to the original.

image-in-c1p.jpg Luminar image back in Capture One Pro for asset management.

All my IPTC and EXIF metadata is intact, and I now have another powerful option for working on my images stored in Capture One. If I do a lot of work to the shot in Luminar, multiple layers for example, I may also want to save the image as a separate Luminar file so I can go back and pick up my work at a later time. I can always export the updated version into Capture One Pro for management with the others.

Haven't tried Luminar? You can download a free trial here.

More Capture One Pro Tips and Techniques

Improve your skills by watching Capture One Pro Essential Training now available on lynda.com. More than 5 hours of tips, tricks, and techniques. Plus many free movies using advanced techniques.

I've also created a dedicated Capture One Pro Training page on The Digital Story. You can follow all of the tips and techniques that I publish in one convenient spot.

Thinking About Making the Transition from Aperture or Lightroom? - Download my free eBook titled, Rocky Nook's Guide to Moving to Capture One Pro. I show you the steps to create a test library, then build the foundation for a smooth transition to Capture One Pro.

Want to Comment on this Post?

You can share your thoughts at the TDS Facebook page, where I'll post this story for discussion.

Photography is both my hobby and a substantial revenue stream. I once kept both worlds in the same application (Aperture), but over the last couple years, I've separated my personal work from what I shoot for hire.

Capture-One-Wildspeak.jpg

Technology has had much to do with this. In 2012, for example, I shot just about everything with the same camera. iPhones weren't as good, Cloud sharing not as robust, and my workflow was essentially to remove the card from the camera, insert it into my Mac, and load everything into Aperture.

But 2017 is much different. I love shooting my day to day life with the iPhone, Olympus TG-4, and a variety of 35mm film cameras. The digital images flow right into my Photos for iOS and macOS apps, and they're instantly available to share, print, and post. It's easy and enjoyable. I've never been happier as a hobbyist.

My professional jobs involve higher resolution cameras, bigger files, larger quantities for each session, multiple export options, and serving as an archive for my clients. And for this work, Capture One Pro 10 has become my go-to app. Here are five reasons why.

Old School Organization

The tools for catalog management include projects, albums, groups (the equivalent of folders in Aperture), and everything else that I need to slice and dice a shoot. Plus, I can also manage content on my hard drives right there in the Capture One interface.

When I load thousands of images into a catalog, I want to be able to tame them as quickly as possible. Capture One makes that easy.

Excellent RAW Processing

The Capture One look is different than any other processor that I've used. It's bold. My RAW files jump off the screen even before I begin editing them.

Robust Editing Tools

Ninety-five percent of the time, I can handle all of my image editing in Capture One Pro. Starting with the amazing Contrast slider (that is far more than you'd think), to sophisticated color tools, to lens corrections, to localized editing brushes... this app provides what I need to get the most out of my images.

Flexible Output Options

The Output tab screams professional app. Here I can create a variety of custom export options to run individually or all at once. So if I need a set of master images to send to the client, and another set of web shots for an online gallery, Capture One Pro can provide that for me all at once.

Versatile Catalog Management

I can run a managed catalog or choose to go referenced with external hard drives storing my masters... on both Mac and PC platforms. I can enable a Session while on the road or working on a specific assignment, then incorporate that content into my master catalog. And I can do just about anything else I want with the Capture One Pro catalog structure. Perfect for guys like me who travel and have a master setup back at the studio.

I'm entering my second complete year with Capture One Pro. And I have to say... it feels great to have made a complete transition from Aperture.

Capture One Pro Tips and Techniques

Improve your skills by watching Capture One Pro Essential Training now available on lynda.com. More than 5 hours of tips, tricks, and techniques. Plus many free movies using advanced techniques.

I've also created a dedicated Capture One Pro Training page on The Digital Story. You can follow all of the tips and techniques that I publish in one convenient spot.

Thinking About Making the Transition from Aperture or Lightroom? - Download my free eBook titled, Rocky Nook's Guide to Moving to Capture One Pro. I show you the steps to create a test library, then build the foundation for a smooth transition to Capture One Pro.

Want to Comment on this Post?

You can share your thoughts at the TDS Facebook page, where I'll post this story for discussion.

Maybe it's because Capture One Pro has so many sophisticated tools that enthusiast photographers overlook the handy (and simple) Auto Adjustments option. But in my experience, I've found it quite helpful.

set-up-auto-settings.jpg

Look for the "Big A" in the top toolbar. If you click on its smaller down-pointing arrow, you can selected the adjustments that will be included in the Auto fix. I use the top four: White Balance, Exposure, High Dynamic Range, and Levels, as shown in the illustration above.

To apply these all at once, just click on an image, then click on the Big A button. Presto, your image is adjusted. You can see what Capture One did by checking the Tools panel on the left. You can fine tune any of the sliders that you wish. If you don't like the new look at all, click CMD-R to Reset.

applying-auto-settings.jpg

Auto Adjust can also by applied on Import. Check the Auto Adjustments box in the Adjustments brick in the Import dialog box. Capture One Pro will apply the changes as it generates the previews.

In general, I've found that using Auto Adjust saves me time, especially when processing a big shoot that was captured in a non-controlled environment. If you haven't tried this feature yet, take it for a spin. You might like where you end up.

More Capture One Pro Tips and Techniques

Improve your skills by watching Capture One Pro Essential Training now available on lynda.com. More than 5 hours of tips, tricks, and techniques. Plus many free movies using advanced techniques.

I've also created a dedicated Capture One Pro Training page on The Digital Story. You can follow all of the tips and techniques that I publish in one convenient spot.

Thinking About Making the Transition from Aperture or Lightroom? - Download my free eBook titled, Rocky Nook's Guide to Moving to Capture One Pro. I show you the steps to create a test library, then build the foundation for a smooth transition to Capture One Pro.

Want to Comment on this Post?

You can share your thoughts at the TDS Facebook page, where I'll post this story for discussion.

This is the moment I've been waiting for. I had been sitting on hundreds of RAW files from my Iceland test of the Olympus OM-D E-M1 Mark II, and I wanted to see how those images really looked. And now I know... Stunning.

Icelandic Ponies RAW file from Olympus OM-D E-M1 Mark II with 12-100mm PRO lens processed in Capture One Pro 10. Photos by Derrick Story.

The combination of the E-M1's imaging pipeline, combined with the sharpness of the 12-100mm f/4 IS PRO Lens and the crunchy RAW processing of Capture One Pro 10, makes for quite a trio.

Icelandic Ponies Grazing

PA270237-Iceland-2016-Derrick-Story.jpg

I'll be reporting on additional aspects of Capture One Pro 10 in upcoming posts. But I wanted you to see firsthand what this software does with RAW files from the E-M1 Mark II.

More Capture One Pro Tips and Techniques

Improve your skills by watching Capture One Pro Essential Training now available on lynda.com. More than 5 hours of tips, tricks, and techniques. Plus many free movies using advanced techniques.

I've also created a dedicated Capture One Pro Training page on The Digital Story. You can follow all of the tips and techniques that I publish in one convenient spot.

Thinking About Making the Transition from Aperture or Lightroom? - Download my free eBook titled, Rocky Nook's Guide to Moving to Capture One Pro. I show you the steps to create a test library, then build the foundation for a smooth transition to Capture One Pro.

Want to Comment on this Post?

You can share your thoughts at the TDS Facebook page, where I'll post this story for discussion.

I forgot to adjust one of my cameras to the proper time here in Iceland. And those images were driving me crazy in my Capture One catalog because they were out of order. Unfortunately, I discovered that there was no easy way to fix this problem within Capture One.

PA270026-TG-4 web2.jpg The original time stamp for this shot of Skogafoss Falls, Iceland was 7 hours off. I needed to fix that. Olympus TG-4 in Program mode. Image by Derrick Story.

After a great deal of hunting, I discovered that I must leave the application for my fix. So, I turned to Photos for macOS, which does have a batch time stamp fix tool. The basic task went like this.

  • Export images out of Capture One Pro.
  • Delete the existing shots from the Capture One Catalog.
  • Create a new library in Photos for macOS.
  • Import pictures into Photos.
  • Use the Adjust Date and Time tool in Photos to fix the time stamps.
  • Export the images out of Photos and back into Capture One Pro.

I was very careful along the way and backed everything up, just in case something went wrong. But I have to say that the entire process was a real hassle. In the future, I'm going to be more diligent about checking the time stamps on all of my cameras. I certainly don't want to spend time on this again.

More Capture One Pro Tips and Techniques

Improve your skills by watching Capture One Pro Essential Training now available on lynda.com. More than 5 hours of tips, tricks, and techniques. Plus many free movies using advanced techniques.

Master Photos for OS X

(It's More Powerful than You Think)

For hands-on tutorials, be sure to take a look at Photos for OS X Essential Training on lynda.com. I cover everything you need to know to get the most from this surprisingly powerful image management application.

You can share your thoughts at the TDS Facebook page, where I'll post this story for discussion.

Connecting Capture One to Aurora HDR

Once my RAW file sequences are safe and sound in Capture One Pro, I can open them in Aurora HDR for finishing the work. Here are the four basic steps I use to make this connection.

Step 1 - Select your three shots in Capture One, then use the Open With command. I right-click on one of the thumbnails to reveal this popup menu.

01-open-with.jpg

Step 2 - Check the Alignment box in the following screen, and make any additional choices required for your images.

02-make-settings.jpg

Step 3 - Once Aurora HDR has processed your images, you can choose from the presets to get the look you want. Presets are revealed by clicking on the big, round icon in the lower right corner.

03-choose-preset.jpg

I often adjust the amount of the preset, then fine tune its settings by working the sliders in the Tools panel.

Step 4 - Export the final version of the shot by choosing File > Export to Image in Aurora HDR. Since I'm usually sending this photo back to Capture One, I export a full-size, 8-bit Tiff file. I then import that Tiff back into Capture One and keep it in the same project as the original shots.

04-export-image.jpg

The exported image can be worked on some more with Capture One tools. I keep the finished HDRs in their own album, within the Project. That way they're easily accessible when I want to display them or export out as lower resolution Jpeg.

If you want to save the work you've done in Aurora HDR, then use the Save command. That file can be reopened in the state that you left it for further fine tuning.

Bridgeport-Dusk-2016.jpg "Bridgeport General Store at Dusk" Olympus OM-D E-M5 Mark II with Panasonic 20mm f/1.7 prime at ISO 320, handheld. Images by Derrick Story.

Capture One and Aurora HDR are a terrific tandem for creating and managing high quality dynamic range images from your RAW file sequences.

More Capture One Pro Tips and Techniques

Improve your skills by watching Capture One Pro Essential Training now available on lynda.com. More than 5 hours of tips, tricks, and techniques. Plus many free movies using advanced techniques.

I've also created a dedicated Capture One Pro Training page on The Digital Story. You can follow all of the tips and techniques that I publish in one convenient spot.

Thinking About Making the Transition from Aperture or Lightroom? - Download my free eBook titled, Rocky Nook's Guide to Moving to Capture One Pro. I show you the steps to create a test library, then build the foundation for a smooth transition to Capture One Pro.

Want to Comment on this Post?

You can share your thoughts at the TDS Facebook page, where I'll post this story for discussion.

Existing light street photography is a blast, but it sometimes leads to off-putting colors. Fortunately, the images can easily be corrected in two steps using Capture One Pro.

original-image.jpg Original image captured in a shop in downtown Lahaina, Maui.

Here's the original image captured on Kodak 400 negative film. Whether the picture is analog or digital, the same sort of things can happen with artificial lighting. The first step is to go to the Color Tab in Capture One Pro and make a White Balance adjustment.

I use the eye dropper and click on a neutral tone in the image. This gets me half way there. The correction is an improvement, but not exactly what I want. I could continue to fine tune with the Kelvin and Tint sliders in the White Balance tool if I wanted. But I have another option too.

white-balance-adj.jpg Using the White Balance adjustment certainly helps.

What I prefer to do, however, is to use the Color Balance tool that's right beneath White Balance. Since my main problem is the green hue caused by the fluorescent lighting, I offset it with moving the center circle indicator towards the red.

I'm I'm not exactly sure what I need to do, I can move the circle indicator all around until I find something that I like. Since this is a global adjustment affecting highlights, shadows, and mid-tones, I start my work within the Master tab. But I often continue to play with the different options in the Color Balance panel. I like the 3-Way Control that provides adjustments for shadows, highlights, and mid-tones individually.

color-balance-v2.jpg Being able to fine tune with the Color Balance tool provides even more control.

Just like everything else in Capture One Pro, you can save these adjustments as presets, or Copy and Apply the settings to other images that have similar lighting problems. The entire process is very fast. And getting rid of unwanted color casts really improves existing light images in urban settings.

More Capture One Pro Tips and Techniques

Improve your skills by watching Capture One Pro Essential Training now available on lynda.com. More than 5 hours of tips, tricks, and techniques. Plus many free movies using advanced techniques.

I've also created a dedicated Capture One Pro Training page on The Digital Story. You can follow all of the tips and techniques that I publish in one convenient spot.

Thinking About Making the Transition from Aperture or Lightroom? - Download my free eBook titled, Rocky Nook's Guide to Moving to Capture One Pro. I show you the steps to create a test library, then build the foundation for a smooth transition to Capture One Pro.

Want to Comment on this Post?

You can share your thoughts at the TDS Facebook page, where I'll post this story for discussion.

Capture One Pro has arguably the best Aperture library import tool available. You can simply open a new Capture One Catalog, go to File > Import Catalog > Aperture Library, and begin the transition from Aperture to Capture One Pro.

After doing so, how do your Aperture images look in C1? Is the library structure retained. How does the RAW processing compare?

In this 6-minute video, I show you how an Aperture library looks in Capture One Pro. And without giving away too much, I'll tell you now that the transition is pretty darn smooth.

If you've been procrastinating making the move from Aperture to Capture One Pro, this movie should provide some motivation. And since we are going into the off-season for photographers, why not make this your end of year project? Then you can start 2017 with a fresh Capture One catalog.

captureone-aperture_import.png

More Capture One Pro Tips and Techniques

Improve your skills by watching Capture One Pro Essential Training now available on lynda.com. More than 5 hours of tips, tricks, and techniques. Plus many free movies using advanced techniques.

I've also created a dedicated Capture One Pro Training page on The Digital Story. You can follow all of the tips and techniques that I publish in one convenient spot.

Thinking About Making the Transition from Aperture or Lightroom? - Download my free eBook titled, Rocky Nook's Guide to Moving to Capture One Pro. I show you the steps to create a test library, then build the foundation for a smooth transition to Capture One Pro.

Want to Comment on this Post?

You can share your thoughts at the TDS Facebook page, where I'll post this story for discussion.

Capture One 9.3 Safe for macOS Sierra

Aside from Eizo monitor support and calibration, there aren't a lot of new features in Capture One Pro 9.3. But there are bug fixes, improved metadata handling, and new camera support. You can see the entire list of newly supported optics and bodies here.

capture-one-sierra.jpg

I tested C1 9.3 on macOS Sierra, and I'm happy to report that everything ran smoothly. Performance was snappy, and there were no hiccups that I could detect. So I recommend that you update both the macOS and Capture One Pro at your earliest convenience.

More Capture One Pro Tips and Techniques

Improve your skills by watching Capture One Pro Essential Training now available on lynda.com. More than 5 hours of tips, tricks, and techniques. Plus many free movies using advanced techniques.

I've also created a dedicated Capture One Pro Training page on The Digital Story. You can follow all of the tips and techniques that I publish in one convenient spot.

Thinking About Making the Transition from Aperture or Lightroom? - Download my free eBook titled, Rocky Nook's Guide to Moving to Capture One Pro. I show you the steps to create a test library, then build the foundation for a smooth transition to Capture One Pro.

Want to Comment on this Post?

You can share your thoughts at the TDS Facebook page, where I'll post this story for discussion.

The image editing tools in Capture One Pro are excellent. But there are times when I need to clone an area or use content aware, which is a strength of the venerable editing app. Fortunately, the two programs play well together, and here's how it works.

reflector-in-shot-web.jpg This fix is easier in Photoshop.

Here's a perfect example. There's a bit of a reflector in the above shot, and I don't have an easy way to fix it in Capture One Pro. So I right-click on the image and choose Edit With... from the popup menu. I then select Photoshop from the list of editing options.

fix-in-photoshop.jpg Easy fix in Photoshop.

In just a matter of seconds, I have removed the reflector with the Clone Stamp tool in Photoshop. Now all I have to do is go to File > Save, and the corrected picture is returned to my Capture One Pro library. Generally speaking, the roundtripped photo is placed before the original in the thumbnail view. It will also be a Tiff file compared to the RAW that you probably started with.

back-in-capture-one.jpg

Back in Capture One, I can continue to fine tune the shot, export it, or do anything else that I need to.

Just a few things to note: Capture one won't let you send an image from a smart album, you have to jump over to a regular album or collection. Also, after you choose Save in Photoshop, the image does return to Capture One, but it also just stays there in Photoshop. You can merely close it, or do something else with it if you wish.

Capture One and Photoshop work well together, and the only really penalty you pay is adding a Tiff file to your catalog that lives beside the existing content.

More Capture One Pro Tips and Techniques

Improve your skills by watching Capture One Pro Essential Training now available on lynda.com. More than 5 hours of tips, tricks, and techniques. Plus many free movies using advanced techniques.

I've also created a dedicated Capture One Pro Training page on The Digital Story. You can follow all of the tips and techniques that I publish in one convenient spot.

Thinking About Making the Transition from Aperture or Lightroom? - Download my free eBook titled, Rocky Nook's Guide to Moving to Capture One Pro. I show you the steps to create a test library, then build the foundation for a smooth transition to Capture One Pro.

Want to Comment on this Post?

You can share your thoughts at the TDS Facebook page, where I'll post this story for discussion.

During our TDS Photography Workshop in Pt. Reyes, CA, I put forth the idea of working in B&W over the course of the event.

P8203873-BW-Tomales.jpg Skipper on Thistle flower. Olympus OM-D E-M5 Mark II with 40-150mm f/2.8 PRO zoom in monochrome mode. Photos by Derrick Story.

Since many of the participants had mirrorless cameras with electronic viewfinders, we could view the beautiful Northern California landscape in Black & White right there in our cameras. I consider this a wonderful feature that makes this type of capture even more exciting.

Another nice feature is the ability to shoot in RAW+Jpeg. In my case, my Jpegs were the monochrome images, recorded at full resolution with SuperFine compression. But I still had the corresponding RAWs for each shot. This provided me the luxury of choosing which version I liked best for any given scene.

P8214009-BW-Pt-Reyes Tomales Point. Olympus OM-D E-M5 Mark II with 14-42mm EZ zoom in monochrome mode.

I was surprised at how often I liked the monochrome better. Yes, I had anticipated that some of the landscape scenes would look great in B&W, but I was delighted that many of the wildlife images looked great too.

P8213932-BW-Pt-Reyes Olympus OM-D E-M5 Mark II with 40-150mm f/2.8 PRO zoom in monochrome mode.

Because the monochromes were Jpegs, I knew that I would be able to edit them quite as much as the RAW files (although they held up better than I anticipated). So I did try extra hard to get them right in the camera. I think this led to me slowing down a bit and really enjoying the experience of photographing the diversity of Pt. Reyes.

P8203907-BW-Tomales Olympus OM-D E-M5 Mark II with 9mm "lens cap" fisheye in monochrome mode.

A few of our photographers also went this route and created very artistic images. Others stuck with RAW and converted to B&W in post. But almost everyone shared a stunning monochrome or two during our class presentation at the end of the workshop.

P8203880-BW-Tomales Olympus OM-D E-M5 Mark II with 40-150mm f/2.8 PRO zoom in monochrome mode.

So what's my conclusion after this artistic experiment? I think I'm going to use this technique more often. I really don't have anything to lose with RAW+Jpeg, and I felt that my concentration was improved while shooting. Not to mention that I really like some of the images.

Capture One Pro Tips and Techniques

I cataloged and fine tuned these images with Capture One Pro. If you want to learn how to work with your photographs in this application, check out Capture One Pro Essential Training, now available on lynda.com. More than 5 hours of tips, tricks, and techniques. Plus many free movies using advanced techniques.

I've also created a dedicated Capture One Pro Training page on The Digital Story. You can follow all of the tips and techniques that I publish in one convenient spot.

Thinking About Making the Transition from Aperture or Lightroom? - Download my free eBook titled, Rocky Nook's Guide to Moving to Capture One Pro. I show you the steps to create a test library, then build the foundation for a smooth transition to Capture One Pro.

Want to Comment on this Post?

You can share your thoughts at the TDS Facebook page, where I'll post this story for discussion.

I've been having a blast this summer shooting with my Olympus TG-4, in part because it records the location data for every picture I take. Many of these images end up in my Capture One Pro catalog... geotags in all.

Capture-One-GPS-web.jpg

But what happens from there? To see what's going on, click on the Metadata tab (i) in the toolbar on the upper left side. You'll have to scroll down a bit, but there is an EXIF-GPS brick that lists latitude, longitude, and altitude. So you can indeed confirm that your image has location data.

Google_Maps-Location-web.jpg

There's also a "Show on map" label in the GPS box. If you click on it, you're transported to Google Maps where you can see your location, share it with others, or send it to a mobile device. You'll need an Internet connection for this to work.

If you didn't know the name of the place where you took the shot, you can copy it from Google Maps, return to the Metadata tab in Capture One Pro, and add the info to the IPTC location fields. It's not quite as seamless as Photos for OS X or Lightroom, but it does work well.

So as the Summer continues, I'm going to keep shooting with my TG-4 and uploading those files to my Capture One Pro catalog.

More Capture One Pro Tips and Techniques

Improve your skills by watching Capture One Pro Essential Training now available on lynda.com. More than 5 hours of tips, tricks, and techniques. Plus many free movies using advanced techniques.

I've also created a dedicated Capture One Pro Training page on The Digital Story. You can follow all of the tips and techniques that I publish in one convenient spot.

Thinking About Making the Transition from Aperture or Lightroom? - Download my free eBook titled, Rocky Nook's Guide to Moving to Capture One Pro. I show you the steps to create a test library, then build the foundation for a smooth transition to Capture One Pro.

Want to Comment on this Post?

You can share your thoughts at the TDS Facebook page, where I'll post this story for discussion.

Mac Photographers managing a large catalog of images may prefer Capture One Pro to Apple's homegrown Photos app. But that doesn't mean they have to give up iCloud connectivity to do so. Here's how to connect your Capture One catalog to your iPhone and other iCloud-enabled devices.

export-folder.jpg

On Your Mac

The first thing you want to do is set up an Capture One Export folder in your iCloud Drive. I'm assuming that you have both iCloud and iCloud Drive enabled. If not, you'll need to do this first.

iCloud Drive will be available in the Favorites sidebar on the left side of any Finder window. Click on it once to open it, then create a new folder inside and label it Capture One Export. This will be the destination for the images that you want to export from Capture One Pro to your iOS device.

Create a New Process Recipe in Capture One Pro

Now go to the Output tool tab in Capture One Pro, and create a new process receipt. I would call it iCloud Export. Choose the parameters you want for the images that will be exported to your iCloud account. Here's how I set mine up.

iCloud-process.jpg

Now all you have to do is select one of more images, then run the iCloud Export process. The images will be placed in the Capture One Export folder, then shortly automatically uploaded to your iCloud account.

Seeing Your Images on the iPhone

icloud-drive.jpg

Now open the iCloud Drive app on your iPhone or iPad. You should see the Capture One Export Folder inside. Tap on it, and the pictures you exported from Capture One will be inside. From this point, you can save them to your Camera Roll (Save Image) or open them in another application. They're also available for Instagram, Facebook, and Twitter.

The good news is, that you don't have to give up pro level image management to enjoy iCloud connectivity. Set up your export folder today, and get those images onto your iOS devices.

More Capture One Pro Tips and Techniques

Improve your skills by watching Capture One Pro Essential Training now available on lynda.com. More than 5 hours of tips, tricks, and techniques. Plus many free movies using advanced techniques.

I've also created a dedicated Capture One Pro Training page on The Digital Story. You can follow all of the tips and techniques that I publish in one convenient spot.

Want to Comment on this Post?

You can share your thoughts at the TDS Facebook page, where I'll post this story for discussion.

One of the primary reasons that I moved from Aperture to Capture One Pro was that I felt comfortable with its organization tools. Yes, I like my catalog neat and tidy, and here's how I do that.

groups-and-projects.jpg

It's all about the hierarchy. At the top are Groups, which is Capture One terminology for what we typically call folders. I create my top level Group by navigating to User Collections, then clicking on the + icon. I then choose Group Inside...

For my catalog, this is usually a year, such as 2016. Moving forward, I keep my images in Projects, which look like little file boxes. Click on your Group once to highlight it, then click on the + and choose Project Inside... to create a new Project inside of that Group.

Projects need Albums to contain the actual image files. Click on your newly-created Project to highlight it, then click on the + icon, and choose Album Inside... from the popup menu. You are now setup to put images inside your User Collection.

When your images first are copied to the Catalog, usually from a memory card, by default they arrive in Catalog Collections > Recent Imports. Select all of those thumbnails from the last import, and drag them to the Album you created inside of the Project in the User Collections area. You have now successfully organized your first shoot.

Now all you have to do is continue down this path, creating nested Groups as necessary. You might want to add a Smart Album or two at the top of the list in the Group. You can click and drag these elements to place them in any order you want.

So the hierarchy looks something like this:

  • User Collections
  • Top Level Group
  • Nested Group
  • Project
  • Album

I like a clean workspace. I feel like I'm more productive in an organized environment, and the tools in Capture One Pro make that easy.

More Capture One Pro Tips and Techniques

Improve your skills by watching Capture One Pro Essential Training now available on lynda.com. More than 5 hours of tips, tricks, and techniques. Plus many free movies using advanced techniques.

I've also created a dedicated Capture One Pro Training page on The Digital Story. You can follow all of the tips and techniques that I publish in one convenient spot.

Thinking About Making the Transition from Aperture or Lightroom? - Download my free eBook titled, Rocky Nook's Guide to Moving to Capture One Pro. I show you the steps to create a test library, then build the foundation for a smooth transition to Capture One Pro.

Want to Comment on this Post?

You can share your thoughts at the TDS Facebook page, where I'll post this story for discussion.

I don't think a lot of photographers realize just how easy it is to digitize their film negatives. I'm going to show you the few basic steps that I use with Capture One Pro. My method was inspired by the excellent article, How to Convert Negatives to Positives Using Capture One by Quentin Decaillet.

negative-scanning-web.jpg

First you have to take a picture of your negative and save it as a RAW file. I have a simple setup where I use a macro lens on my Olympus OM-D to photograph a negative on a lightbox. I use a large skylight filter to keep the neg flat while I shoot it. Works great.

scanning-the-neg.jpg

Then I load the RAW file into Capture One Pro. Select the Levels adjuster and invert the dark and light values. It's simple: in the bottom boxes below the graph, enter 255 where 0 is, then enter 0 where 255 was. Save this as a preset. You now have a positive.

levels-adj-web.jpg

At this point, I typically just adjust the luminosity to taste, add a little clarity and sharpening, and call it a day. I tend not to mess with color much because I like the film look supplied by the negatives themselves.

P7181076-TFP016-Scan.jpg SMART Train Dry Run, Santa Rosa, CA - Contax 137 MA in Aperture Priority Mode at f/16. Yashica 42-75mm zoom. Fujicolor Superia 400 expired film. Photos by Derrick Story.

The point is, you can put film negatives to work right away for social and general web publishing. Take a picture, invert the levels, and enjoy.

More Capture One Pro Tips and Techniques

Improve your skills by watching Capture One Pro Essential Training now available on lynda.com. More than 5 hours of tips, tricks, and techniques. Plus many free movies using advanced techniques.

I've also created a dedicated Capture One Pro Training page on The Digital Story. You can follow all of the tips and techniques that I publish in one convenient spot.

Thinking About Making the Transition from Aperture or Lightroom? - Download my free eBook titled, Rocky Nook's Guide to Moving to Capture One Pro. I show you the steps to create a test library, then build the foundation for a smooth transition to Capture One Pro.

Want to Comment on this Post?

You can share your thoughts at the TDS Facebook page, where I'll post this story for discussion.

One of the new features in Capture One Pro 9.2 is called Create Albums From... It's something that former Aperture users will appreciate, because it allows you to choose a group of thumbnails, right-click on them, and put those shots in an album, on the fly.

For the most part, the tool works well, although I am going to suggest a tweak that I hope they incorporate in future updates. But first, let's see how it works now.

create-album.jpg

Using "Create Albums From"

second-dialog.jpg

Select a group of thumbnails and right-click on them to reveal the popup menu command, Create Albums From. Then choose Selection. You'll see a second dialog box that gives you two choices: "Add selected images after creation" (which seems unnecessary to me, since that's the point of the whole thing) and "Select collection after creation," which opens the album after you make it.

At this point, I expected Capture One to put the new album inside the project I was working in. But instead, it places it at root level. So there's one more step of dragging the new album into the project. Not a big deal, but I think we should have the option to put the new album in its parent project. Maybe in the next update...

Overall, however, this feature is a timesaver. And it's available right now if you update to Capture One Pro 9.2. Being able to create albums on the fly makes it much easier for us to work with sub-groups of images while we're organizing our catalog.

More Capture One Pro Tips and Techniques

Improve your skills by watching Capture One Pro Essential Training now available on lynda.com. More than 5 hours of tips, tricks, and techniques. Plus many free movies using advanced techniques.

I've also created a dedicated Capture One Pro Training page on The Digital Story. You can follow all of the tips and techniques that I publish in one convenient spot.

Thinking About Making the Transition from Aperture or Lightroom? - Download my free eBook titled, Rocky Nook's Guide to Moving to Capture One Pro. I show you the steps to create a test library, then build the foundation for a smooth transition to Capture One Pro.

Want to Comment on this Post?

You can share your thoughts at the TDS Facebook page, where I'll post this story for discussion.

Just because you left Aperture or Lightroom behind, that doesn't mean that you have to abandon your favorite plugins too. I've been using Silver Efex Pro with Capture One, and the two get along just fine. This also works for other apps/plugins too.

What you might not realize is that, even though you've been using Sliver Efex Pro 2 as a plugin, there's an app in your Applications folder: Applications > Nik Collection > Silver Efex Pro 2.app. Capture One Pro can connect with that app using the Edit With command: Control-Click > Edit With > Silver Efex Pro 2.

01-Edit-With.jpg Start with the Edit With command in Capture One Pro.

Going this route allows you to set up an Edit Recipe, where you can choose between Tiff or Jpeg, color space, resolution, and scale. A new file is created from the original RAW, and it is sent to Silver Efex for work. Here's how to do it.

02-Adjust-SilverEfex.jpg

The Actual Steps

  • In Capture One Pro, start with a RAW file. By doing so, the original image will stay protected.
  • Right-click on the RAW file and select Edit With...
  • Set up the job to your liking, including selecting Silver Efex from the Open With popup menu (see the top illustration). You can choose any of the apps that appear here.
  • Click on the Edit Variant button.
  • Adjust your image in Silver Efex, then click on the Save button.
  • The new Jpeg or Tiff will be returned to your Capture One Pro library.

Tiff-Returned-to-C1P.jpg File retured to Capture One Pro and placed alongside the original.

I've just stared playing with this workflow, so I'm sure there's more to learn. But this should get you pointed in the right direction is you want to continue to use your favorite plugins with Capture One Pro.

More Capture One Pro Tips and Techniques

Improve your skills by watching Capture One Pro Essential Training now available on lynda.com. More than 5 hours of tips, tricks, and techniques. Plus many free movies using advanced techniques.

I've also created a dedicated Capture One Pro Training page on The Digital Story. You can follow all of the tips and techniques that I publish in one convenient spot.

Thinking About Making the Transition from Aperture or Lightroom? - Download my free eBook titled, Rocky Nook's Guide to Moving to Capture One Pro. I show you the steps to create a test library, then build the foundation for a smooth transition to Capture One Pro.

Want to Comment on this Post?

You can share your thoughts at the TDS Facebook page, where I'll post this story for discussion.

One of the reasons why I continued using Aperture after Apple ceased development, was because I was fond of the plugins I had acquired for it.

As I became more familiar with Capture One Pro, however, I learned that I might not be giving up all that much after all, especially for Black & White photography. Two reasons for that: 1) The Black & White converter image adjustment, and 2) Styles presets.

Black & White Converter Tool

capture-one-bw.jpg

The adjustment sliders for B&W conversion are very good. But the kicker is all of the presets loaded in to the application. So you can browse the different looks, pick one you like, and then fine tune from there. Here's a video on how that works.

As a finishing touch, take a look at the Film Grain tool. There are a variety of great effects there, including my favorite, Silver Rich.

Film Emulation Styles

There are also some wonderful commercially available Styles that you can download, such as Capture One Styles that load a variety of effects right in to your application.

film-styles.jpg

The nice thing about these is that they don't disrupt the RAW workflow. My previous Aperture plugins required that I converted files to TIFFs and then roundtrip them. With Styles, everything stays in RAW and in the host application.

Thanks to these features, I'm discovering that there is indeed, life after Aperture plugins.

More Capture One Pro Tips and Techniques

Improve your skills by watching Capture One Pro Essential Training now available on lynda.com. More than 5 hours of tips, tricks, and techniques. Plus many free movies using advanced techniques.

I've also created a dedicated Capture One Pro Training page on The Digital Story. You can follow all of the tips and techniques that I publish in one convenient spot.

Thinking About Making the Transition from Aperture or Lightroom? - Download my free eBook titled, Rocky Nook's Guide to Moving to Capture One Pro. I show you the steps to create a test library, then build the foundation for a smooth transition to Capture One Pro.

Want to Comment on this Post?

You can share your thoughts at the TDS Facebook page, where I'll post this story for discussion.

One of the most flexible tools in Capture One Pro is User Styles. I think they're also off the radar for many users. That's too bad because this functionality allows photographers to save a combination of settings and apply them to images as necessary.

user-styles-c1.png

You can use styles to create "your look" for images, apply specific adjustments to portraits and landscapes, and even save them as metadata boilerplates. Take a look at this short movie for an overview on how styles work.

And in addition to the styles you create, you can purchase styles to apply a variety of effects and film emulations to your photographs. Once you enable this secret weapon to your workflow, you'll have a whole new appreciation for the power of Capture One Pro.

More Capture One Pro Tips and Techniques

Improve your skills by watching Capture One Pro Essential Training now available on lynda.com. More than 5 hours of tips, tricks, and techniques. Plus many free movies using advanced techniques.

I've also created a dedicated Capture One Pro Training page on The Digital Story. You can follow all of the tips and techniques that I publish in one convenient spot.

Thinking About Making the Transition from Aperture or Lightroom? - Download my free eBook titled, Rocky Nook's Guide to Moving to Capture One Pro. I show you the steps to create a test library, then build the foundation for a smooth transition to Capture One Pro.

Want to Comment on this Post?

You can share your thoughts at the TDS Facebook page, where I'll post this story for discussion.

I can't be the only photographer who sometimes needs to export just a single image quickly for a web post, then later on send out an entire batch at different resolutions. It all depends on the task at hand, right?

Capture One Pro is quite versatile in this area. There are two distinct ways to export images from your catalog. The first is the actual Export command (File > Export Images), and the second is using the Output tab with its Process Recipes. Take a look at this video for a quick overview of each method.

I tend to use File > Export for those quick tasks when I'm only sending an image or two to the Desktop. But I love having the Output option for the bigger jobs when I want to send images out of the catalog at multiple resolutions, simultaneously.

batch-export-cp1.jpg The Output tab is perfect for bigger export jobs.

This is a terrific system for getting your images out of your catalog and in to clients' hands, social sites, and on your mobile devices.

More Capture One Pro Tips and Techniques

Improve your skills by watching Capture One Pro Essential Training now available on lynda.com. More than 5 hours of tips, tricks, and techniques. Plus many free movies using advanced techniques.

I've also created a dedicated Capture One Pro Training page on The Digital Story. You can follow all of the tips and techniques that I publish in one convenient spot.

Thinking About Making the Transition from Aperture or Lightroom? - Download my free eBook titled, Rocky Nook's Guide to Moving to Capture One Pro. I show you the steps to create a test library, then build the foundation for a smooth transition to Capture One Pro.

Want to Comment on this Post?

You can share your thoughts at the TDS Facebook page, where I'll post this story for discussion.

The Clarity and Structure tools in Capture One Pro allow you to adjust both fine and coarse detail in your images. There are different algorithms to choose from, so you can use "Natural" for portraits and "Neutral" for objects. And because the sliders are centered positioned, you can both increase and decrease the effect, depending on your subject.

In this training video, I show you how to use Clarity and Structure for both objects and for portraits. I review the different modes so you can see exactly how to get the effect you want for your images.

More Capture One Pro Tips and Techniques

Improve your skills by watching Capture One Pro Essential Training now available on lynda.com. More than 5 hours of tips, tricks, and techniques. Plus many free movies using advanced techniques.

clarity-in-c1.png

I've also created a dedicated Capture One Pro Training page on The Digital Story. You can follow all of the tips and techniques that I publish in one convenient spot.

Thinking About Making the Transition from Aperture or Lightroom? - Download my free eBook titled, Rocky Nook's Guide to Moving to Capture One Pro. I show you the steps to create a test library, then build the foundation for a smooth transition to Capture One Pro.

Want to Comment on this Post?

You can share your thoughts at the TDS Facebook page, where I'll post this story for discussion.

in-aperture-exile.png

Recently, David Grover, business support for Phase One, and myself got together for a conversation about moving from Aperture to Capture One Pro. This falls into line with my thinking that C1 is the logical transition from Aperture for professional and demanding enthusiast photographers.

This one-hour video, that you can watch for free, covers topics such as:

  • Similarities between the two photo management applications.
  • Differences and things I miss from Aperture.
  • New tools in C1 that I wish I had had in Aperture.
  • Tips for new Capture One users.
  • Resources for making the move from Aperture to Capture One.

If you're interested in these topics, you might want to spend your lunch break with us. It's a good conversation that I hope you'll find helpful.

More Capture One Pro Tips and Techniques

Improve your skills by watching Capture One Pro Essential Training now available on lynda.com. More than 5 hours of tips, tricks, and techniques. Plus many free movies using advanced techniques.

I've also created a dedicated Capture One Pro Training page on The Digital Story. You can follow all of the tips and techniques that I publish in one convenient spot.

Thinking About Making the Transition from Aperture or Lightroom? - Download my free eBook titled, Rocky Nook's Guide to Moving to Capture One Pro. I show you the steps to create a test library, then build the foundation for a smooth transition to Capture One Pro.

Want to Comment on this Post?

You can share your thoughts at the TDS Facebook page, where I'll post this story for discussion.

From Aperture to Capture One Pro

Aperture users still contemplating their next move may want to read my guest post on the Phase One blog titled, Smooth transition from Aperture to Capture One Pro 9.

P8075103-bricks-n-stairs1900-1-1419x946.jpg

I write a bit about why I chose C1, then delve into the test library concept for those who prefer a smooth ride from one photo management app to another. There's also a 35-percent off coupon code for the book, "Capture One Pro 9, Mastering Raw Development, Image Processing, and Asset Management" by Sascha Erni. Not a bad deal at all!

More Capture One Pro Tips and Techniques

Improve your skills by watching Capture One Pro Essential Training now available on lynda.com. More than 5 hours of tips, tricks, and techniques. Plus many free movies using advanced techniques.

I've also created a dedicated Capture One Pro Training page on The Digital Story. You can follow all of the tips and techniques that I publish in one convenient spot.

Thinking About Making the Transition from Aperture or Lightroom? - Download my free eBook titled, Rocky Nook's Guide to Moving to Capture One Pro. I show you the steps to create a test library, then build the foundation for a smooth transition to Capture One Pro.

Want to Comment on this Post?

You can share your thoughts at the TDS Facebook page, where I'll post this story for discussion.

One of the most handsome contact sheet tools I've ever seen was right beneath my nose in Capture One Pro. There are a variety of styles to choose from, and the functionality is smooth and professional looking.

In this short video, I show you exactly how it works and how good looking the final product is.

There are a variety of applications for this tool, including publishing on your web site, creating smart-looking Flash drive galleries, or for client presentations on your laptop. Plus, you can include clickable links to your website and brand the galleries specifically for your business. And they won't look like the stuff that everyone else is creating.

lynda-web-contact-sheet.jpg

More Capture One Pro Tips and Techniques

Improve your skills by watching Capture One Pro Essential Training now available on lynda.com. More than 5 hours of tips, tricks, and techniques. Plus many free movies using advanced techniques.

I've also created a dedicated Capture One Pro Training page on The Digital Story. You can follow all of the tips and techniques that I publish in one convenient place.

Thinking About Making the Transition from Aperture or Lightroom? - Download my free eBook titled, Rocky Nook's Guide to Moving to Capture One Pro. I show you the steps to create a test library, then build the foundation for a smooth transition to Capture One Pro.

Want to Comment on this Post?

You can share your thoughts at the TDS Facebook page, where I'll post this story for discussion.

The latest release of Capture One Pro includes RAW support for seven new cameras:

  • Olympus Pen-F
  • Olympus Olympus Om-D E-M10 Mk II
  • Olympus Sony A68
  • Olympus Sony a6300
  • Olympus Sony RX1R Mk II (revised implementation) • Ricoh GR II
  • Olympus Pentax K-S2

I've been anxious to see how C1 would handle the images from one of my current favorite street cameras, the Olympus OM-D E-M10 Mark II. So I cruised Market St. last night to record some RAW for a test. I was not disappointed.

capture-one-9pt1.jpg

This shot was captured at ISO 1250 at f/1.7 with the Panasonic 20mm mounted on the E-M10 Mark II. Shutter speed was 1/40th with exposure compensation at +0.3 and auto white balance. The RAW file rendered in Capture One beautifully. The colors, right out of the camera were rich and saturated. I didn't make any color adjustments at all... just a little contrast and clarity. You can see (and download) a standalone version of the shot on my Flickr account.

This is going to be a wonderful combination, both with the E-M10 Mark II and the PEN-F. I also can't wait to see some shots from the Sony cameras that were added to the list.

More Capture One Pro Tips and Techniques

Improve your skills by watching Capture One Pro Essential Training now available on lynda.com. More than 5 hours of tips, tricks, and techniques. Plus many free movies using advanced techniques.

Thinking About Making the Transition from Aperture or Lightroom? - Download my free eBook titled, Rocky Nook's Guide to Moving to Capture One Pro. I show you the steps to create a test library, then build the foundation for a smooth transition to Capture One Pro.

Want to Comment on this Post?

You can share your thoughts at the TDS Facebook page, where I'll post this story for discussion.

My favorite time to add copyright and contact information for pictures is when I import them. You can do this in Capture One Pro by creating and applying a metadata preset. I've established one that contains my name, copyright, contact city, website, and usage terms. If you'd like to see how that's done, take a look at this instructional video.

Now that I have the metadata preset created, I can apply it during import using Styles. The Styles popup menu is located in the Adjustments area of Capture One's import dialog. Click on it and choose User Presets > Metadata > [your preset].

Apply-Meta-Import.jpg

Your contact information will be added to the images as they are imported. Plus, this setting is sticky, so it should remain enforce for your next import too. There's no better time to add metadata than at the very beginning of the workflow.

More Capture One Pro Tips and Techniques

Improve your skills by watching Capture One Pro Essential Training now available on lynda.com. More than 5 hours of tips, tricks, and techniques. Plus many free movies using advanced techniques.

Thinking About Making the Transition from Aperture or Lightroom? - Download my free eBook titled, Rocky Nook's Guide to Moving to Capture One Pro. I show you the steps to create a test library, then build the foundation for a smooth transition to Capture One Pro.

Want to Comment on this Post?

You can share your thoughts at the TDS Facebook page, where I'll post this story for discussion.

After months or research, testing, and practice, my 5+ hour video training Capture One Pro Essential Training is now available. Here's a taste of what's in store for you.

These movies are designed to show you the easiest ways to make the transition to Capture One. The techniques are straight-forward and uncomplicated. The focus is to get you up and running as quickly as possible, so you can be productive in your new photo management environment. This is a best practices approach.

CaptureOnePro-Promo 1024.jpg

These tutorials will be particularly helpful to former Aperture users looking for a new home, and for unhappy Lightroom photographers who want better RAW decoding and improved performance. I myself made the transition from Aperture to Capture One, and I show you how you can too.

After working with these movies, you might be surprised at just how easy it was to learn this application. Take a look. I think you'll be happy you did.

More Capture One Pro Tips and Techniques

Improve your skills by watching Capture One Pro Essential Training now available on lynda.com. More than 5 hours of tips, tricks, and techniques. Plus many free movies using advanced techniques.

Thinking About Making the Transition from Aperture or Lightroom? - Download my free eBook titled, Rocky Nook's Guide to Moving to Capture One Pro. I show you the steps to create a test library, then build the foundation for a smooth transition to Capture One Pro.

Want to Comment on this Post?

You can share your thoughts at the TDS Facebook page, where I'll post this story for discussion.

Among its many processing skills, Capture One Pro is an excellent B&W converter. And thanks to its built-in presets, you can create a beautiful monochrome in just 3 steps.

Step One - Choose a Preset

Choose your image and go to B&W in the Tool Tabs. It's the icon that's box with a diagonal line through it. The list of presets are listed in the B&W pane.

step1-choose-BW-preset.png

Mouse over the list to see how the various options affect your image. Choose your favorite.

Step 2 - Fine Tune Exposure, Clarity, and Grain

Once you've applied the preset, fine tune the image using the other tools in the B&W panel. I like the B&W sliders and Clarity. Exposure and Levels are usually helpful too.

step2-finetune-grain.png

Don't forget to add some grain. It's a wonderful effect and adds a little crispness to the image too.

Export to Your Desktop

Now all you have to do is go to File > Export Images > Variants, then set the parameters and click Export 1 Variant. Your B&W photo will be ready to share.

BW-Austin-1600.jpg

More Capture One Pro Tips

I've published a short tutorial for organizing the User Collections area of your library. Take a look at One Way to Set Up Your Capture One Library. Following those simple techniques will help you add the structure that you crave for your image library.

Capture One Pro Essential Training on lynda.com

Later this month, my new video training titled, Capture One Pro Essential Training will be live on lynda.com. Keep your eyes peeled for my announcement. More than 100 movies that show you the easiest way to master your library, edit files, and output them in a variety of ways.

Thinking About Making the Transition from Aperture or Lightroom? - Download my free eBook titled, Rocky Nook's Guide to Moving to Capture One Pro. I show you the steps to create a test library, then build the foundation for a smooth transition to Capture One Pro.

Want to Comment on this Post?

You can share your thoughts at the TDS Facebook page, where I'll post this story for discussion.

One of the best feelings a photographer can experience is to fire up the computer and quickly find an image from the past. Knowing that you are the master of your image library builds confidence and efficiency.

tina-library-organized.jpg

The first step in Capture One Pro is understanding the difference among the three major sections in the Library pane: Catalog Collections, User Collections, and Folders. Here's a brief explanation of each:

  • Catalog Collections - Controlled by the application using pre-defined filters such as All Images and Recent Imports. This is where your pictures enter the database when imported from a memory card.
  • User Collections - Controlled by you, providing the tools to build a library structure that's consistent with your sense of organization. You can create Groups (that act like folders in Aperture), Projects, and Albums.
  • Folders - Shows the location of your masters, whether they're in the C1 catalog container, or outside the application set up as a referenced catalog.

I've published a short tutorial for organizing the User Collections area of your library. Take a look at One Way to Set Up Your Capture One Library. Following those simple techniques will help you add the structure that you crave for your image library.

Capture One Pro Essential Training on lynda.com

Later this month, my new video training titled, Capture One Pro Essential Training will be live on lynda.com. Keep your eyes peeled for my announcement. More than 100 movies that show you the easiest way to master your library, edit files, and output them in a variety of ways.

Thinking About Making the Transition from Aperture or Lightroom? - Download my free eBook titled, Rocky Nook's Guide to Moving to Capture One Pro. I show you the steps to create a test library, then build the foundation for a smooth transition to Capture One Pro.

Want to Comment on this Post?

You can share your thoughts at the TDS Facebook page, where I'll post this story for discussion.