One of the most common questions I hear when teaching digital photography has to do with people wanting to serve their iPhoto libraries on the Internet. Now, thanks to Fastball Software, you can serve both iPhoto 6 and Aperture 1.5 albums on the web using the built-in Apache server in Mac OS X.
WebGem 1.1.3 is a nifty tool that you can download for free and serve up to 200 iPhoto and/or Aperture images. If you want unlimited photo serving, the registered version cost only $15.
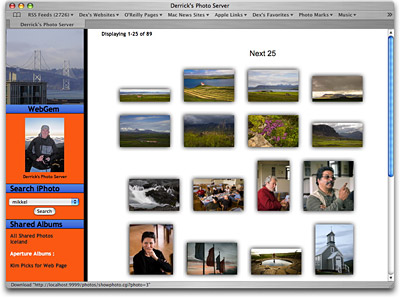
Setup couldn't be easier. Download WebGem, add it to your Applications folder, launch it, open the Preferences to determine which iPhoto and Aperture albums you want to serve, set the limits on maximum image size you're going to make available, and click the Start Server button. WebGem uses your built-in Apache server and makes your albums available through port 9999. If you don't know what your IP address is, go to the Sharing Preference pane, click on the Services tab, click on Personal Web Sharing, and read your IP address at the bottom of the pane. It should be something like 172:18:1:4. All you have to do is add :9999 to that address, and you can view the shared albums on any Mac, Windows, or Linux computer. (That address is what you send to those you want to make these pages available to. For example, it could be http://172:18:1:4:9999).
If you want to make the full size version of the image available to viewers, such as clients for your photography, check the "Allow full size downloads" box in WebGem's preferences. A "Download Full Size Photo" link will be added to each photo page than enables viewers to grab the high resolution version.
Aperture 1.5 users can serve their images too, right along side the iPhoto albums. The key is to use the previews function in Aperture 1.5. Once you generate previews for the albums you want to serve, they are available through WebGem.
I recommend that you also turn on Mac OS X's Firewall if you're going to serve images from your personal computer via WebGem. To make sure others can access the photos (but not the rest of the information on your Mac), add Port 9999 to the "Allow" menu. Go to the Sharing Preference pane, click on the Firewall tab, click on the New button, add Port 9999, then turn on the Firewall. You can now safely serve photos from your Mac.
WebGem provides search (via keywords) and organization via your published albums. Users do have to use the browser back button to go from enlarged images back to thumbnails, but aside from that minor inconvenience, this application works great.
I think WebGem is one of those truly handy shareware applications for Mac OS X photographers. Who would have thought that photo enthusiasts would be able to set up an Apache server with a photo database backend in just minutes? It's a beautiful thing...
Technorati Tags:
The Digital Story