The Digital Story now has a Member Photo Gallery where you can post up to 5 pictures a week to share and discuss with other virtual camera club members. Participation is simple. We've established a Flickr Public Group to manage the submissions. Once you post an image to the Public Group, it appears on the TDS Member Photo Gallery within 24 hours. It's that easy. Here are the detailed steps.
- Establish a free Flickr account (if you don't have one already).
- Join The Digital Story Public Group. Look for the "join" link on the Public Group page.
- Go back to your flicker home page (by clicking on the "Home" link in the upper left corner).
- Click on "Upload Photos" link and add your images.
- Choose one of the pictures that you've just uploaded that you want to add to The Digital Story Member Gallery, and click on it. This will open it up on a new page where you can add tags and a caption. You can even change the title if you want.
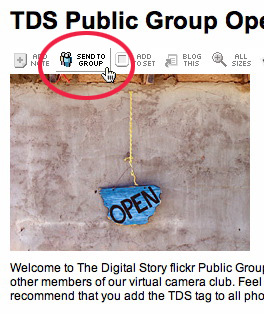
- Once you have everything in order, click on the "Send to Group" link right above the photo. You will see the link to The Digital Story in the popup menu. Select it and you're done!
Within 24 hours, your picture will appear on the Member Photo Gallery page. We'll also use the Flickr Public Group to communicate with each other, such as sending out special notices and alerts.
Visit the TDS Member Photo Gallery to see what your peers are publishing. Feel free to comment on any of the photos by clicking on them (you need to be a Flickr member to comment on these photos).
I'll continue to evolve this page and its functionality. So stay tuned... and start sharing your photos today!
Technorati Tags: digital photography, The Digital Story