This is The Digital Story Podcast #627, March 20, 2018. Today's theme is "An Office on the Road." I'm Derrick Story.
Opening Monologue
One of the great things about being a Nimble Photographer is the ease at which I can travel. In just a few days I will be on the road for a couple weeks. It will be an opportunity to add new images to my library and enjoy a change of scenery for my work. Yes, that's right, my work. And in this week's show I'll explain how I'm going to pull that off.
An Office on the Road
I'll be bouncing around to a few locations in the Hawaiian Islands. And because I'm on the go so much, I want to push my nimbleosity to the limits.
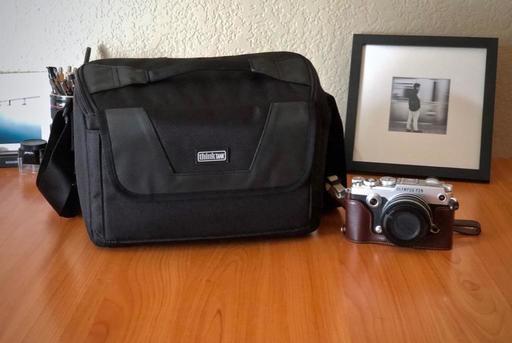
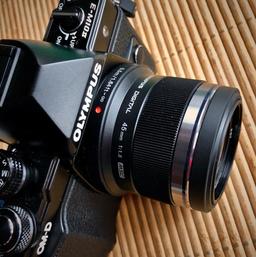
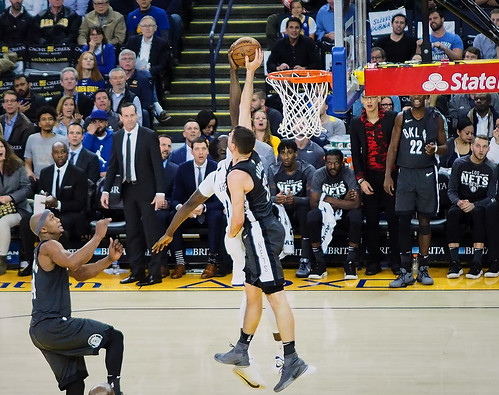
 Olympus OM-D E-M10 with 14-42mm EZ zoom lens and the Lowepro Dashpoint 30 pouch.
My gear bag is already packed, and I'm testing it here at home. I'm using a Lowepro Fastpack 150AW that is extremely compact. It fits anywhere, under any seat, in any overhead compartment, and easily next to me in a restaurant. Since I will always have my bag with me, it must be light and thin.
Speaking of light, it weighs in at 12.5 pounds for my entire kit, and that includes a 13" laptop. Here are the contents:
- Lowepro Fastpack BP 150 AW II
- Apple 13" MacBook Pro
- G-Technology 500GB G-DRIVE slim USB 3.1 Gen 2 Type-C External SSD
- Olympus OM-D E-M10 Mark II mirrorless camera with 14-42mm EZ zoom
- Olympus M.Zuiko Digital 45mm f/1.8 lens
- Panasonic Lumix G 20mm f/1.7 II ASPH. lens
- Olympus Tough TG-5 digital camera
- Leica D-LUX (Typ 109) digital camera
- Contax 159mm 35mm SLR with Zeiss 45mm f/2.8 Tessar lens
- Lowepro Dashpoint 30 camera pouch
- iPhone X
- Zoom H1n Digital Handy Recorder
- The typical accessories such as batteries, memory cards, backup hard drive, etc.
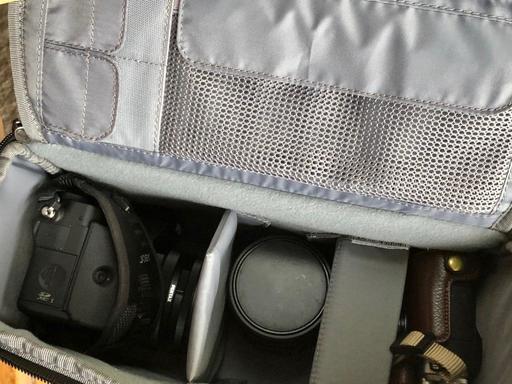
The cameras are all packed in individual tight-fitting cases inside the Lowepro backpack. I can grab any individual camera as I'm dashing out the door for a bite to eat or to run an errand. I also save space by using wrist straps instead of longer neck straps. You might not think it makes that much difference, but it does.
With this kit, I can handle all of my work over the next two weeks, and all I need is an Internet connection and occasional power.
Do You Have a Film Camera that Needs a Good Home?
Over the last year, I've received donations from TDS members who have film cameras that need a good home. What I do is inspect the items, repair and clean as I can, then list them in TheFilmCameraShop where I can find a good home for them. If you're interested in donating, please use the Contact Form on TheNimblePhotographer site. And thanks for you consideration!
Dates Announced for the Burney Falls and Lassen Volcanic National Park Workshop
We have our cabin reservations secured for Sept. 27-29, 2018 for the Burney Falls and Lassen Volcanic National Park Workshop. Here's more about it.
Aerial Photography Workshop Update
Public registration is now open for the Sonoma Country Hot Air Balloon and Drone Photography Workshop, June 8-10, 2018. We're combining two very fun aerial activities into one workshop. Be sure to get on the Reserve List for this one!
Come Join me at the Skylum Photography Public Group
I'm now moderating the Skylum Photography Public Group, and I would love to have interested members from our audience join me there.
Updates and Such
You can become a member of our Inner Circle by clicking on this link or by clicking on the Patreon tile that's on every page of The Digital Story.
B&H and Amazon tiles on www.thedigitalstory. If you click on them first, you're helping to support this podcast. And speaking of supporting this show, and big thanks to our Patreon Inner Circle members:
And finally, be sure to visit our friends at Red River Paper for all of your inkjet supply needs.
See you next week!
More Ways to Participate
Want to share photos and talk with other members in our virtual camera club? Check out our Flickr Public Group. And from those images, I choose the TDS Member Photo of the Day.
Podcast Sponsors
Red River Paper - Keep up with the world of inkjet printing, and win free paper, by liking Red River Paper on Facebook.
The Nimbleosity Report
Do you want to keep up with the best content from The Digital Story and The Nimble Photographer? Sign up for The Nimbleosity Report, and receive highlights twice-a-month in a single page newsletter. Be a part of our community!
Want to Comment on this Post?
You can share your thoughts at the TDS Facebook page, where I'll post this story for discussion.