About the only way you can get a spare Olympus-branded battery for the OM-D E-M5 is to buy a second body. So those of us who need a second cell, or who like to shoot with the Power Grip that holds another battery, are forced to look elsewhere for the time being.
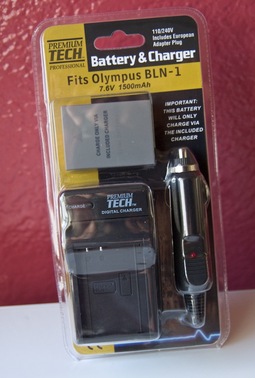
I've tried the Power Tech 2-Pack Battery And Charger Kit that sells for $24.95.
The kit includes two BLN-1 batteries, a portable charger, and a handful of other goodies. The charger has swing-out electrical prongs so you don't need a separate power cable to plug it into the wall. It also comes with a two-prong European adapter, and a car outlet adapter.
The batteries seem to last about 2/3 as long as the OEM Olympus batteries. I put the Power Tech cell in the OM-D body, then use the original Olympus BLN-1 in the power grip. In the menu, I instruct the camera to use the Power Grip battery first. I do this because it's much easier to change batteries from the grip than having to remove the grip to get to the one in the camera body. Basically, the Power Tech unit become my backup battery if I drain the Olympus unit.
The catch to all of this is that you can only charge the Power Tech batteries in the supplied charger. They are not compatible with your OEM Olympus charger. The bad news is that the Nimble Photographer doesn't like carrying two battery chargers. The good news is that they don't take up much room, plus I can charge two batteries at once.
I don't consider this a long term solution. But for the moment, I'm happy to have 3 batteries for my OM-D, and with a cash outlay of only $25.
Take a look at the Olympus Micro Four Thirds Gear Guide for an overview of cameras, lenses, and accessories.