This is The Digital Story Podcast #619, Jan. 23, 2018. Today's theme is "Oh, The Assumptions We Make." I'm Derrick Story.
Opening Monologue
Assumptions aren't always a bad thing. In our fast-paced world, they can save us time as we move from decision to decision. But we also know that assumptions can get us in trouble, or at least lead us down the wrong path. Photography is not immune to this shortcoming, and that's the topic for today's show.
Oh, The Assumptions We Make
Not long ago, I purchased a beautiful used Pentax-FA 50mm f/1.4 lens. I was looking for a fast prime to use on both my film cameras as well as DSLR bodies, and this optic, at least on paper, seemed to fit the bill.

First I mounted it on a Program Plus and shot a half dozen 35mm frames with it. Then I put it on my KP DSLR and snapped a photo with it wide open at f/1.4. When I review the image on the LCD, I thought something must be wrong. It didn't look very sharp. I recorded another frame with the same result.
My immediate assumption was that I had received a "bad copy." A wave of sadness came over me. It was such a beautiful lens, and I had purchased it for only $125. Fortunately, I decided to dig a little deeper, and here's what I discovered... (story concludes on the podcast).
Here are some other assumptions to be leary of...
- Larger camera sensors are always better.
- Primes are always sharper than zooms.
- I must always shoot at a low ISO.
- RAWs are always better than Jpegs.
- Real photographers (pros) only shoot with Nikons and Canons.
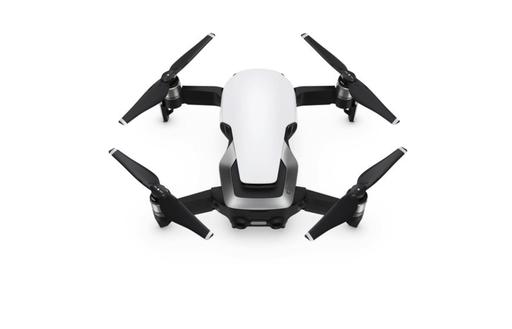
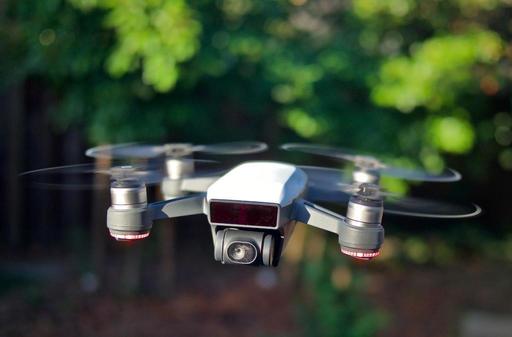
DJI Mavic Air leaked ahead of announcement, looks like a Spark-Mavic hybrid
DP Review writes: If these leaked photos and specifications are accurate, the Mavic Air will put Mavic-level hardware--a 3-axis gimbal, 1/2.3-inch CMOS sensor, 4K 60p video capture, obstacle-avoidance sensors on the front, back, and bottom--into a body that looks very much like the diminutive DJI Spark. The upside is that 4K 60p video capture that the Mavic Pro and even Mavic Pro Platium has been missing; the downside is that the smaller body means even less flight time, which is rumored at just 21 minutes. The drone is also purported to have a 32MP panorama mode.
Velbon launches the Chairpod, a tripod-chair hybrid (no, really)
Digital Camera World reports: We all love photography, but sometimes it's also nice to sit down. Well, thanks to Japanese manufacturer Velbon, these two pursuits need no longer be enjoyed separately.
Here, we present the Chairpod HY127, reported in Japanese publication DC Watch (translated version here). Able to extend to a maximum height of 1.28m with the addition of an extension rod, the Chairpod integrates a tripod and a folding chair, which allows the photographer - well, at least, a photographer that weighs less than 80kg (176 pounds), which is the maximum weight it'll support - to shoot while sitting.
The San Francisco Street Photography Workshop
San Francisco Street Photography - April 26-28, 2018 - We'll work entirely on location in San Francisco. Our hotel in picturesque Union Square will serve as our headquarters during the event. No rental car will be necessary. We'll explore the City's hidden treasures and capture them through our lenses. As always, we're adding new shooting locations again this year, including twilight assignments. This is San Francisco like you've never seen it before. And as a bonus, Olympus Visionary Mike Boening will be joining the teaching staff and leading sessions on street shooting and night photography. Two instructors, three days, and all for just $695. (That's right, it's 3 full days in one of the most photogenic cities in the U.S.)
The 2018 Nimble Classroom Series
The 2018 Nimble Classroom Series begins in February. Here are the first three sessions:
- Layers in Capture One Pro 11 - Feb. 10
- BUILD YOUR DIGITAL DARKROOM WITH PHOTOS - MARCH 10
- Digital Asset Mgmt with Luminar - April 21
You can sign up right now for each of these and reserve your spot. Only 6 participants per class.
Updates and Such
Three new training videos are now posted for our Patreon Inner Circle Members:
- Tips for Importing Images into Photos for macOS
- Using Gradient Masks in Luminar
- Working with Light Adjustments in Capture One Pro
You can become a member of our Inner Circle by clicking on this link or by clicking on the Patreon tile that's on every page of The Digital Story.
B&H and Amazon tiles on www.thedigitalstory. If you click on them first, you're helping to support this podcast. And speaking of supporting this show, and big thanks to our Patreon Inner Circle members:
And finally, be sure to visit our friends at Red River Paper for all of your inkjet supply needs.
See you next week!
More Ways to Participate
Want to share photos and talk with other members in our virtual camera club? Check out our Flickr Public Group. And from those images, I choose the TDS Member Photo of the Day.
Podcast Sponsors
Videoblocks - Go to videoblocks.com/digitalstory to get all the stock video, audio, and images that you can imagine for just $149. Save on millions of studio-quality clips, tracks, and graphics.
Red River Paper - Keep up with the world of inkjet printing, and win free paper, by liking Red River Paper on Facebook.
The Nimbleosity Report
Do you want to keep up with the best content from The Digital Story and The Nimble Photographer? Sign up for The Nimbleosity Report, and receive highlights twice-a-month in a single page newsletter. Be a part of our community!
Want to Comment on this Post?
You can share your thoughts at the TDS Facebook page, where I'll post this story for discussion.