Recently in Photography

  Page 96 of 384 in Photography  

If I were to switch right now, a serious contender would be the Fujifilm X-T20 mirrorless camera. I'll start by listing its impressive specs (including the $899 price tag), then I'll get to the real temptation.

Fuji-X-T20-Front.jpg

Terrific Baseline Features

  • 24.3MP APS-C X-Trans CMOS III Sensor
  • X-Processor Pro Image Processor
  • 3.0 inch 1.04M-dot Tilting Touchscreen LCD Monitor
  • 2,360K-dot OLED color viewfinder
  • UHD 4K Video Recording
  • Continuous Shooting Up to 5 fps
  • AF-C Custom Settings
  • Interval timer shooting for time lapse photography
  • Built-in WiFi for shooting from your smartphone
  • Wireless backup of data to a computer via WiFi
  • Weather and dust resistant

Clearly, this is a camera that can get the job done. But what pushes me over the edge is both the X-T20's button and dial layout, combined with its artistic film simulation modes.

Fuji-X-T20-top.jpg

I think Fuji's top deck is one of the best in the business. And for those of us who like a very tactile experience while shooting, these cameras are a delight.

Then there are the film simulation modes and grain control. Another thing that Fuji knows (very, very well) is film. And their evolution into digital imaging has retained the knowledge they gained during the analog years.

The Fujifilm X-T20... "also has a Grain Effect function for reproducing distinctive graininess seen in photographs taken with film cameras. The function can be set to Strong or Weak, and can be combined with any of the Film Simulation modes. You can easily obtain the look of film-based photos, with the effect most obvious when the image is printed out."

Combine this with the new ACROS Film Simulation mode (added to the already excellent simulated film emulsions), and I could truly extend my analog endeavors, even when it wasn't practical to shoot film.

Like I said, this is one tempting camera.


Nimble Photographer Logo

The Fujifilm X-T20. has a high Nimbleosity Rating. What does that mean? You can learn about Nimbleosity and more by visiting TheNimblePhotographer.com.

Want to Comment on this Post?

You can share your thoughts at the TDS Facebook page, where I'll post this story for discussion.

I love the RAW editing tools in Capture One Pro. But there are times when I want to tap the magic of Luminar and its extensive set of filters. And I don't want to compromise my digital asset management system to do so. As a result, I needed to figure out how to get these two kids to play together. And that's what I'm going to show you right now.

luminar-in-c1p.jpg Image edited in Luminar, then returned to Capture One Pro for asset management. Photos by Derrick Story.

Going from Capture One Pro to Luminar

Since you're not going to get a clean roundtrip from Capture One to Luminar then back, the next best thing is to use the Open With... command in Capture One (right-click on the image and choose Open With... from the popup menu). Luminar can process your RAW files, so you're sending over a high quality image for editing. Select Luminar from the popup menu, and the image will open in the app.

open-with-command.png

Edit in Luminar

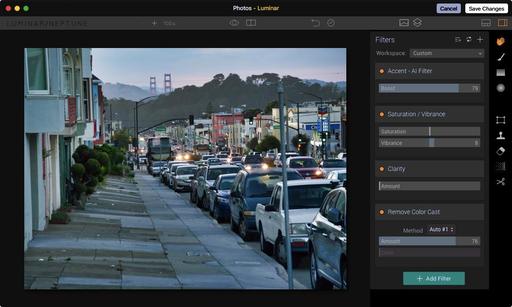
Edit as you normally would in Luminar, using the filters and presets to achieve the look you want. Once the image is ready to send back to Capture One, choose the Export command in Luminar, File > Export. This is the point where you have to think about your file organization.

Sending Back to Capture One Pro

My recommendation is to set up a standard receiving folder for the Luminar images, then import from that folder back into Capture One. Mine is a referenced system, leaving the images where they are and pointing the Capture One database to them. I tend to send back full sized Jpegs to keep file size reasonable. But you can choose Tiffs or another format, if you wish, during the export process.

before-after.jpg The before and after for this image in Luminar.

I add the word Luminar to the file name when exporting it, so I will know a bit about the picture's history when reviewing it in the Capture One catalog. Since the file name for the edited image is the same as the original, except for having Luminar at the end, the picture shows up in the catalog next to the original.

image-in-c1p.jpg Luminar image back in Capture One Pro for asset management.

All my IPTC and EXIF metadata is intact, and I now have another powerful option for working on my images stored in Capture One. If I do a lot of work to the shot in Luminar, multiple layers for example, I may also want to save the image as a separate Luminar file so I can go back and pick up my work at a later time. I can always export the updated version into Capture One Pro for management with the others.

Haven't tried Luminar? You can download a free trial here.

More Capture One Pro Tips and Techniques

Improve your skills by watching Capture One Pro Essential Training now available on lynda.com. More than 5 hours of tips, tricks, and techniques. Plus many free movies using advanced techniques.

I've also created a dedicated Capture One Pro Training page on The Digital Story. You can follow all of the tips and techniques that I publish in one convenient spot.

Thinking About Making the Transition from Aperture or Lightroom? - Download my free eBook titled, Rocky Nook's Guide to Moving to Capture One Pro. I show you the steps to create a test library, then build the foundation for a smooth transition to Capture One Pro.

Want to Comment on this Post?

You can share your thoughts at the TDS Facebook page, where I'll post this story for discussion.

That innocent looking Preview app on your Dock can handle so many photography tasks that we sometimes forget all the things that it can do... such as digitize a snapshot in 3 easy steps.

Just make sure your Mac and Multi-Functional Printer are on the same network. Put the snapshot on the glass scanning surface, then fire up Preview.

01-Preview.png Step 1 - File > Import from Scanner.

Go to File > Import from Scanner. You should see your device online. Select it.

02-Scanning.jpg Step 2 - Choose your settings.

The scanner should begin to generate a preview for you. If you don't like what you see, such as wanting to make an adjustment or repositioning the snapshot on the glass, do so, then click the Overview button to generate another preview.

Now you can choose your settings such as B&W or Color, DPI (I like 600), Auto Selection (easy way to scan just the image and not the entire surface), Format (Jpeg is the most common), and any image correction necessary. Once you've set those, click on the Scan button (see figure 2).

03-SaveImage.jpg Step 3 - Save the image.

Soon, your scanned image will popup in Preview ready for you to name it and save to your hard drive. Or, if you wish, you can print the scanned file, thereby making a semi-instant duplicate of it. (And don't forget to add the file to your photo management software for cataloging.)

Book or Videos: Photos for macOS

Explore the world of modern photography with my The Apple Photos Book for Photographers that features insightful text and beautiful illustrations.

And if you'd like to cozy up to a video at the same time, watch my latest lynda title, Photos for macOS Essential Training

You can share your thoughts at the TDS Facebook page, where I'll post this story for discussion.
Photography is both my hobby and a substantial revenue stream. I once kept both worlds in the same application (Aperture), but over the last couple years, I've separated my personal work from what I shoot for hire.

Capture-One-Wildspeak.jpg

Technology has had much to do with this. In 2012, for example, I shot just about everything with the same camera. iPhones weren't as good, Cloud sharing not as robust, and my workflow was essentially to remove the card from the camera, insert it into my Mac, and load everything into Aperture.

But 2017 is much different. I love shooting my day to day life with the iPhone, Olympus TG-4, and a variety of 35mm film cameras. The digital images flow right into my Photos for iOS and macOS apps, and they're instantly available to share, print, and post. It's easy and enjoyable. I've never been happier as a hobbyist.

My professional jobs involve higher resolution cameras, bigger files, larger quantities for each session, multiple export options, and serving as an archive for my clients. And for this work, Capture One Pro 10 has become my go-to app. Here are five reasons why.

Old School Organization

The tools for catalog management include projects, albums, groups (the equivalent of folders in Aperture), and everything else that I need to slice and dice a shoot. Plus, I can also manage content on my hard drives right there in the Capture One interface.

When I load thousands of images into a catalog, I want to be able to tame them as quickly as possible. Capture One makes that easy.

Excellent RAW Processing

The Capture One look is different than any other processor that I've used. It's bold. My RAW files jump off the screen even before I begin editing them.

Robust Editing Tools

Ninety-five percent of the time, I can handle all of my image editing in Capture One Pro. Starting with the amazing Contrast slider (that is far more than you'd think), to sophisticated color tools, to lens corrections, to localized editing brushes... this app provides what I need to get the most out of my images.

Flexible Output Options

The Output tab screams professional app. Here I can create a variety of custom export options to run individually or all at once. So if I need a set of master images to send to the client, and another set of web shots for an online gallery, Capture One Pro can provide that for me all at once.

Versatile Catalog Management

I can run a managed catalog or choose to go referenced with external hard drives storing my masters... on both Mac and PC platforms. I can enable a Session while on the road or working on a specific assignment, then incorporate that content into my master catalog. And I can do just about anything else I want with the Capture One Pro catalog structure. Perfect for guys like me who travel and have a master setup back at the studio.

I'm entering my second complete year with Capture One Pro. And I have to say... it feels great to have made a complete transition from Aperture.

Capture One Pro Tips and Techniques

Improve your skills by watching Capture One Pro Essential Training now available on lynda.com. More than 5 hours of tips, tricks, and techniques. Plus many free movies using advanced techniques.

I've also created a dedicated Capture One Pro Training page on The Digital Story. You can follow all of the tips and techniques that I publish in one convenient spot.

Thinking About Making the Transition from Aperture or Lightroom? - Download my free eBook titled, Rocky Nook's Guide to Moving to Capture One Pro. I show you the steps to create a test library, then build the foundation for a smooth transition to Capture One Pro.

Want to Comment on this Post?

You can share your thoughts at the TDS Facebook page, where I'll post this story for discussion.

If you'd like to spice up your Lightroom post production, consider tapping the Luminar plug-in that's included with the app bundle. It's easy to use, and provides a whole new set of editing options for your Lightroom images.

Step 1 - Install the Luminar Plugin for Lightroom

Enable-Lightroom.jpg

First launch the Luminar app, the go to Luminar > Install Plugins. If the Lightroom plugin is already installed, you're golden. Just click Done. If not, click on the Install button, then click Done once the install is completed. You can now minimize Luminar.

If you just installed the plugin, you'll have to restart Lightroom. Now everything is ready for the next step.

Step 2 - Choose Luminar from Plug-In Extras

02-choose-luminar.jpg

In Lightroom, click once on a photo you wish to edit, then go to File > Plug-In Extras > Transfer to Luminar. After a few seconds, the image will appear in the Luminar interface where you can use all of its creative tools.

03-Edit-in-Luminar.jpg

Step 3 - Apply Changes

Once you've finished your work in Luminar, click on the Apply button, and your image will be flattened and returned to your Lightroom catalog as a Tiff. Mine always come back right next to the original image.

04-back-to-lightroom.jpg

I've found that the Luminar toolset helps me explore my photographs in a new way. As such, it's a great complement to Lightroom's adjustments.

If you decide that you want to work more in depth with Luminar, creating multiple layers and enabling localized adjustments, I recommend that you open a master version of the image in the standalone Luminar app. By doing so, you can save your work document, with all of the layers and adjustments, and come back to it at a later time.

But if you're looking to quickly add come creative punch to a Lightroom catalog image, the plugin is both convenient and fast.

You can try Luminar for free. And if you like what you see, the entire package is only $69.

We're on Apple News!

Find us now on the Apple News App for iOS! Just open this link on your iOS device, then add The Digital Story to your Favorites.

Want to Comment on this Post?

You can share your thoughts at the TDS Facebook page, where I'll post this story for discussion.

This is The Digital Story Podcast #566, Jan. 10, 2017. Today's theme is "10 Questions I Asked Myself in Las Vegas." I'm Derrick Story.

Opening Monologue

If you've read my latest Nimble Photographer Journal entry, you know that I was a bit underwhelmed with CES this year. And I found myself muttering these questions as I roamed the hallways of Mandalay Bay and the Las Vegas Convention Center. So I thought you might find them interesting.

10 Questions I Asked Myself in Las Vegas

This year's show was more renovation than innovation, IMHO. I mean, I like kitchen remodels as well as the next guy. But I don't usually travel to Las Vegas to experience them firsthand. Here are a few questions, with answers, that passed through my mind during the week.

Las-Vegas-train-station.jpeg

  • Why doesn't my monorail pass work? - Great high tech idea: My prepaid monorail pass will be combined with my CES pass so that I'll have one easy to use badge for everything. Problem is, not only didn't my monorail pass work, I may or may not see a refund for my prepayment.
  • Where the heck is Olympus? - After not hearing a peep from them before the show, I wrote my contact and asked. Olympus decided to sit this out. They must of knew something that I didn't before the show.
  • Is Lyft as Good as Uber? - Since I didn't have a functional monorail pass, I decided to take advantage of the $5 per ride credit that Lyft was offering. I hadn't used them before, and was curious about their service. Bottom line: they are every bit as good as Uber.
  • What happened to the Canon booth? - One place that I could always count on for lots to do at CES was the Canon booth. This year I felt like they were jobbed out to a 3rd party vendor.
  • When did AT&T fix its network? - About half way through the show, it dawned on me that my phone had been working the entire time. This is quite a feat in a venue with thousands of connected geeks.
  • Why doesn't Panasonic get more credit for being great? - One of the bright spots of the week was the great offerings by Panasonic. Not only did they show off the wonderful GH-5, but they updated a number of their lenses. And this was only one small area of their display. Seems like Panasonic should get more respect...
  • Is it worth switching to Fuji just for the Titanium XT-2? - As if this camera didn't look hot enough already!.
  • Are we seeing comebacks from Polaroid and Kodak? - Unlike some of the other Polaroid cameras of late, the Pop looks like a quality device. And Kodak is finding a voice again with a second generation Super 8 and the revival of Ektachrome.
  • Is there no limit to what people will endure for a free lunch? - I can't believe what the press corps tolerates just for a dry sandwich.
  • Is it possible to attend CES and not come home with a cold? - Apparently not!

In the News

DJI reportedly takes majority stake in Hasselblad. "DJI is reported to have acquired a majority share in Hasselblad, according to an article posted January 4 on Luminous Landscape. We asked DJI's Corporate Communication Director of North America, Adam Lisberg, about the reports and he declined to comment. It's telling, however, that DJI isn't making an effort to deny the reports."

"The initial report from LL, written by Kevin Raber, recounts the history of Hasselblad from the company's aerial beginnings to the announcement of the X1D system. Raber speculates that unexpectedly high demand for the X1D forced Hasselblad to look for funding to produce the camera."

Thanks to DPreview.com.

Fisheye in Vegas

If you follow me on Instagram, Twitter, or Facebook, you may have noticed that I was relying heavily on my newish Rokinon 7.5mm f/3.5 Fisheye Lens during this trip. The bigness of Las Vegas seemed like a natural subject for this optic. And I have to tell you, I loved shooting with it last week. More about my adventures with it in this segment of the show.

Updates and Such

Big thanks to all of our Patreon members! I was able to pay for the podcast server and the backup system from last month's pledges. Your contributions are making a positive impact.

B&H and Amazon tiles on www.thedigitalstory. If you click on them first, you're helping to support this podcast. And speaking of supporting this show, and big thanks to our Patreon Inner Circle members.

And finally, be sure to visit our friends at Red River Paper for all of your inkjet supply needs.

See you next week!

More Ways to Participate

Want to share photos and talk with other members in our virtual camera club? Check out our Flickr Public Group. And from those images, I choose the TDS Member Photo of the Day.

Podcast Sponsors

MindShift Gear - MindShift Gear is a group of committed professional photographers and product designers who support conservation and protection of our natural resources and planet.

Red River Paper - Keep up with the world of inkjet printing, and win free paper, by liking Red River Paper on Facebook.

The Nimbleosity Report

Do you want to keep up with the best content from The Digital Story and The Nimble Photographer? Sign up for The Nimbleosity Report, and receive highlights twice-a-month in a single page newsletter. Be a part of our community!

Want to Comment on this Post?

You can share your thoughts at the TDS Facebook page, where I'll post this story for discussion.

I remember Macworld 2007 quite well. Thanks to my being on the conference faculty, I had a decent seat for the Steve Jobs keynote... the one where he introduced the iPhone.

iphone-introduction.jpg The Introduction of the iPhone, San Francisco 2007 - Canon Rebel XT, f/4, 1/20, ISO1600, -1.0ev, 28mm. Photos by Derrick Story.

By 2007, we really needed an all-in-one device that could handle phone calls, text, personal organization, and the Internet. We were tired of juggling Palm Pilots and candy bar cell phones. Blackberries seemed too pedestrian. And if we could get a decent camera out of the deal, all the better.

The problem was, that first 2-megapixel iPhone camera wasn't very good. And it certainly wasn't going to challenge the Canon XT I toted to San Francisco in 2007.

john-mayer.jpg John Mayer performing at the 2007 Macworld Keynote. Canon Rebel XT.

But the iPhone's sophistication evolved steadily, and by the iPhone 4, we had a good camera in addition to its other mobile features, and things began to change in the world of photography.

We know that the iPhone has all but killed the consumer compact digital camera. I never really liked carrying them around anyway, to be honest. I have two front pockets in my jeans: one for my wallet and the other for my iPhone. That's all I want with me.

Beyond that, however the iPhone was more than just my new compact camera, it was an integral link in my overall photography workflow. Regardless of what camera I was shooting with, I could upload those images, edit them, and publish from practically any location in the world.

iphone-with-adapter.jpg

During my reporting in Las Vegas last week, I would capture the image with an Olympus OM-D E-M5 Mark II, send the images to my iPhone 6S via WiFi, and share them on Instagram, Facebook, and Twitter from hotel lobbies, Starbucks, and yes, the occasional casino lounge.

ces-reporting.jpg Reporting during CES 2017.

As much as I like the iPhone camera, and I do like it, what I truly appreciate these days is the mobile connection to my entire photography ecosystem that includes iCloud, Photos for macOS, and all of my social sites. The iPhone is my Swiss Army Knife for reporting on the road. And as such, it has helped me become a more timely, creative photographer.

And to be honest... I'm having more fun than ever.

Photos for macOS - Part of my iPhone Ecosystem

Explore the world of modern photography with my The Apple Photos Book for Photographers that features insightful text and beautiful illustrations.

And if you'd like to cozy up to a video at the same time, watch my latest lynda title, Photos for macOS Essential Training

You can share your thoughts at the TDS Facebook page, where I'll post this story for discussion.
Panasonic, Canon Step Up at CES

Just when I was beginning to think that connected devices were going to overrun the halls of the Las Vegas Convention Center, Panasonic and Canon take the spotlight and show photographers that there's plenty for them at CES too.

Canon GX9 Mark II

Canon_G9X_MARKII.jpg The Canon GX9 Mark II.

I held the latest version of the GX9 last night at the Pepcom Digital Experience "Technology Tailgate" Event, and was amazed at how light and nimble it is. The big news about this 1"-sensor wonder is that Canon added its DIGIC 7 processor that allows for 8 fps when shooting RAWs. Basically, it's a muscle car squeezed into a compact. You can preorder the GX9 Mark II for $529 (in silver or black). It should be available next month.

Panasonic GH5

Panasonic-GH5-web.jpg Panasonic GH5

Panasonic's flagship mirrorless camera definitely has a Hemi under the hood. Take a look at this list of highlighted specs.

  • 20.3MP Digital Live MOS Sensor with Venus Engine Image Processor
  • UHD 4K 60p Video (no crop)
  • Internal 4:2:2 10-Bit 4K Video at 24/30p
  • 5-Axis Sensor Stabilization; Dual I.S. 2
  • 0.76x 3.68m-Dot OLED Viewfinder
  • 3.2" 1.62m-Dot Free-Angle Touchscreen
  • Advanced DFD AF System; 6K & 4K PHOTO
  • ISO 25600 and 12 fps Continuous Shooting
  • Dual UHS-II SD Slots; Wi-Fi & Bluetooth

Where Panasonic is distinguishing itself from the Olympus OM-D E-M1 Mark II is with video performance. In addition to its still photography prowess, the GH5 is a serious movie making machine, from cinematic theater to corporate training.

The Panasonic GH5 should be available by the end of March for $1,997

Refreshed Lens Line Up from Panasonic

Panasonic-lens-lineup-web.jpg

If there was ever any doubt that Micro Four Thirds rules the roost for mirrorless lens catalog, these latest updates from Panasonic should confirm what many of us already knew.

Case in point are four refreshed pro lenses, adding a new exterior finish and Dual IS performance when mounted to compatible cameras. They also include a micro step drive system that makes them even better suited for smooth focusing when recording video. The refreshed lenses include: 12-35mm f/2.8 II, 35-100mm f/2.8 II, 45-200mm f/4-5.6 II, 100-300mm f/4-5,6II.

Panasonic also introduced the Leica DG Vario-Elmarit 12-60mm f/2.8-4.0 ASPH. Power O.I.S. ($997) for pros who want a versatile zoom for just about any situation.

More Photography to Come

Other camera makers are making a splash at CES too. We'll keep the coverage coming. Stay tuned for more news.


Join me on my Instagram site as I explore the world of photography in Las Vegas.

This is The Digital Story Podcast #565, Jan. 3, 2017. Today's theme is "Something To Look Forward To." I'm Derrick Story.

Opening Monologue

Have you ever had a friend tell you, "I just want to get something on the books. I like having things to look forward to."? It's a very human emotion. In a lot of ways, I think it's an expression of hope. And it's a concept that applies well to our photography too, as I will discuss in today's show.

Something To Look Forward To

When we're standing at the threshold of a new year, most strive to make the 12 months ahead better than those in the rear view mirror. And one of the ways that we can do that is plan for activities that will bring goodness to our lives.

An area that's rich with possibilities for us is our photography. It offers so many opportunities in a variety of ways, a few of which I'm going to cover right now.

surf-bug.jpg

  • Enter a Photo Competition - Few things feel better to a photographer than having an image earn a top prize. In addition to all of the attention, and possible financial rewards, it is a solid affirmation that we are improving in our craft. But there are other benefits to this activity too...
  • Save For, then Purchase, a New Camera - This is different than slapping an impulse buy on your credit card. Instead, make this a project where you identify the gear that you desire, create a plan to save for it, then purchase it once the funds have been secured. Not only will you have the elation of a new camera or lens, but the satisfaction of designing a business project and accomplishing your goals.
  • Plan a Photography Vacation - There are so many benefits to getting out of your own backyard and exploring a different part of the country with your camera. In addition to the pictures you capture, you will meet new people, taste different foods, and broaden your understanding of the world. The good feelings will begin right away with putting your name on a reserve list or booking the flight.
  • Volunteer Your Services - There are so many areas that could use skilled photographers, but don't know how to find them or can't afford them: the local food bank, churches, schools, and amateur sports teams, just to name a few. If you line up a project for one such entity, imagine how good it feels to say, "Yeah, I'm going to be the photographer for that little leagues baseball team this summer."

In the News

An Update on Brides Magazine's Insistence That Pros Shoot Canon or Nikon. "Brides approached Matsuura with an article proposition: providing couples a guide for choosing a photographer. In response to the question "Besides the quality and style of photographs, what else should brides be thinking about?", Matsuura proposed a series of more detailed questions, one of which was: "What type of equipment do you use?" In addition to the proposed questions, Matsuura offered hypothetical answers that a photographer might give a client in an effort to further illustrate the type of interactions a couple might expect with a potential photographer. These hypothetical answers included the controversial assertion that professionals use either Canon or Nikon cameras."

What she wrote was: "Your photographer should know their equipment. Canon and Nikon are the most readily used cameras, but there are many other well-known professional cameras out there. Whatever your photographer does choose, it's good to make sure that he/she is well versed in their equipment."

But it was changed to: "Ideally, your photographer would use the most readily available professional camera."

Thanks to FStoppers.com.

Do You Have an Old Pentax DSLR?

I have some terrific Pentax-F and Pentax-FA lenses that I would like to compare on digital sensors to the film cameras I'm testing. If you have an older Pentax DSLR that you're not use and willing to sell affordably, please drop me a line at: derrick@thedigitalstory.com

CES is This Week

Most likely, by the time you hear this podcast, I will be in Las Vegas for the Consumer Electronics Show. That means I'll be reporting during the week, and will have a special podcast for you next week.

Updates and Such

Big thanks to all of our Patreon members! I was able to pay for the podcast server and the backup system from last month's pledges. Your contributions are making a positive impact.

B&H and Amazon tiles on www.thedigitalstory. If you click on them first, you're helping to support this podcast. And speaking of supporting this show, and big thanks to our Patreon Inner Circle members.

And finally, be sure to visit our friends at Red River Paper for all of your inkjet supply needs.

See you next week!

More Ways to Participate

Want to share photos and talk with other members in our virtual camera club? Check out our Flickr Public Group. And from those images, I choose the TDS Member Photo of the Day.

Podcast Sponsors

MindShift Gear - MindShift Gear is a group of committed professional photographers and product designers who support conservation and protection of our natural resources and planet.

Red River Paper - Keep up with the world of inkjet printing, and win free paper, by liking Red River Paper on Facebook.

The Nimbleosity Report

Do you want to keep up with the best content from The Digital Story and The Nimble Photographer? Sign up for The Nimbleosity Report, and receive highlights twice-a-month in a single page newsletter. Be a part of our community!

Want to Comment on this Post?

You can share your thoughts at the TDS Facebook page, where I'll post this story for discussion.
When I use my smartphone and Dropbox mobile to scan a document, the entire process only takes seconds, and the digital file is instantly available across all of my devices. The funny thing about this is, I don't think a lot of Dropbox users are aware of this functionality.

scan-in-dropbox.png

When you tap the + button in the Dropbox mobile app, a popup menu with three options appears: Scan Document, Upload Photos, Create or Upload File. Tap Scan Document, and you're directed to the scanning interface, which is designed specifically for documents and pictures. Here's a short video from Dropbox for Photographers that shows how it works.

Now I can access my new scan from any Dropbox-connected device: phone, tablet, or computer. And since Dropbox is platform agnostic, that means iOS, Android, Windows, and macOS.

See What Else Dropbox Can Do for You

Take a look at my lynda.com training, Dropbox for Photographers to see how this multi-platform service can easily integrate into your photography workflow.