Recently in Photography

  Page 365 of 382 in Photography  

Drool Factor: The Seitz 6x17 Digital

Seitz 6x17 Digital

This one is just for the dreaming of it... a high resolution 6x17 (160 million pixels - 7,500 x 21,250 resolution) digital camera that records shots in just one second. Impossible? No says Seitz, the maker of this amazing device.

The image sensor was developed by DALSA Corporation exclusively for Seitz. It has very high sensitivity and broad ISO range: 500-10,000, high image quality thanks to 48-bit color depth, low noise, high dynamic range, DALSA anti-blooming feature, Seitz image optimization algorythms, and you have the freedom to use your own raw-conversion workflow. It accepts world-class Schneider or Rodenstock large format lenses (on Seitz lens board) or Linhof Technorama, Fuji and other large format lenses (on adaptor plates). Bottom line, you get a gigantic digital panorama at nearly the speed of many "regular" digital cameras.

The price? It's big too. The Seitz 6x17 Digital will set you back 28,900 Euros (that's about $36,800 American). Oh my...

Technorati Tags: ,

QuickTip: Make a String Tripod

digicam_tile.jpg

Here's a trick that only requires a 1/4" bolt and some sturdy string. The result? A super portable tripod that helps you steady your camera up to 2-f/stops of light or more! Call it a poor man's image stabilizer.

First, take a sturdy length of string and create a loop at one end big enough to slide your foot into. Then determine the length your need to hold the camera up to your eye. Attach the 1/4" bolt to the other end of the string at the proper length. You're now ready to shoot.

Slide your foot through the loop, attach the bolt to the camera's tripod mount socket, and pull the camera upward until the string is taut. You'll be amazed at how steady you can hold the camera as you gently squeeze off a shot.

Normal acceptable handheld shutter speeds are 1/30th of a second. With the string tripod, you should be able to shoot all the way down to 1/8th of a second. Give it a try!

Technorati Tags: , ,

Add Voice Memos to Your iPhoto Library

Most compact cameras enable you to record voice memos to accompany photos you've just captured. To get the most out of this function, however, you want to store the audio with the appropriate image.

Unfortunately iPhoto doesn't let you add straight audio files to its library. There has to be an image attached the audio file. So the dream of having voice memos associated with your pictures is only that, a dream. Or is it? By using this easy technique and QuickTime Pro, you can include voice memos with your images in iPhoto.

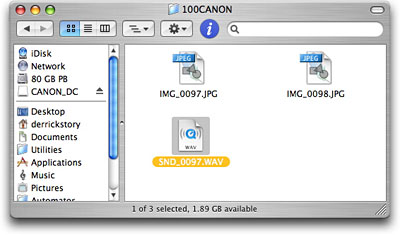
After you've uploaded your pictures to iPhoto, leave the memory card mounted on your Desktop so you can examine its internals. This is where card readers have a real advantage over uploading your images directly from the camera. Find the audio file, usually with a .wav extension, and the corresponding image file. The two should have the same number in their file names.

find the wave file

Drag the photo on to the QuickTime logo on your Dock to open it in QuickTime. You're going to convert it into a movie by exporting it selecting File > Export then choosing "Movie to QuickTime Movie" under the Export pop up menu. Click the Options button and choose "Photo Jpeg" as your compressor and 640 x 480 as the size. After you hit Save, your image will become a QuickTime movie. Double-click it to open it

Now drag your camera's sound file to QuickTime to open it. You have two QuickTime movies open -- the converted photo and the audio file. Go back to your photo and go to Edit > Select All, then choose Edit > Copy. Your picture movie is now on the clipboard. Go back to your voice memo and choose Edit > Add to Selection and Scale. The photo movie is now added to your voice memo. You can listen to the audio by clicking the play button. (You need the Pro version of QuickTime to use this technique. You can upgrade on the Apple site for $29.95.)

color_accent_screenshot.jpg

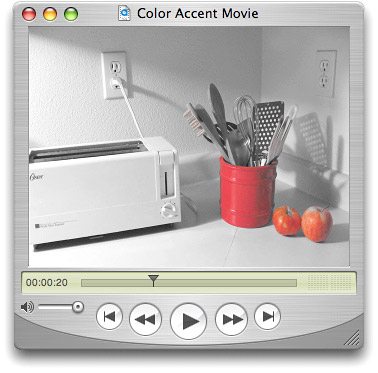
You're almost finished. Now choose Save As and select "Save as self-contained movie." Give your movie a name and click Save. Drag your voice memo photo movie into the iPhoto album where the other photos are stored. Now, in addition to all of the still images, you have a descriptive movie to accompany them that explains the technique you used to capture them.

You can download a sample movie here. Try it. It's really cool.

Spot Color

What used to be an agonizing process in Photoshop, now only takes seconds using the "Color Accent" feature in the Canon PowerShot SD630, SD700 and their brethren. This is one of those gimmicks that you might pass by in the owner's manual without ever trying. My advice, if it's included in your camera, go try it now.

Color Accent works like this. First you look at a composition and decide what color to feature. Navigate to Color Accent mode, point your spot meter marker in the LCD viewfinder at the color, and press the appropriate button on your camera to "mark" it. Your camera notes that color. Now, when you take a photo, everything else in the composition turns to black and white, except for the items that contain the color you marked. You can even control the density of the color rendered right there on the LCD.

In the photo above, I marked the red of the ceramic canister holding the kitchen utensils. I also picked up some red in the tomato and apple. Everything else went to black and white -- all done in camera, and with a point and shoot at that. Now if I connected the camera to a direct print dye sub printer, such as my CP330, I can output a 4x6 inch spot colored photo without ever touching a computer or image editor.

I've been having a blast with Color Accent. It really gets the creative juices flowing. If you have this on your camera, give it a try. If you're shopping for one, this is a feature to look for.

Technorati Tags: ,

Camera Raw Sharpening

Almost every RAW file requires some degree of sharpening to counter the effect of blurring that occurs at some stage of image capture or image processing. But when do you apply the sharpening? In Camera Raw or later in Photoshop? The answer isn't as straightforward as you might think. In this excerpt from "Photoshop CS2 RAW", Mikkel Aaland shows you how to sharpen your images with confidence.

I worked with Mikkel on a chapter of Photoshop CS2 RAW, and have some images in there that I captured at Pt. Reyes. The entire book is good, and this excerpt on sharpening is particularly useful.

Technorati Tags: ,

Canon G7

Among Canon's latest round of pre-Photokina announcements, they debuted the new Canon PowerShot G7. Its impressive features include: 10 MP sensor, 6X optical zoom (35-200mm equiv.), image stabilizer, 2.5" LCD, hot shoe, DIGIC III processor, custom white balance setting, and ISO 1600.

What's missing? No RAW mode and the viewfinder is mounted to the back of the camera no longer swinging out as in earlier G models. If you want RAW on a Canon camera, you have to move up to the Digital Rebel. I'd better understand this move if Canon were having a hard time selling Rebels. But that ain't the case. The PowerShot G7 is a sophisticated camera that should include RAW.

The Canon G7 should be available in October '06. No price was announced.

Technorati Tags: ,

Woz on a Segway

Woz on a Segway

I was hanging around the front of the Apple Media Event yesterday, taking some outdoor shots of the Yerba Buena Theater and all the goings on around it. Out of the corner of my eye I see Steve Wozniak, Apple Computer co-founder, approach on his Segway. I was able to quickly recompose the shot to capture Steve in the foreground zipping by with the all the Apple decor in the background.

I was shooting with a Canon Digital Rebel XT, ISO 100, 1/250 at f-9.5. Fortunately I was in Raw mode, which helped me tame the intense contrast of the scene later in Adobe Camera Raw.

As we've discussed before in our virtual camera club... always take your camera.

You can see more images here from the Apple Media Event

See It in Person

If you're in Northern California on the weekend of October 7, stop by the Macintosh Computer Expo and sit in on my iPhoto 6 Tips and Tricks session. It's free, and I'll show you this tip plus lots of other cool iPhoto goodies. For those who really want to dig into some shooting techniques, stick around another day and sign up for my Digital Photography Made Amazing half day workshop on Oct. 8. But sign up early because seating is limited.

Technorati Tags: ,

Canon SD 700 IS

I'm researching an article on image stabilizers for compact cameras. I'm going to start out by testing the Canon PowerShot SD700 IS, which I should have in my hands within a week or so. But I would like to test other image stabilizer compacts too, and am interested in your comments about them.

If you have experience with any current image stabilizer compacts, or have one you recommend that I test, please post a comment. Also, I'm fascinated by the technology behind these cameras. So if you have any inside info on image stabilization, point me in the right direction.

I'll be sure to report back on what I find...

Tips for Great Group Shots

Group Shot

The two key components to great group shots are composition and lighting. Start with lighting. You could position everyone in the bright sun, snap a frame or two, and move on. But I doubt that your subjects will be thrilled with the results. Harsh direct illumination creates unflattering shadows and high contrast.

Diffused, even illumination will help everyone in the shot look their best. I often schedule group shots for early or late in the day to take best advantage of sweet light. Slightly overcast days are a blessing because nature creates a giant softbox in the sky for you. If conditions are less than ideal, use open shade from a tree or patio, then turn on your flash letting it serve as a fill light. Keep in mind, however, that you have to stay within the range of your flash, which is usually about 8 feet.

When composing the shot, position your subjects as close together as possible. People tend to stand too far apart, and this space between them is accentuated by the camera. I'll often position some of the subjects at a 45 degree angle to the camera. This creates variety in the composition and enables them to stand closer to others in the group. Before you snap the shutter, check everyone's hair and clothing to make sure nothing is out of place, then ask, "Can you see the camera? If you can't see the camera, it can't see you." Reposition as necessary.

Once you have a group shot you like, ask folks if they have a few more minutes for something fun. You can let them strike poses, lean against one another, try interesting angles such as you shooting up at them, or anything else that comes to mind. Often this will be the shot that they like the best, and it ends the session on an upbeat note.

Canon PowerShot SD630

The Canon PowerShot SD630 has all the bells and whistles that you'd expect from a quality 6-megapixel compact, and more... more ISO speed. Most compacts have a hard time controlling image noise above ISO 200. This is one of the compelling reasons to use a DSLR -- you can shoot at ISO 800 and 1600 and get quality images.

I just read a very good review on Imaging Resource that waxes positively about the SD630's image quality at high ISOs. Here's what Stephanie Boozer and Dan Havlik had to say:

"To me, digital noise has always resembled that obnoxious snowy fuzz you get on your TV when it's stuck between channels. The triumph of Canon's recent digital SLRs is that they've been able to shoot at high ISOs with low incidence of noise. With these new ELPHs it appears Canon has been able to bring its low-noise/high ISO expertise to a non-professional audience which is very good news for consumers. Most people have gotten so used to shooting with a flash in low light that they're amazed when they see the results without one. Instead of blown-out faces and blacked out backgrounds you have nice natural skin tones and detail of the room behind your subject. While there's still a greater chance of blur when you shoot without a flash -- even at the SD630's speedy ISO 800 setting -- if your subject's relatively still, results with the Canon SD630 look sharp."

There's lots of other good info in their review, and I think it's worth a read if you're shopping for a quality compact in the $300 range that can shoot in existing light with good results. You can also check out Canon's product page.

Technorati Tags: , ,