Recently in Photography

  Page 262 of 381 in Photography  

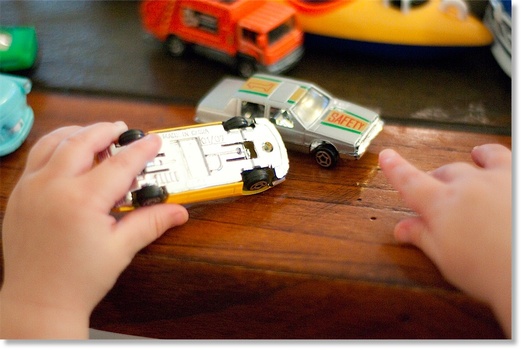
"Tiny Hands" - Grab Shot 207

michael_cortina_gs.jpg "I spend a lot of my time as an amateur photographer taking photos of my two grandboys," writes Michael Cortina. "They are my favorite subjects, and my wife uses the pics in her scrap-booking and brag-books."

"This an over the shoulder picture of my 11-month old Cristian. He is close to walking, so he spends a lot of time playing at the coffee table for stability."

"I snapped this shot with my Nikon D300s and a 50mm 1.8 lens. It was taken wide open at 1/200 in natural window light at ISO 3200."

"Tiny Hands" by Michael Cortina. Click on image for larger version.

This is our 207th Grab Shot! Wow. If you want to review the collection that began back in 2006, go to our Grab Shots page.

If you have a candid you'd like to share, take a look at our Submissions page, then send us your Grab Shot. We'll try to get it published for you on The Digital Story.

And you can view more images from our virtual camera club in the Member Photo Gallery.


The Digital Story Podcast App is the best way to stream or download weekly TDS podcast episodes. No more syncing your iPhone, iPod Touch, iPad, or even your Android phone just to get a podcast. And the best part is, The Digital Story Podcast App is your way to help support this show. Download it today!


twitter.jpg Follow me on Twitter


canon_60d_18-135.jpg

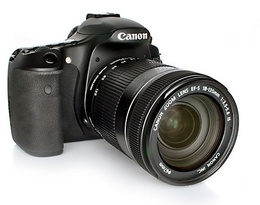
I've reviewed the Canon EOS 60D extensively, both on this site and for Macworld Magazine. I felt that this $999 DSLR body is a great value for serious enthusiasts who want both top quality images and video.

Pop Photo has now published their lab test of the 60D, saying that, "it's clear that this 18MP Canon is going to be a big star." One of the most interesting areas of the test had to do with high ISO performance.

"In noise suppression, the 60D pulled a surprise upset. Canon managed to keep noise lower at its default settings than Nikon [D7000] did, despite the 60D's extra megapixels. In our test, the 60D scored a Low or better ratings from ISO 100 through ISO 800. It didn't reach an Unacceptable rating until ISO 6400, while the D7000 did so at ISO 3200. In fact, the Canon turned in lower noise results at every ISO the two cameras share, except at ISO 800, where they tied. (The 60D doesn't go past ISO 12,800; the D7000 reaches one more stop to ISO 25,600.)"

If you're interested in the Canon EOS 60D, it's worth reading the Pop Photo Lab Test.


twitter.jpg Follow me on Twitter


Olympus E-5 DSLR Pros and Cons

Olympus E-5

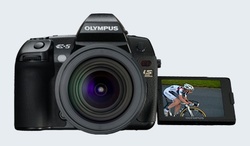
I've been shooting with the new Olympus E-5($1,699 street price) with the fantastic Olympus Zuiko 12-60mm f/2.8-4.0 Digital ED SWD Lens($899 street price). Talk about a DSLR that inspires confidence when you hold it. The Olympus E-5 is a solid machine. My full review is posted on Macworld Magazine if you want to see more. In the meantime, here are my pros and cons for this flagship four/thirds DSLR from Olympus.

PROS

  • Very fast autofocusing
  • Great image quality at ISO 800 and below
  • Weather resistant body tops for the money
  • Articulated 900,000 pixel LCD
  • Dual card slots (CF and SDXC)
  • Wireless flash control built-in
  • Multiple Exposure capability (up to 4 frames)
  • Add Copyright Capability (2 fields)
  • Level guage
  • 2% Spot Meter
  • Cool Art Filters including Dramatic Tone can be used in PASM modes
  • Pop up flash
  • 100% Field of View Optical Viewfinder
  • In-camera Raw to Jpeg conversion
  • Zuiko Digital ED 12-60mm (24-120mm) 1:2.8-4.0 SWD lens is a good one
  • CONS

  • 12 MP sensor (that is basically the same as in the PEN cameras)
  • AVI Motion JPEG format at 30fps seems outdated (no 24 fps), Limited video options
  • Lackluster High ISO performance compared to other flagship DSLRs
  • Only 5 fps burst mode
  • No Mode Dial
  • E-5 Specs Compared to Previous E-3

  • 12.3MP vs 10.1MP
  • HD Movie mode vs None
  • Upgraded image processor
  • Improved AE Bracketing (2, 3, 5, 7) vs 3 frames
  • 10 Art filters vs None
  • 3" Articulated LCD at 920,000 vs 2.5" at 230,000 pixels
  • SD for second slot replaces xD Picture Card
  • Same battery

  • twitter.jpg Follow me on Twitter


The just announced PENpal Bluetooth accessory for the Olympus PEN E-PL2 allows photographers to send images via Bluetooth to a variety of devices. This includes some smart phones, Windows computers, and Macs.


Accessory PENpal, originally uploaded by The Digital Story.

At first, I wondered how practical the PENpal would really be. After all, it's not that hard to take the memory card our of the PEN and insert it into my MacBook Air. But after some testing, I've found that the PENpal is saving me time. So I thought I would show you how.

My Normal Workflow

I have to do lots of quick turnaround work, especially with blog posts and other online projects. Usually it goes like this. I shoot the shots, take out the card, put it in the computer, browse the images in Adobe Bridge, find the one I like, sample it down to blog posting size, upload it, then return the card to the camera. Later, when I have time, I upload the entire shoot into my photo management system.

send_via_bluetooth.jpg

Olympus PENpal Workflow

Once I pair the E-PL2 with the MacBook Air, the two devices can talk to each other via Bluetooth. This changes my "quick turnaround" workflow considerably. Now, it's just these few steps:

  • Browse the photo on the 3" LCD of the E-PL2 to find the image I want to use. Right away I've saved a few steps because I immediately know the picture I want to use. If I need to, I can zoom-in on the camera to determine the quality of the shot.
  • Send the image to my Mac. It's quite easy to do. While viewing the shot on the E-PL2 in playback mode, I press the OK button to bring up the contextual menu. I choose "Send a Picture" and the photo goes directly to my Mac.
  • Upload the shot to my blog. Since the Olympus will automatically resample the photo for me before it sends it, I don't even have to open an image editor. I can choose from three sizes: Small 640x480, Large 1920x1440, or Medium 1280x960.

I'm done. And with Art Filters and other in-camera editing tools, I can actually create some pretty good looking stuff on the fly.

Does it Work with iOS Devices?

I was not able to get the PENpal to work with an iPad or iPhone. Bluetooth in those devices isn't as accessible as it is with Mac OS X. Too bad. That would a really sweet workflow to go from the PENpal to an iPad.


twitter.jpg Follow me on Twitter


star_camera.jpg

The best way to make a living is doing something that you love. For many of us, photography is that passion.

The tripwire in this scenario is often the business aspect itself. Yes, you have the gear. Yes, you know how to take good shots. But do you have the discipline and the capital to run a business? That's the tough part.

If you're considering adding photography as a revenue stream, I have a few tips for you. First, make sure you have enough funds. When you're working for yourself, you don't get paychecks every two weeks like you do from an employer. So you need enough money stashed away to weather the delay in payments. Part of your preparations now is building up a savings account that will serve as your cushion.

Also, know how to create and stick to a budget. Being clear about how much money you need to fund your endeavor, not to mention pay the rent, is important. Be honest about listing your expenses when creating a budget. Many people overlook real expenditures such as pocket cash, daily lunches, coffee, etc. All of those things add up and affect the bottom line.

Consider taking pictures as a revenue stream, but not the only one. In my business, I try to maintain four reliable revenue streams at any given time. All are related to photography, but don't necessarily involve taking pictures every day. If I lose one of the four sources, I can get by until I replace it. I like at least one of the revenue streams to come from a successful company.

Think broadly. Don't get fixated on being "only a portrait artist." If shooting portraits is your true passion, then that should certainly be one of your revenue streams. Be sure to explore other activities that are related, such as consulting others, writing about technique, working in a gallery, selling equipment, and so on. As your success grows as a portrait artist, you can gradually cut back on the other work that you don't like as much.

And finally, study what others have done. For example, here's a good article: Moving From Hobby To Business: What It Takes To Get To The Next Level. There is lots of good content available on the web and in books. Study it, take what applies to you, and make it work.


twitter.jpg Follow me on Twitter


aperture_in_mac_store.jpg

Sometimes a great deal is nothing more than that. A perfect example is Aperture 3.1.1 for only $79 in the new Mac App Store. This is a great price compared to the $199 it will cost you in the online Apple Store.

I read some speculation today that the $79 offering represented a "closeout sale" for Apple's professional photo management software. Really? Rumors of Apple abandoning Aperture have been around about as long as the application itself.

My take on all of this? This is a fantastic price in the Mac App Store. And if you don't have Aperture already, and want it, buy it now. I predict that Aperture will with be us for quite some time.

Aperture Tips and Techniques

To learn more about Aperture 3, check out my Aperture 3 Essential Training on Lynda.com. Also, take a look at our Aperture 3 Learning Center. Tons of free content about how to get the most out of Aperture.
twitter.jpg Follow me on Twitter

Tonight at CES, Olympus announced the new E-PL2 system camera with updated MSC ED m14-42mm f3.5/5.6 zoom lens and an affordable price tag of $599. This latest addition to the micro four/thirds line includes a number of welcome refinements.

Olympus E-PL2 The Olympus E-PL2 system camera with new MSC ED m14-42mm f3.5/5.6 zoom lens. Click on image for larger version. Here's a complete gallery of E-PL2 images.

The first thing you'll notice is the redesigned MSC ED m14-42mm f3.5/5.6 zoom. This is not your standard kit lens. It uses a improved inner focus mechanism to make it fast and nearly silent when recording high-definition movies. The focusing speed is also quite snappy for still image photography. After two weeks of testing it in the field, I very much like this new version of the standard zoom that covers 28-84mm range.

My second favorite improvement is the 3", 460,000 dot fixed-monted LCD with a 176 degree viewing plane. Photos look great on it during review, and the live image holds up well when panning and recomposing.

Overall, the E-PL2 feels lighter, sleeker, and more refined. The on/off button on top, and the movie record button on the back are now recessed to prevent accidental pushing. The front grip is more contoured and quite comfortable, even with larger mits. It's very easy to hold this camera in one hand.

E-PL1 and E-PL2 Side by Side The Olympus E-PL2 and E-PL1 (right) side by side. Click on image for larger version. Here's a complete gallery of E-PL2 images.

Other nice touches include Art Filter variations and enhancements so you can creatively play with images in the camera. The ISO now goes up to 6400, but lots of luminance and chroma noise come with that setting. I still limit my shooting with the E-PL2 to ISO 1600, which I think is quite decent. Playback on an HDTV via the E-PL2's HDMI port is a lot of fun. Once the two devices are connected via an optional HDMI cable , you can control the E-PL2's menus with the TV remote.

Image quality at ISO range of 200 to 800 is quite good, both indoors and out. ISO 1600 is well within the acceptable range when you need it.

Bike Riders The Olympus E-PL2 is so light that you can take it just about anywhere. And the images it records are clear and colorful. Click on image for larger version. Here's a complete gallery of photos of the E-PL2.

There are a handful of new accessories that are compatible with the E-PL2. One that I tested was the PENpal. When connected to the new Accessory Port 2 on the E-PL2, the PENpal can transfer pictures to a Bluetooth device such as a smart phone or to another PEN camera. It doesn't work with iOS devices including the iPad and the iPhone. But I was able to have the PENpal send images to my MacBook Air via Bluetooth. It's fun, and at times could be a very useful convenience.

Olympus PENpal The Olympus PENpal is a Bluetooth accessory that allows you to send images from the camera. Click on image for larger version. Here's a complete gallery of photos of the E-PL2.

I do have a few nits with the latest PEN. The control wheel on the back spins with the lightest touch, and I often found that my exposure compensation was set to -1 or +1 unintentionally. I also think there's still room for improvement with the menu system. It's still not as easy to navigate as Canon and some other competitors. And I would like the external mic jack to be built into the body instead of requiring an accessory port adapter. But that's about it for complaints. Overall, I'm very happy shooting with this camera, and I can easily recommend it to photographers at all levels.

The Olympus E-PL2 should be available in February for $599 US. If you've been waiting to get a PEN, or if you'd like a second body to go with your existing system, I think you'll enjoy shooting with this handsome micro four/thirds camera.


twitter.jpg Follow me on Twitter


Episode Extras

If you've purchased the TDS Podcast App for the iPhone or iPod touch, then you should be aware that there are two different types of "Extras" included. I just received mail from a listener who didn't realize that there are Extras with each individual episode as well as the standing Extras when you first launch the app.

To see the "Episode Extras," click on any podcast in the list of shows. Once you have a particular show open, click on that Extras button in the upper righthand corner. That reveals a second menu. For example, this week's show, "11 Photography Goals for 2011," you have another photographer's survival kit movie (from Stefan) waiting for you in the bonus content (as shown in the illustration).

I try to add a goodie at least every other show, and sometimes more often. It's all for fun. I save my serious work for the daily posts and the weekly podcasts.

Another Few Tips

You'll notice that at the top of the screen for every podcast episode, there's a star that is outlined. If you tap on that star, you have the option of adding it to your starred list, and you can download the show to your iPhone. This is handy if you have bandwidth at the moment, but are concerned that you might not be able to stream the show in real time when you're ready to listen to it. Tapping the Download button puts the show right on your mobile device.

When you are listening to a show, you may have noticed the "round arrow" surrounding the number 30. This allows you to jump backward 30 seconds. It's quite helpful if you miss something that I say, and you want to hear it again. Just tap the number 30, and back you go.

When I add a wall paper to the Extras for a show, as I did for the "Canon EOS 60D Review" episode, it is downloaded to your Camera Roll in your Photos application. This is yours to play with as you see fit.

Android Users

I don't have an Android phone, but I did have a chance to look at the TDS Podcast App on an Android device, and it looked quite similar to the iPhone version. But the one omission seems to be the Extras button. I'm going to see what I can do about that. If I can add it to the app, I'll be sure to post about it.

And Finally, Thanks!

As you may have guessed, no body is getting rich off this podcast. I have ISP fees, two sys admins to help with improvements and the constant battle against spammers, and I spend a lot of time each week generating original content. I provide the podcast app as a service and as a way to generate an extra bit of revenue. For each app that is purchased, $1 goes towards supporting the show. The other 2/3rds is split between Apple and the developer of the app. But every bit helps, and I appreciate your support.


twitter.jpg Follow me on Twitter


One way to make 2011 memorable is to accomplish something you've always dreamed of doing with your photography. So why not make it happen? In this week's podcast, I discuss 11 noteworthy photography projects for you to consider. Choose one and start making plans now to achieve photographic greatness.

Listen to the Podcast

You can also download the podcast here (33 minutes). Or better yet, subscribe to the podcast in iTunes. You can support this podcast by purchasing the TDS iPhone App for only $2.99 from the Apple App Store.

Monthly Photo Assignment

Ground Level is the January 2011 Photo Assignment. You can read more about how to submit on our Member Participation page. Deadline for entry is Jan. 31, 2010.

TDS Summer 2011 Photography Workshop

We're making plans now for the Summer 2011 TDS Photography Workshop. If you want your name on the reserve list, just drop me a line.

More Ways to Participate

Want to share photos and talk with other members in our virtual camera club? Check out our Flickr Public Group. It's a blast!

Podcast Sponsors

Red River Paper -- Try the $7.99 Sample Kit.

Make Your Photos Sizzle with Color! -- SizzlPix is like High Definition TV for your photography.

Blurb believes passionately in the joy of books - reading them, making them, sharing them, and selling them. Learn more by visiting Blurb on The Digital Story.


Technorati Tags:
, , , , ,


I have a small collection of VHS tapes that contain some terrific content. My favorite of the bunch is American Photography, a Century of Images, which is a wonderful resource for students of the medium. I decided to digitize these tapes and put them on my iPhone and iPad so I could watch them whenever I wished. The process is quite simple. All you need is an affordable digitizer, a computer, and a VHS player.

VHS Recording Setup


Here's an old 1.33 GHz PowerPC G4 being used to digitize VHS tapes for my iPhone. Click on image for larger version.

I spent very little money on this project. I dusted off an old PowerPC 1.33 GHz laptop running Tiger that wasn't being used, and connected it to a Sony VHS player using an iGrabber that I bought on sale on Meritline for $21 (normally $36). That was the sum total of my investment.

Basically, I fired up the digitizer, started playing the video, and saved it to my computer as a QuickTime movie in standard definition (640x480). I then added the movie to my iTunes library, including information about the production that I copied off the VHS dust sleeve.

At this point, I can watch the digitized tape on my computer. It plays fine. But if I use a CODEC during the digitizing process that the iPhone doesn't like, such as PhotoJPEG, then I have to have iTunes convert the file to MPEG-4 to make it compatible with my iOS device. To do so, I clicked on the movie, then selected Advanced > Create iPod or iPhone Version. iTunes created a second version of the movie that can now be viewed on a mobile device.

Software Download

For some reason, the Mac version of the software that was on my iGrabber DVD was corrupt. Fortunately, I could use the serial number on the envelope and download a good version of the driver from the MyGica site. Once I did that, everything worked great.

Recording CODECs

I initially tried using H264 as the recording CODEC as I was digitizing the content, but my older G4 just couldn't handle the load and I had sync problems. So I captured using the PhotoJPEG CODEC, then converted the file for iPhone playback in iTunes on an Intel Mac. It's an extra step, but I like being able to dedicate the old computer to this project. As for audio, I've been using "uncompressed." It doesn't add that much size to the file, and it really sounds good, both on the computer and my iPhone.

As we all know, VHS tapes don't last forever. So if you have a few cherished recordings that you would like to save, then this setup will probably serve you well.


twitter.jpg Follow me on Twitter