Recently in DIY

  Page 2 of 4 in DIY  

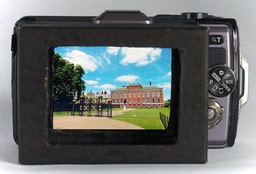
Make a Shade for Your Camera's LCD

lcd-in-shade-place.jpg

Very few things in photography are as tough as composing on an LCD in bright conditions. It's basically "guess and shoot."

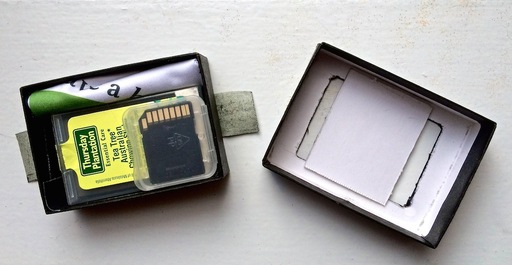
I've designed a simple solution using a cardboard jewelry box. It's easy to make, has adjustable depth, and can double as an accessory storage container. And the best part is, in bright conditions, it really works.

I explain how this gem works in my latest article for the lynda.com Article Center titled, Photography Hacks: Make an LCD Shade, Battery Protector, and Lighting Field Kit. It's the first installment of a 3-part series that I'm authoring for the site.

accessories-in-box.jpg When it's not shading your LCD screen, the shade can serve as a handy accessory box.

If you've got a little time to tinker this weekend, you might want to take a look at this post. I think you'll like what you end up with.

Want to Comment on this Post?

You can share your thoughts at the TDS Facebook page, where I'll post this story for discussion.

My original iPad was in virtual retirement on the top closet shelf. Since it doesn't support iOS 6 or 7, it seemed destined for my personal electronics museum. And that seemed wrong.

The battery is still good, the screen is colorful and bright, and the wireless is just as viable as ever. I was determined to make it relevant again.

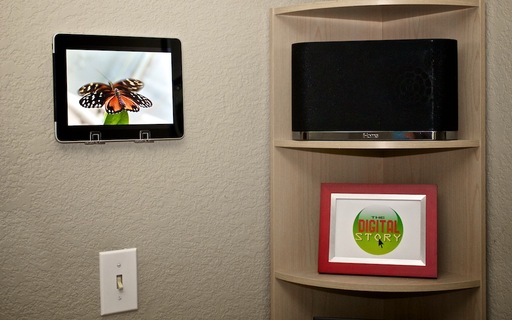
ipad-picture-frame.jpg The original iPad displaying a slideshow of my work in what used to be a dark corner of the stairwell where my iHome AirPlay speaker system is located.

I found a wall mount for it at Padbracket.com and decided that my old iPad could become the ultimate digital picture frame. After a few days of use, I can't imagine why I waited so long. (There are a variety of creative wall mounts for your iPad online. Shop around a bit to find one you like.)

The setup is easy. Create an Album in the Photos app specifically for the images you want to display on your new digital picture frame. Then go to Settings > Picture Frame, and select the Album along with the other options you prefer, such as transitions and display time for each image.

When it's time to show off your work, you don't even have to unlock the iPad. Push the Power button, tap on the Picture Frame icon in the lower right corner, and enjoy the show.

You can change things up by running a weather app with pretty pictures and the local temperature. There are still many available for iOS 5.

I like that my original iPad is back in business. And the looping slideshow brightens up that corner of the studio. If you have an iPad collecting dust, you might want to give it new life as a digital picture frame.


iPad for Digital Photographers

This is the kind of stuff I write about in iPad for Digital Photographers-- now available in print, Kindle, and iBooks format.

Want to Comment on this Post?

You can share your thoughts at the TDS Facebook page, where I'll post this story for discussion.


Join me on my Instagram site as I explore the world of mobile photography. And now Instagram features 15-second movies too.

olympus-share-wifi.png

Like many seasoned shooters, I have a library of slides that I'm not using, simply because they haven't been digitized. Thanks to inspiration from Victor Kaijser Bots, who converted a slide projector into an automated digitizer, I've created my own high quality rig with components that I had on hand.

My digitizer is a single-shot system that emphasizes quality over speed. I've dabbled with these projects in the past. The problem was always mediocre quality because of cheap optics.


Olympus Image Share app running on an iPhone 5S controlling the E-M1 that's digitizing the slides in the projector.


This rig solves that problem by using an Olympus 60mm f/2.8 macro lens with an Olympus OM-D E-M1. The Olympus 60mm has excellent edge-to-edge sharpness, plus a small barrel diameter to correctly couple with the slide projector. I simply remove the lens that came with the projector, then point the 60mm optic toward the illuminated slide.
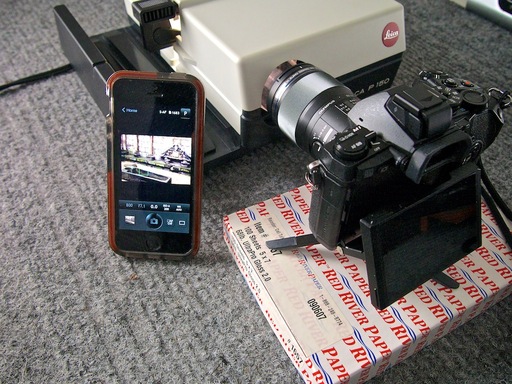
slide-projector-setup.jpg I remove the lens from the Leica P 150 slide projector and point the macro 60mm toward the image. I used the Olympus Image Share WiFi app to control the OM-D E-M1.

The trick to making this rig work is to install a diffuser between the slide and the light source. This creates even illumination that's ideal for digitizing the image. I cut an piece of translucent plastic that was originally used for a portable light box that no longer worked. (I usually take apart broken items and salvage parts before discarding them.) I sandwich the diffuser with the slide and insert them into the single viewing slot on the projector.
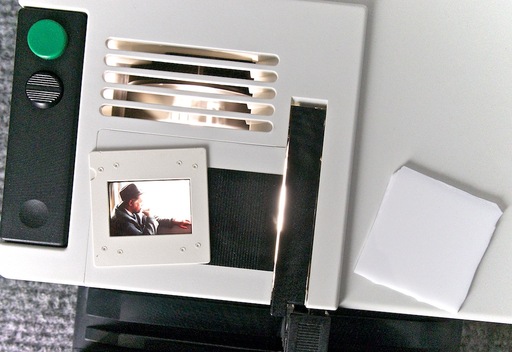
slide-projector-diffuser.jpg The diffuser (on the right) is placed between the light source and the slide.

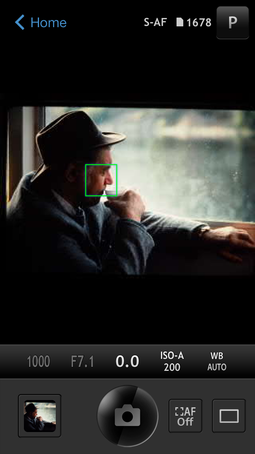
I used the Olympus Image Share app on my iPhone to focus and trip the shutter on the camera. This is really nice because I get a preview on the iPhone and have access to camera controls, without have to fiddle with the camera itself. Plus, I don't jar the E-M1 when initiating the exposure.

Riding the Train

The resulting digital images were very faithful to the originals, and quite easy to scan. This portrait was captured on a train in Scotland in 1992 with a Contax 167MT and Fuji 100 slide film.
The picture below was captured with the same equipment, then converted to B&W using Nik Sliver Efex Pro.

Holyrood House, Scotland

I could further automate this process by figuring out a way to mount the diffuser in the slide projector without damaging the projector itself. I still want to be able to present traditional slide shows with the Leica P 150. But I can tackle that challenge another day. For now, I'm having a blast converting images from my past and adding them to my Aperture library.

Aperture Tips and Techniques

To learn more about Aperture, which is what I use to image edit and catalog my digitized slides, check out my Aperture 3.3 Essential Training (2012) on lynda.com. Also, take a look at our Aperture 3 Learning Center. Tons of free content about how to get the most out of Aperture.


The Digital Story on Facebook -- discussion, outstanding images from the TDS community, and inside information. Join our celebration of great photography!

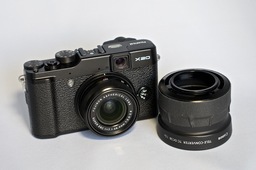
Fujifilm X20 Tele Extender

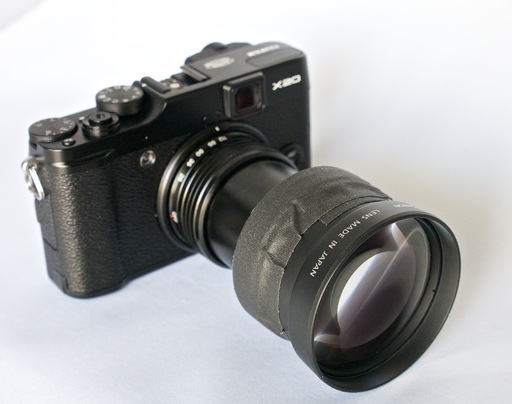
My goal at game 3 of the Warriors vs Nuggets NBA playoff was to have a good time. (And boy did I!) But I also wanted to capture a few memories from the event with my compact camera. And I knew I was going to need a bit more reach than the 112mm zoom the Fjuifilm X20 provided. So I created a Frankenzoom

The key components were a Fujifilm adapter/lens hood for the X20 and an old Canon 1.5X tele extender that I had for my G2. I used gaffer's tape to connect the lens hood to the tele extender, then screwed the device into the front of the camera.

Fujifilm X20 Tele Extender

I was able to extend my reach from 112mm at f/2.8 to 168mm with virtually no light loss. This made it much easier to capture candids during the exciting game, and even capture a shot or two of the action on the floor.

protect-defend-battle-unite.jpg

I rarely let go of old glass, even if I'm not using the camera anymore. Because when I go into my lab filled with optics, adapters, and gaffer's tape, I never know exactly what's going to emerge.


iPad for Digital Photographers

If you love mobile photography like I do, then you'll enjoy iPad for Digital Photographers-- now available in print, Kindle, and iBooks versions.

Want to Comment on this Post?

You can share your thoughts at the TDS Facebook page, where I'll post this story for discussion.

Convert to MP3 Using iTunes 11

When you need to convert your purchased AAC (MPEG-4) music files to MP3, you can do so in iTunes 11 following these basic steps.

Setting Up

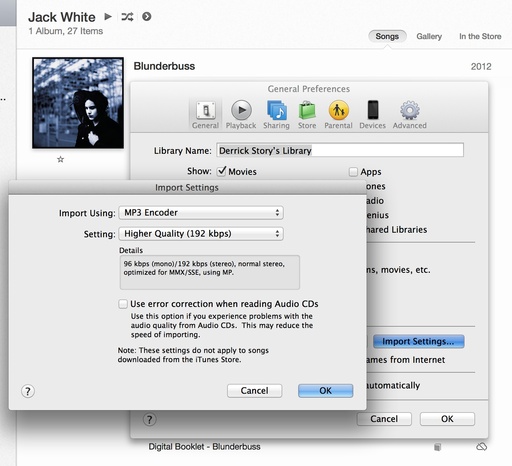
In iTunes 11, open Preferences and click on the General tab. Click on the Import Settings button. Choose MP3 Encoder from the pop up menu. For the Setting popup, I recommend the highest quality. Click OK. Then Click OK again to close Preferences.

itunes_import_setting.jpg

Making the Conversion

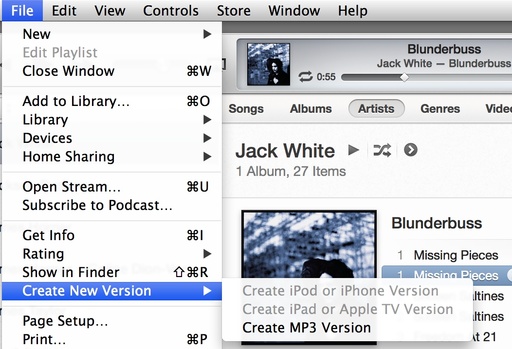
Select the songs you want to convert. Go to File > Create New Version > Create MP3 Version. iTunes will convert your AAC file to the MP3 specifications you established previously. The MP3 version is added to your library. So you will have two copies of the song.

convert_to_mp3.jpg

You can also right-click or control-click on the song and choose "Create MP3 Version" from the popup menu.

Copying and Transferring

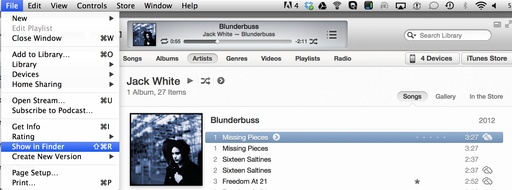
Once you've created the transcoded versions of your songs, click on one in the iTunes library, then go to File > Show in Finder. iTunes will send you to the location of your files.

show-in-finder.jpg

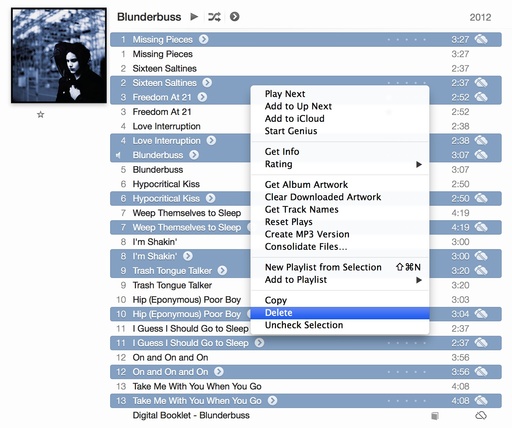
From there you can copy the songs to a flash drive, SD card, or other media for playback on an MP3-only device. Once you've copied the files, you'll probably want to delete them from your iTunes library to save space.

deleting_mp3_files.jpg

Click on the songs that have the "anti-iCloud" icon, then right-click or control-click on one of the selected and choose Delete. Make sure you don't delete your digital booklet if you have one in the album. They will be removed from your computer.

I've used this process to create MP3 files to play off a flash drive for my car stereo. It's very convenient, the ID3 tags accompany the files, and you still have your masters safe and sound in iTunes.

Want to Comment on this Post?

You can share your thoughts at the TDS Facebook page, where I'll post this story for discussion.

Want to have fun making a Valentine's Day card and delight the recipient at the same time? Take a look at Card Shop for the iPad. I've been playing with this 99-cent app, and have created some great looking greeting cards with it.

card_shop_example.png

Once you've designed your masterpiece (which is a lot of fun, I have to admit), you can share it electronically or send to an AirPrint printer. If you don't have AirPrint, then move it to your computer and print traditionally. (We recommend using Red River Paper for the stock.)

So, pour yourself a cup of coffee, get out your iPad, and design a few cards right now. That way, you'll be ready when Valentine's Day gets here.


The Digital Story on Facebook -- discussion, outstanding images from the TDS community, and inside information. Join our celebration of great photography!


Postcards present great advantages. In a mailbox full of bland envelopes, postcards radiate like desert flowers. They're easy to send: stick a 32-cent stamp on the back, write an address, and drop them in the mail. Postcards will bring smiles to the faces of good friends, or catch the eye of potential clients. And you may not realize it, but they're easy to make. Yes, you could use outside printing services for this, but why not create your own?

Monterey Postcard Delight friends and family when a beautiful landscape appears amongst the bills and ads in their mailboxes.

By downloading the postcard "backs" on this page for 4" x 6" and 5" x 7" versions, all you have to do is add your artwork on the front, and you have a professional-looking mailer that you can send, share, or even sell. You can use your choice of paper surfaces. Take a look at the Red River Postcards Info Page for affordable paper options, tips, and specs.

4x6_postcard_back.jpg 4"x6" postcard back template. Right-click to download.

5x7_postcard_back.jpg 5"x7" postcard back template. Right-click to download.

The best papers to work with are those that are at least 8.5 mil thick (which exceeds postal regulations) and have plain paper backs that make it easy to print the template and write an address. The links on the Red River page offer some good suggestions that meet these requirements.

I like to print up a handful of templates to have on hand, then just run them through the printer again when I have an image I want to add. I also keep the digital templates on my iPhone, so I can create new postcards anywhere I find an AirPrint printer.

If you want to stand out from the crowd, both for business or pleasure, postcards are a great way to do so. Print up a few, and see what you think.


Like Red River Paper on Facebook -- Free paper give aways, printing tips, and lots more.


iPad for Exercise Bike

When I travel, I'm impressed with the exercise bikes I see in modern hotel gyms. They have a complete multimedia setups that help pass the time while I'm peddling away. After I got an iPad 2 for a client assignment, I contemplated ways to put my original iPad to good use. Then the lightening bolt struck: upgrade my exercise bike.

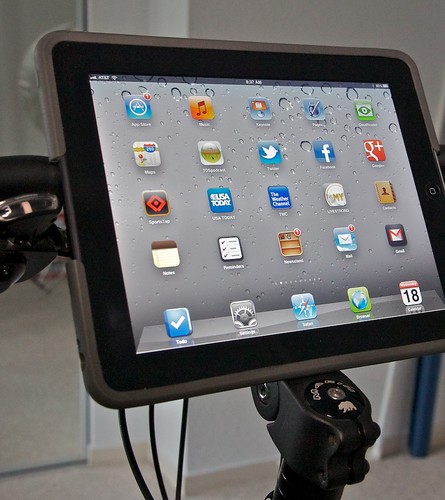
Close Up of iPad on Bike

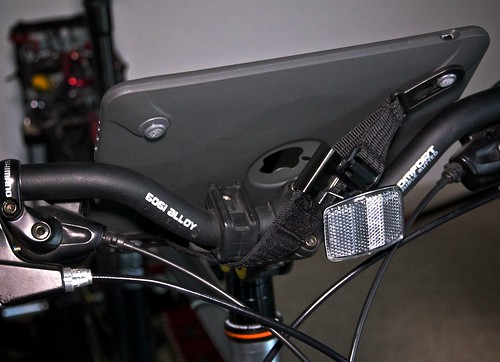
The iPad fits wonderfully on the handlebars. It's a great size for this use. But how to secure it? I used a modul R case with the optional hand strap. It protects the iPad and creates a snug fit.

Close Up of iPad Back

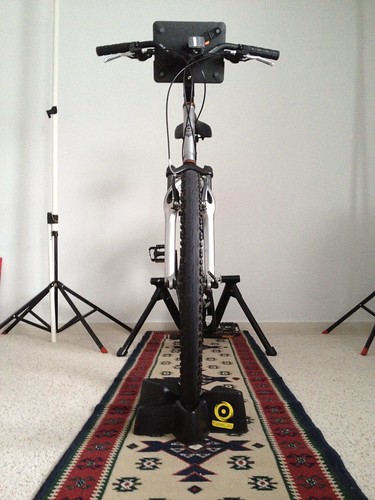
For the actual exercise, I use the CycleOps MAGNETO trainer with progressive resistance. It's easy to set up, and it provides a good workout with my street bike. (I bought mine a while back at REI. You can get good deals on older models.) During dreary winter months here in Northern CA, I set the bike up in the shooting room at the studio. If I have an assignment I need to work on, I can switch back to photography in just a few minutes.

Bike with CycleOps and iPad

Since I've added the iPad to this rig, I found that I'm riding longer, and loving it! I'm able to maintain my workout regiment regardless of the weather outside.


The Digital Story on Facebook -- discussion, outstanding images from the TDS community, and inside information. Join our celebration of great photography!


How to Mount an iPad 2 to a Tripod

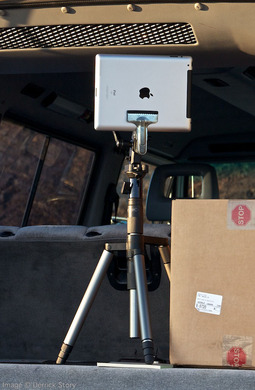
Tripod Mounted iPad 2

You can securely mount an iPad 2 to your favorite tripod for movie recording and time lapse photography. All you need are a few standard studio hardware items that may already exist in your lighting kit. If not, this article lists what to get and where to find it.

If you haven't considered actually taking pictures with an iPad 2, you might want to read Nimble Time Lapse Photography with iStopMotion for iPad, where I share examples of time lapse movies that were recorded, edited, and published using only the iPad 2 with iStopMotion for the iPad and iMovie for iOS. (This is fun stuff!)

Hardware List

OK, back to the hardware you'll need to make this happen.

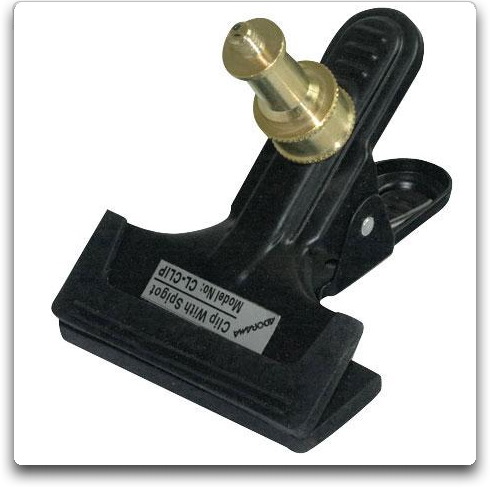
Flashpoint Clamp with 1/4-20 Stud ($9.95) - This clamp securely holds the iPad 2. Make sure the rubber grips are in place so you don't scratch the screen.

flashpoint_clamp.jpg

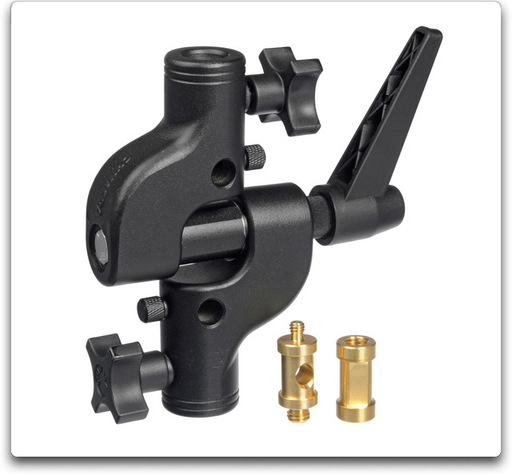
Chimera Single Axis Stand Adapter ($38.90) -- You put the Flashpoint Clamp in the top of the Chimera, then mount the entire rig to your tripod using the included threaded adapters. You can use other brands too, but make sure they include, or you already have, the adapters to connect to your tripod.

chimera_adapter

This rig will work with any tripod. And the best part is, you can also use these pieces for off-camera flash and studio lighting.

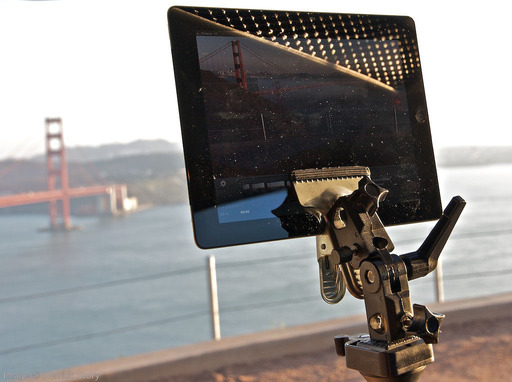
studio_clamp_mount_for_ipad My personal rig that I used for shooting The Overlook time lapse movie.


The Digital Story on Facebook -- discussion, outstanding images from the TDS community, and inside information. Join our celebration of great photography!


Someday I will pay $400 for Z-Finder Pro because they are clear, secure, and adjustable. But today isn't that day. Budget is too tight at the moment. But I do need a bright, crisp LCD magnifier for some upcoming video projects. So for the time being, I'll do it myself.

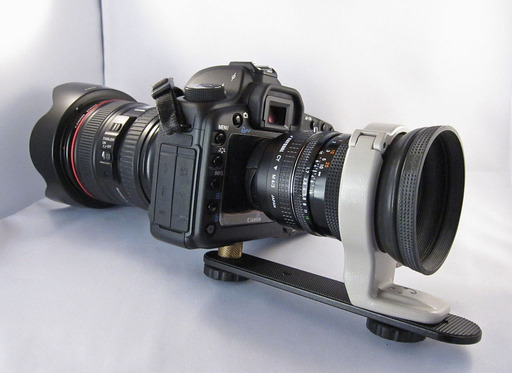
LCD Magnifier for Canon 5D Mark II DIY LCD magnifier uses a 50mm f/1.7 Zeiss lens extended by using a Rayqual adapter. The mount is built around a Canon 70-200mm f/4 Tripod Collar.

Figuring Out the Optics

I went upstairs into my mad scientist lab and started playing with lenses and mounts. My magnifier is based on the old "reverse lens trick" to increase magnification. I chose a Zeiss 50mm f/1.7 lens because of its wide opening. To get the right viewing distance from the LCD screen, I needed to add a couple spacers. I used my Rayqual Micro 4/3 adapter because it also had a large diameter opening. It was close to the right distance, but just a tad short. So I took a real lens cap, cut a large diameter hold in it, and mounted it to the Rayqual adapter. Perfect!

I added a little gaffers tape to the open end as to not scratch the LCD on the Canon. On the other end, I screwed in a rubber lens hood to serve as my eyepiece. That way I can use the rig in bright light.

Designing the Mount

I wanted something solid that didn't look too cobbled together. It dawned on me that the tripod collar for my 70-200mm f/4 Canon lens might work. You can get these cheap, BTW -- $12.99 from Meritline. For the bottom plate, I repurposed a flash bracket that had two tripod screws. One for the camera and the other for the Canon ring mount. The only problem was, it sat a little high. So I found a brass spacer in my lighting bag that lined everything up nicely. It doesn't look too bad, does it?

Pros and Cons for this Set Up

Cons: The image is beautifully crisp, but it doesn't cover the entire LCD, only the central area. This isn't a problem when the camera is tripod mounted because I can set up the shot, then remove the magnifier. But for action shooting this would be a problem.

Pros: Aside from being very sharp, I can fine tune the focus via the lens focusing ring. Also, I used stuff I already had (no cash outlay!). And, when I want to use the 50mm on my Olympus PEN camera, I just remove the bottom lens cap (that has a hole in it) and mount the lens to my micro 4/3s camera. So I can get double use out of this set up. (Since the PEN doubles the focal length, that means I have a 100mm f/1.7 lens for my E-PL1. Tell me that isn't useful at times.)

Final Thoughts

At some point this DIY rig will drive me crazy. Hopefully by then I'll have the money to buy a real LCD magnifier. Until then, however, I'm in business.


If you like do it yourself gear, be sure to check out our DIY Section here on The Digital Story. Lots of great ideas there.


twitter.jpg Follow me on Twitter