The new Photos app in iOS 8 not only adds functionality to our iPhones and iPads, but it's a preview of things to come in Mac OS X Yosemite. So it's worth a look at its image editing tools. Here's a tour on my iPad Mini with Retina Display.
Basic Editing Tools
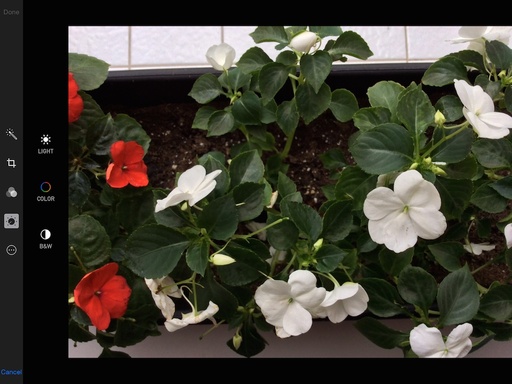
Most enthusiast photographers will want to head over to the Light/Color/B&W panel that is activated by tapping on the icon that is fourth from the top. Apple logically displays options for Light, Color, and B&W - the basics of image editing.
Adjusting with the Light Tools
Tap on Light and you can make a global adjustment by sliding up and down on the thumbnails that represent tonal adjustments. It works fine, but the real goodies are revealed by tapping on the menu icon beneath them.

Now it gets interesting. There are six additional adjustments that you can play with just by tapping on them. Here's what they do:
- Exposure - Adjusts the bright values of the image. For those familiar with Histograms, Exposure effects the right side of the graph.
- Highlights - Enables recovery of highlight detail. If you have tones that are "blown out" in the brightest areas of the image, this will help you bring them back.
- Shadows - Helps you recover lost detail in the darkest areas of the photo.
- Brightness - This is a midtone luminance adjustment. For those familiar with Histograms, Brightness effects the middle of the graph.
- Contrast - Impacts the bright areas and dark areas at the same time. Increasing contrast makes the darks darker and the brights brighter. Decreasing contrast does just the opposite.
- Black Point - Adjusts the dark areas of the image. For those familiar with Histograms, Black Point effects the left side of the graph.
Adjusting with the Color Tools
As with Light, you can make an overall color adjustment by sliding up and down on the color thumbnails. Tap on the menu icon beneath them, and there are three additional adjustments: Saturation, Contrast, and Cast. Here's what they do.
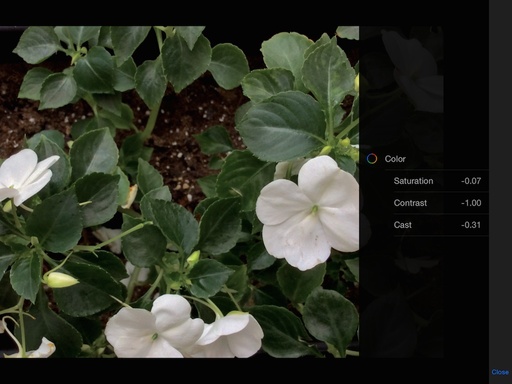
- Saturation - Increases or decreases the intensity of the color for all values.
- Contrast - This is a new control, and it behaves similar to Saturation, but also impacts the tonal values. I like this new effect.
- Cast - It's not really warm to cool, or magenta to green, but more of a hybrid color adjustment that seems to combine the two. Bottom line, if your color is a bit off, this slider is designed to help you correct it.
Adjusting with the B&W Tools
The engineers at Apple must like B&W photography. The tools here are pretty sophisticated. Here's what they've included.
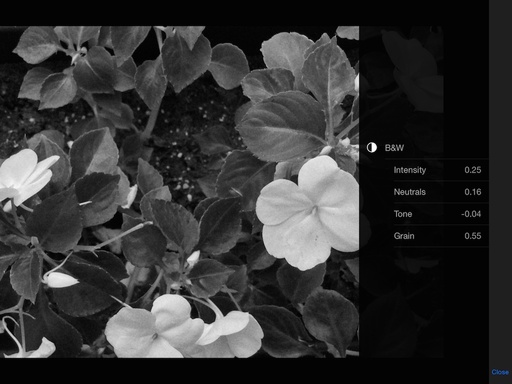
- Intensity - This adjustment attacks the color conversion to B&W. As you slide it up and down, you'll notice that it effects the colored areas of the image, but doesn't have much impact on the neutral tones.
- Neutrals - On the other hand, Neutrals has a powerful effect on the whites. So you have a separate control to work with the conversion of the brightest objects in the image.
- Tone - This slider seems to impact everything in the image: blacks, whites, and middle tones. It's almost like a contrast slider for B&W.
- Grain - Do you want to add a little grit to your image. Maybe Tri-X pushed to ASA 800? Grain is your slider for that.
General Tips
You can view the original version of the image by tapping and holding on it. Lift your finger and you're returned to the edited version.
The tool bar can be positioned on any side of the frame. Rotate your iPad to place it on the side that works best for you.
When cropping, you can pinch to zoom the image in the frame. Very handy. You can lock-in aspect rations by tapping the icon in the lower right corner next to Cancel.
There's no sharpening feature (that I could find) at this time. For that, you'll need to move over to another app.
Final Thoughts
Overall all, Photos App in iOS 8 is a big step forward. I like the tools that are there now. And I'm hoping for more to come with future updates.
Photos for iOS 8 has a high Nimbleosity Rating. What does that mean? You can learn about Nimbleosity and more by visiting TheNimblePhotographer.com.
Want to Comment on this Post?
You can share your thoughts at the TDS Facebook page, where I'll post this story for discussion.


