Recently in Show Notes

  Page 95 of 95 in Show Notes  

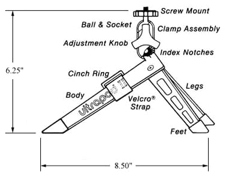
Ultrapod II
The UltraPod II is one of my 12 favorite photo gadgets. Read on for the other 11...

Every photographer has his or her favorite gadgets. This week's show lists 12 attractive ones that I think will interest you, and might make the perfect gift for a special photographer on your holiday shopping list. Here are the links for the dozen I discussed on Podcast #9.

  1. Tamrac Photographer's Vest -- There are lots of great vests on the market, and I've liked most of what I've seen. This Tamrac vest comes in black or khaki and costs about $90 (at the top of the range I would pay). You can also buy quality vests for as low as $40 from Campco and around $65 from Domke.
  2. UltraPod II -- I think this is one of the best pocket tripods available. Works for light DSLRs as well as compacts. You can score one of these for about $22.
  3. Cokin Graduated ND filter -- Great for balancing a bright sky with the landscape forground. You can get a kit with 3 filters and the holder for about $55.
  4. SanDisk Ultra PC Card Adapter for CompactFlash -- Laptop users with a PC Card slot can upload images from their CompactFlash memory card with a simple PC Card adapter that costs less than $10, and works great! A good stocking stuffer...
  5. Belkin 15-in-1 Reader Writer -- This speedy USB 2.0 reader/writer can handle just about any type of memory card. And the price has come down recently so you can buy one for less than $30.
  6. Tamrac Expedition 3 Photo Backpack -- I've discussed this backpack, and its bigger sibling, the Expedition 4, in a recent review. I like the Expedition 3 because of its more compact design and affordable $50 price tag.
  7. Giottos Rocket Air Blaster -- I've posted a review of the Rocket Air Blaster because I was impressed by its design and ease of use. This is a great way to kick the "canned air habit" for cleaning lenses, and it only costs about $11. If properly used, it's also safe for blowing dust off DSLR image sensors.
  8. iPod Camera Connector -- iPods (full size models with color screens) are great devices for storing photos as well as music. The Camera Connector costs less than $30 and enables you to connect your camera's USB cable, or the Belkin 15-in-1 Media Reader to your iPod and upload pictures for backup and viewing. You can transfer the images to your computer when you return home.
  9. Tamrac N-5053 Camera Strap -- This lightweight, strong strap holds most digital SLRs and memory cards and features rubber tracks to prevent slippage. Two neoprene memory card holders provide convenient access to memory cards while shooting. The quick-release buckles are interchangeable with other Tamrac quick-release camera straps. They cost about $20 each.
  10. Sony NiMH rechargable batteries and charger -- Power hungry electronic flashes and cameras demand good batteries. This Sony kit is a bargin for $20.
  11. LensPen -- So how do you clean those hard to get areas on your digital camera, such as the optical eyepiece? The folks at LensPen have a solution, and my experience is that it works great. You have lots of different sizes to choose from. I find myself reaching for the miniPRO model most often. You can buy it directly from the LensPen site for $15.
  12. Lowepro Photo Gloves -- I've saved one of my most favorites for last. These gloves keep the hands warm, yet provide enough dexterity to operate your camera. Plus they look great! You can buy them for for less than $20... be sure to get the right size!

Listen to the Podcast

Now that I have your curiosity piqued, it's time to listen to today's audio show titled, "12 Photo Gadgets for Gifts" You can download the podcast here (31 minutes).

Technorati Tags: , , ,

"Hottest Digital SLRs" - Podcast #8

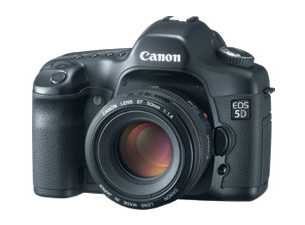
This week, I take a look at my favorite Digital SLRs. I start with the megapixel king in this roundup, the Canon 5D, and work down the list from there. All of these cameras are excellent. One of them may be right for you.

Canon 5D DSLR
The Canon 5D is the 12.8MP king in this roundup of advanced cameras...

  • Canon 5D -- $3,300 without lens or memory card. The Canon 5D is a "full frame" 12.8 Megapixel CMOS sensor. Full frame means that the image sensor (35.8 x 23.9mm) is roughly the same size as 35mm film. So your existing collection of lenses behave similarly on the 5D as they do mounted on your film SLRs. This feature is great if you have a handful of EF lenses; not as good if you've recently purchased EF-S lenses that don't work on this camera. RAW file size is approx. 12.9MB (4,368 x 2,912) and Large/Fine Jpegs are approx. 4.6MB (4,368 x 2,912). Use your best lenses on the 5D to get the highest quality results.
  • Nikon D2X -- $5,000 without lens or memory card. Nikon's CMOS image sensor (23.7 x 15.7mm) is smaller than the Canon 5D resulting in a 1.5X magnification factor for your lenses. This is a rugged, well-built SLR body that provides great resolution, wide tonal range, and is extremely responsive. You have good connectivity with the USB 2.0 interface and optional WiFi transmitter. Other niceties include good battery life, fast CF write performance, and fast start up time. Full image size from this 12.4 MP sensor is 4,288 x 2,848.
  • Nikon D200 -- $1,700 without lens or memory card. The much-anticipated Nikon D200 uses a 10.2MP sensor to capture sharp, clean high resolution images that you can preview on its 2.5" LCD monitor. Instant "power up" and almost immeasurable shutter lag will make this DSLR a favorite among sports photographers and photojournalists. It produces both Raw and Jpeg images as large as 3,872 x 2,592 pixels.
  • Canon 20D -- $1,300 without lens or memory card. With its 8.2 MP image sensor, the 20D combines high performance with a rugged magnesium alloy body, plus lots of shooting modes and features. Canon's EF-S lenses are perfectly suited for the 20D as well as the extensive line of regular EF glass, although with a 1.6X magnification factor for the latter. Other notables include fast start-up time, 5 fps second burst mode, and 9-point AF system. RAW file size is approx. 8.7MB (3,504 x 2,336) and Large/Fine Jpegs are approx. 3.6MB (3,504 x 2,336).
  • Canon Digital Rebel XT (350D) -- $780 without lens or memory card, $880 with 18-55mm EF-S Lens. The Digital Rebel XT sports an 8MP CMOS sensor in a very light and compact body. Photo quality is excellent and on par with the 20D at low ISOs. The 20D performs slightly better at ISO 800 and above. The Rebel shoots up to 3 fps and has a 7-point AF system. Battery life isn't as good as the 20D, so be sure to buy an extra one with the camera. RAW file size is approx. 8.3MB (3,456 x 2,304) and Large/Fine Jpegs are approx. 3.3MB (3,456 x 2,304).
  • Nikon D50 -- $650 without lens or memory card, $800 with 18-55mm DX Zoom Nikkor lens. The D50 is high quality and very affordable for a DSLR. Its 6.1MP sensor provides plenty of resolution for large prints and cropping. The battery life is outstanding and it sports a 2" LCD monitor. Burst mode is up to 2.5 fps and it uses a 5-area sensor for autofocus. The D50 performs very well in low light situations. Image size is 3,008 x 2,000 pixels.
  • Nikon Coolpix 8800 -- $860 with 35-350mm built-in lens. This 8MP "all in one" camera isn't a Digital SLR, but might appeal to the serious photographer who wants high performance in a compact package. It can capture both Jpeg and Raw formats (3,264 x 2,448), plus includes all of the shooting and metering modes most photographers would want. Yet, it weights only 21 ounces without battery.

Listen to the Podcast

Now that I have your curiosity piqued, it's time to listen to today's audio show titled, "Hottest Digital SLRs" You can download the podcast here (35 minutes).

Technorati Tags: , , ,

"ISO Settings and More" - Podcast #7

The main discussion in this week's show focuses ISO settings (and how far you can go with them). I also revisit the memory card fiasco from last week and touch on the new WiFi cameras offered by Nikon and Canon.

ISO Settings

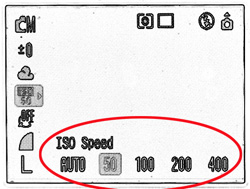
ISO Setting

Sometimes referred to as film speed, ISO speed is actually a better term for expressing the light sensitivity of your digital camera. ISO stands for International Organization for Standardization. This entity has established many standards, including the light sensitivity of photographic materials. If your camera has multiple ISO speed settings, then you can use these adjustments to increase the light sensitivity of the image sensor. The default setting for most digicams is ISO 100. This is the speed setting for general photography. If you’re in a low-light situation and need to increase the sensitivity of you image sensor, change the ISO Speed setting from 100 to 200, 400 or even 800, if necessary. Each setting is the equivalent to one f-stop of light.

The general rule of thumb is to keep your ISO setting as low as possible on compact cameras (100 or 200), but understand that you have more latitude with Digital SLRs, which have larger image sensors and more robust electronics. I've had good luck with my Canon Rebel XT at ISO 400 and 800.

Noise Reduction Plug-ins

If you do end up with an image that's nosier that you'd like, here are some Photoshop plug-ins to help you correct the image:

Listen to the Podcast

Now that I have your curiosity piqued, it's time to listen to today's audio show titled, "ISO Settings and More" You can download the podcast here (30 minutes).

Technorati Tags: , ,

If you need a good camera while on the go, I'd recommend that you start by comparing compact models. They're easier on the wallet and fit into a pocket or purse. Compact cameras typically range from 2 to 7 megapixels of resolution. Their picture quality can be outstanding, but they usually don't offer the array of features and controls that larger models do. The zoom lens tend to be 3X, which translates into 35-105mm for most models.

After you listen to this week's podcast, use this handy checklist to help you, or a friend, find the right digital camera. I recommend that you print it out, then mark the features that are important to you. Then bring it with you to the store.

Compact Camera Features Checklist

Megapixels

  • ( ) 3-5 megapixels -- great snapshots, quality enlargements possible up to 8" x 10"
  • ( ) 5-8 megapixels -- quality prints possible up to 11" x 14", ability to crop and still have enough resolution for decent sized enlargements

Memory Card (Spare Recommended)

  • ( ) Are the read and write speed specifications of your spare memory card matched to camera for maximum performance? This is particularly important for cameras that have robust burst modes and high quality video capture. Generally speaking, you'll need a spare 256MB card for 3-4 MP cameras, 512MB for 5-7MP cameras, and a 1GB card if you plan on shooting any video.

Batteries (Spare Recommended)

  • ( ) Rechargeable Lithium -- most common these days. Designed specifically for the camera by the manufacturer
  • ( ) Rechargeable NiMH AAs -- Are more bulky, but you can always use regular AA alkalines in an emergency
  • ( ) Charger included in camera kit?
  • ( ) Charger compact and easy to pack?

LCD Monitor

  • ( ) Fixed back -- Mounted to the back of the camera
  • ( ) Vari-angle -- can swivel screen, and sometimes rotate. Versatile viewing options for shooting low angle compositions or for holding the camera about your head.
  • ( ) Screen size -- 1.5" to 2.5" Bigger is better if you like to show others your pictures on the camera's LCD monitor
  • ( ) Image quality -- sharp, smooth motion, rich colors
  • ( ) Magnification -- allows to "zoom in" on recorded images to study detail. Very useful function, but some cameras implement this better than others
  • ( ) Data viewing -- enables to review settings such as white balance, ISO, and flash

Flash

  • ( ) Settings for built-in flash easily accessible

Shooting and Exposure Modes

  • ( ) Continuous or Burst mode -- How many frames can be recorded without pause to write to memory card
  • ( ) Subject shooting modes -- predefined settings for action photography, as well as portraits, nature, low light, and close-up
  • ( ) Self-Timer -- Some models have 2 sec and 10 sec settings
  • ( ) Remote Control -- Is a remote control included in the kit or available as an accessory?
  • ( ) Macro -- How close can you focus?

White Balance

  • ( ) Are settings easily accessible?
  • ( ) Is there a good variety or white balance presets?
  • ( ) Is there a manual white balance setting for tricky lighting situations?

Exposure Compensation

  • ( ) Is the exposure compensation setting easy to get to, or buried deep within the menu?

Special Features

  • ( ) Movie mode -- records QuickTime video at 10, 15, or 30 frames per second and/or at 160x120, 320x240, or 640x480 pixel dimensions
  • ( ) Panorama mode -- provides visual guides in the LCD viewfinder for aligning overlaping frames for panorama images
  • ( ) Special effects -- usually includes Black & White mode, sepia, and vivid colors
  • ( ) Audio annotations -- enables to add short voice recording to images
  • ( ) Weather resistant -- provides for photography in rain or sometimes even shallow immersion. Is there an underwater housing available for your model?

Software

  • ( ) Bundled software -- How good is the included software for special camera functions such as creating panoramas?
  • ( ) Will your new camera work with your existing photo software?

Listen to the Podcast

Hope you enjoy today's audio show titled, "Compact Camera Buying Tips" You can download the podcast here (46 minutes).

Technorati Tags: , ,

"Raw Workflow" - Podcast #5

As we wait for Aperture and software like it to help us manage Raw files more efficiently, many of us are forced to using two or more applications to complete our workflow.

When I was shooting with a Canon 10D, I stuck with iPhoto 5 for organizing and browsing my .CRW files. But everything broke with my new Canon 5D that produces .CR2 files. iPhoto 5 couldn't read those images until the recent Mac OS X 10.4.3 update that added .CR2 file compatibility (among others). Even so, iPhoto just seems too underpowered for this type of work.

So I've been playing with different combinations of software that will help me manage my Raw files, and this is what I discuss in this week's audio show. I'm a big fan of editing Raw files with Adobe's Camera Raw, but I'm not crazy about Adobe Bridge, especially the length of time it takes to render thumbnails for my .CR2 files.

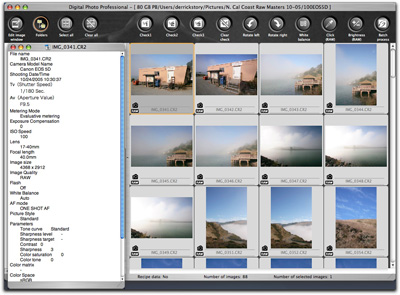
As a result, I've been playing with Canon's Digital Photo Professional (version 2) to browse my Raw images. It renders thumbnails quickly and provides lots of metadata that helps me understand what went right and what didn't. Minolta, Nikon, and Olympus also provide bundled software for managing their Raw files. If anyone is using those flavors, please post a comment with your impressions of them.

Canon Digital Photo Pro
Canon's Digital Photo Professional software has come of age with version 2.

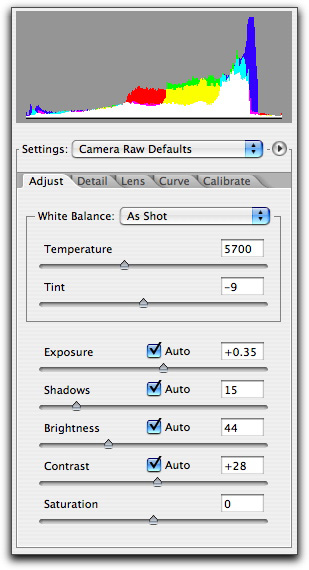
As much as I like the Canon software for browsing, I don't enjoy it for editing. So once I find a picture I want to work on, I note its file name and open it in Camera Raw. I like to use the "Auto" settings in Camera Raw 3.2 (available with Photoshop CS2) as a starting point for my image editing. You can override any of the auto settings by simply sliding the adjuster. But I've found that the Auto settings are often a good starting point.

Camera Raw Adjusters
The Auto settings are often a good starting point for image editing in Camera Raw

Once I've adjusted my Raw image, I save it as a Photoshop file that becomes my working master. Then if I need to post the picture on the web or share via email, I save a copy as a JPEG. I mentioned in the audio show that I think it's important to retain the original file number through all of these iterations. It makes it easier to find these files later. So the original Raw file might be "IMG_0421.CR2" then the Photoshop master could be "Sunset_0421.psd" then the working Jpeg could be "Sunset_0421.jpg".

For some of us, new applications such as Aperture will improve this process. But for others, you could get by with using your bundled software and spending less than $100 for Adobe's Photoshop Elements 4, and work quite effectively.

Listen to the Podcast

Now that I have your curiosity piqued, it's time to listen to today's audio show titled, "Raw Workflow" You can download the podcast here (30 minutes).

One of the great debates among advanced digital photographers is whether to use the JPEG or Raw format for recording images. Both formats are capable of producing high-quality pictures, but when you shoot in JPEG mode, the camera processes the image for you so it is "complete" when you upload it to your computer.

Images captured in Raw format, on the other hand, are not complete when you transfer them to your workstation. This process is more like taking a negative into a darkroom where you can adjust white balance and exposure until you get the perfect image. It's true that you can make those same adjustments in post-production with JPEGs, but it's different because you're readjusting information that's already been set. With Raw you are actually mapping the original bits of information.

One of my battle cries is “good data in; good data out.” The better you capture your shot, the easier it will be to produce high-quality output. By shooting in Raw mode, you're able to delay some difficult decisions until you're in the comfort of your own home, working at your computer.

A Practical Example for Shooting Raw

A good example is determining the correct white balance, which is often difficult at the moment of exposure, especially under fluorescent or mixed lighting. When you shoot in JPEG mode you have to make an immediate decision and, if you're wrong, you have to figure out how to correct it later.

In Raw mode, it doesn't make as much difference which white balance setting you have when you shoot the picture. The camera just records the “raw” data and lets you fine tune the color later while at the computer. You can apply different color temperatures to the image, view their appearance, and have the computer apply one that you like without any compromise to image quality. It's just like choosing white balance at the time of exposure (only better because you're looking at a 17” monitor, not a 2” LCD screen!).

Raw Software

If your camera has the ability to shoot in RAW format, it will include software to work with these images. Photoshop users can also work with Raw files right in Photoshop using the Camera Raw plug-in. (This includes Photoshop Elements that's available for less that $100.) And now iPhoto 5 users can include Raw files in their libraries. So no matter which software you use, this method is as close as you can come to a true digital darkroom, and it provides you with maximum flexibility for processing your images. Working with Raw images requires more work and processing time later at the computer. But for situations in which you want absolute control over quality and final output, Raw is an excellent option.

Which is best for you? A common-sense approach would be to capture at the highest JPEG settings for your “everyday” shooting, and take advantage of the Raw format for difficult lighting situations, or when you want to squeeze every drop of quality out of your picture-taking process.

Listen to the Podcast

Now that you have your curiosity piqued, it's time to listen to today's audio show title, "Raw: To Shoot or Not to Shoot." You can download the podcast here (34 minutes).

Digital cameras have become adept at making movies as well as capturing still images. I've had great fun with the Casio EX-P505 that shoots amazing video using the M2S4 (MPEG-4) Codec. I get 30fps at 640x480 resolution and stereo audio. Many other cameras offer comparable specs too.

For some time now, we've been able to watch the movies we make with these cameras on our computers and even burn them to DVD for TV viewing. But as of Oct. 12, 2005, we can start thinking about carrying our videos around and sharing them with others on the new Apple iPod video that displays movies at 320x240 resolution in full stereo.

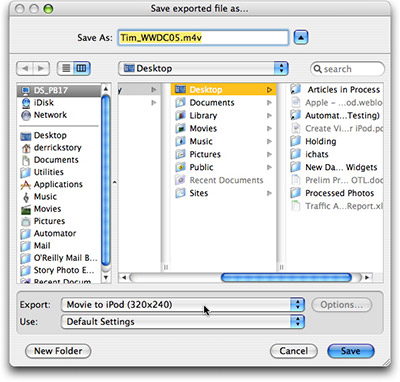
It's quite easy to prepare your movies for the iPod. Just download the latest version of QuickTime Pro (the player only version is free, but to edit and prepare content for the iPod you need the Pro version that costs $30) and open your home movie. Then go to File > Export... and select "Movie to iPod" from the drop down menu as shown below.

Export to iPod
Open your movie in QuickTime Pro, then choose the "Movie to iPod" export option.

You should know that the ripping process is processor-intensive and will take your computer a while, so you might want to go grab some dinner while it prepares the movie. Once it has finished making your production iPod-frienndly, you can open iTunes 6 and drag the movie to the "Videos" folder in the left hand "Source" column. If you don't have iTunes 6 yet, you can download it for free. Now, when you connect your iPod video, it will automatically grab the movie you just loaded into the Video folder, and you can play it right alongside the latest episode of "Lost."

If you want more details, Apple has published a helpful tutorial titled, Creating Video for iPod.

Tips for Capturing Video with a Digital Camera

Here are a few tips to help you capture iPod-friendly video. There's also a helpful article on O'Reilly's Digital Media site by Ian David Aronson that provides additional hints.

  • Shoot in good lighting. Video needs lots of light. If it's too dark inside, then go out, at least for your first project or two.
  • Use a big memory card. Video takes up much more memory than still pictures. I recommend 1GB.
  • Record at the highest quality and resolution possible. For example, if you camera supports 640x480 at 30fps, go for it.
  • Get close. Compose your frame tightly. These movies will be viewed at 320x240, which isn't exactly movie theater size. So stay away from distance shots and get close to your subjects.
  • Try to avoid too much background noise (audio). On-camera microphones tend to pick up *everything,* so try to control background noise best you can. And beware of wind! It sounds terrible.
  • Figure out what you're going to shoot before you press the record button. You don't have to have a full blown storyboard, but sketch out your scenes beforehand.
  • Keep your movies to 5 minutes or less. You have a better chance of holding your audience's attention.

Listen to the Podcast

Now that you have your gear together, it's time to listen to today's audio show title, "Making Movies with Digital Cameras." You can download the podcast here (23 minutes). And for a real treat, I've posted a sample movie titled, The Potting Bench. It's iPod ready now.

"To Shoot a Bottle" - Podcast #2

You don't need expensive lighting to get professional results in the studio, especially for product photography. With a little planning, you can use natural light from a window to capture compelling shots. This is a great technique for posting eBay for-sale items and article illustrations. Here's a quick tour of how to set up your existing light studio.

First, you need to find an area with a light source. A north window is ideal because the light is diffused and not too harsh. Then, set up your backdrop. White photographer's seamless backdrop paper works best, but you can use a roll of butcher's paper too. You want to create a "sweep." That means that you attach the paper to the wall (or any vertical surface), then have it curve as it bends toward your horizontal shooting platform. The gentle curve of the sweep eliminates any distracting edges in the background. The white background enables you to place your shot seamlessly on a white web page. Once your backdrop is set up, put your subject on the shooting platform.

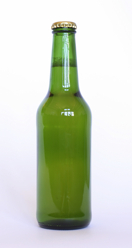
Existing Light Bottle
Glass bottle shot with window light and butcher's paper for backdrop. ISO 100, 1/4 sec. @ f-8, +2 exposure compensation.

-------------------

Mount the camera on a tripod. Set the ISO at 100 to keep image noise to a minimum. Adjust your white balance to "cloudy" to compensate for the bluish light coming through the north window. Set exposure compensation to +2. You need to do this because your camera's light meter will be fooled by the bright white backdrop forcing it to underexpose the subject. By setting your exposure compensation to +2, you will have cleaner whites in the background and a properly exposed subject. If the shot turns out too bright, back off exposure compensation to +1 or +1.5.

Finally, set the self-timer and make sure the camera is focusing on the subject. The self-timer will prevent jarring the camera when you initiate the exposure. Check your shot in the LCD viewfinder; it should look pretty good. The only adjustment you should have to make is possibly adding some side-lighting with reflectors (foamcore or white cardboard works great), or exposure compensation for an image that's too bright or dark.

If you'd like to learn more, check out my Digital Photography Pocket Guide, 3rd Edition. For a crash course on product photography with studio lighting, see my article titled, Professional Product Shots Made Easy. And feel free to post your questions and comments here. See you next time!

If you haven't listened to it already, you can download the podcast here (23 minute show).

Compact cameras generally use "Auto Flash" as their default mode. And for most flash photography, auto gets the job done. But if you want to improve your photos, to the point where they rival professional images, spend a few minutes exploring the other flash modes on your camera.

Start by locating the "lightening bolt" icon on you camera -- that's the universal symbol for electronic flash. If you're lucky, it's a button control on the back of your camera, which means easy access. Some cameras bury the flash controls in the menu system. If that's the case for your digicam, you'll have to dig a little deeper to find it.

My favorite option is "flash on." This control makes the flash fire regardless of the ambient lighting conditions. I use it often for outdoor portraits. Why, because when working in nature, the light isn't always coming from a flattering angle, such as with this image:

No Flash Portrait

By enabling the "flash on" option, you can add a pleasing front light to the portrait, put a little sparkle in the eyes, and reduce skin imperfections. Look at the difference in this portrait.

Flash On Portrait

A variation of this technique is the "slow synchro" flash mode. Sometimes this option is located in the menu items as "Nighttime Flash," "Nighttime Portrait," or "Night Snapshot." I use this mode at evening parties or whenever I want to capture some background environment along with the main subject.

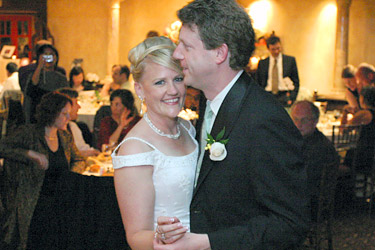
Slow synchro flash will immediately elevate your party shots above everyone else's who will have a dark background and a harshly lit subject. The main thing to keep in mind is to hold the camera very still during exposure, even for a second or two after the flash has fired. That will keep your background from becoming too blurry. Here's an example.


Nighttime Flash Mode

These simple techniques will dramatically improve your pictures. If you'd like to learn more, check out my Digital Photography Pocket Guide, 3rd Edition. And feel free to post your questions and comments here. See you next time!

If you haven't listened to it already, you can download the podcast here (26 minute show).